Bamboo Boards Offer Sustainability
When it comes to choosing a new set of chopping boards for your kitchen, one of the top considerations is sustainability. Joseph Joseph offers several bamboo chopping board options that provide an eco-friendly choice compared to plastic boards. Bamboo is a highly renewable resource, growing rapidly without the need for fertilizers or pesticides. Since bamboo is a grass rather than a wood, it can be harvested every 3-5 years without destroying the plant.
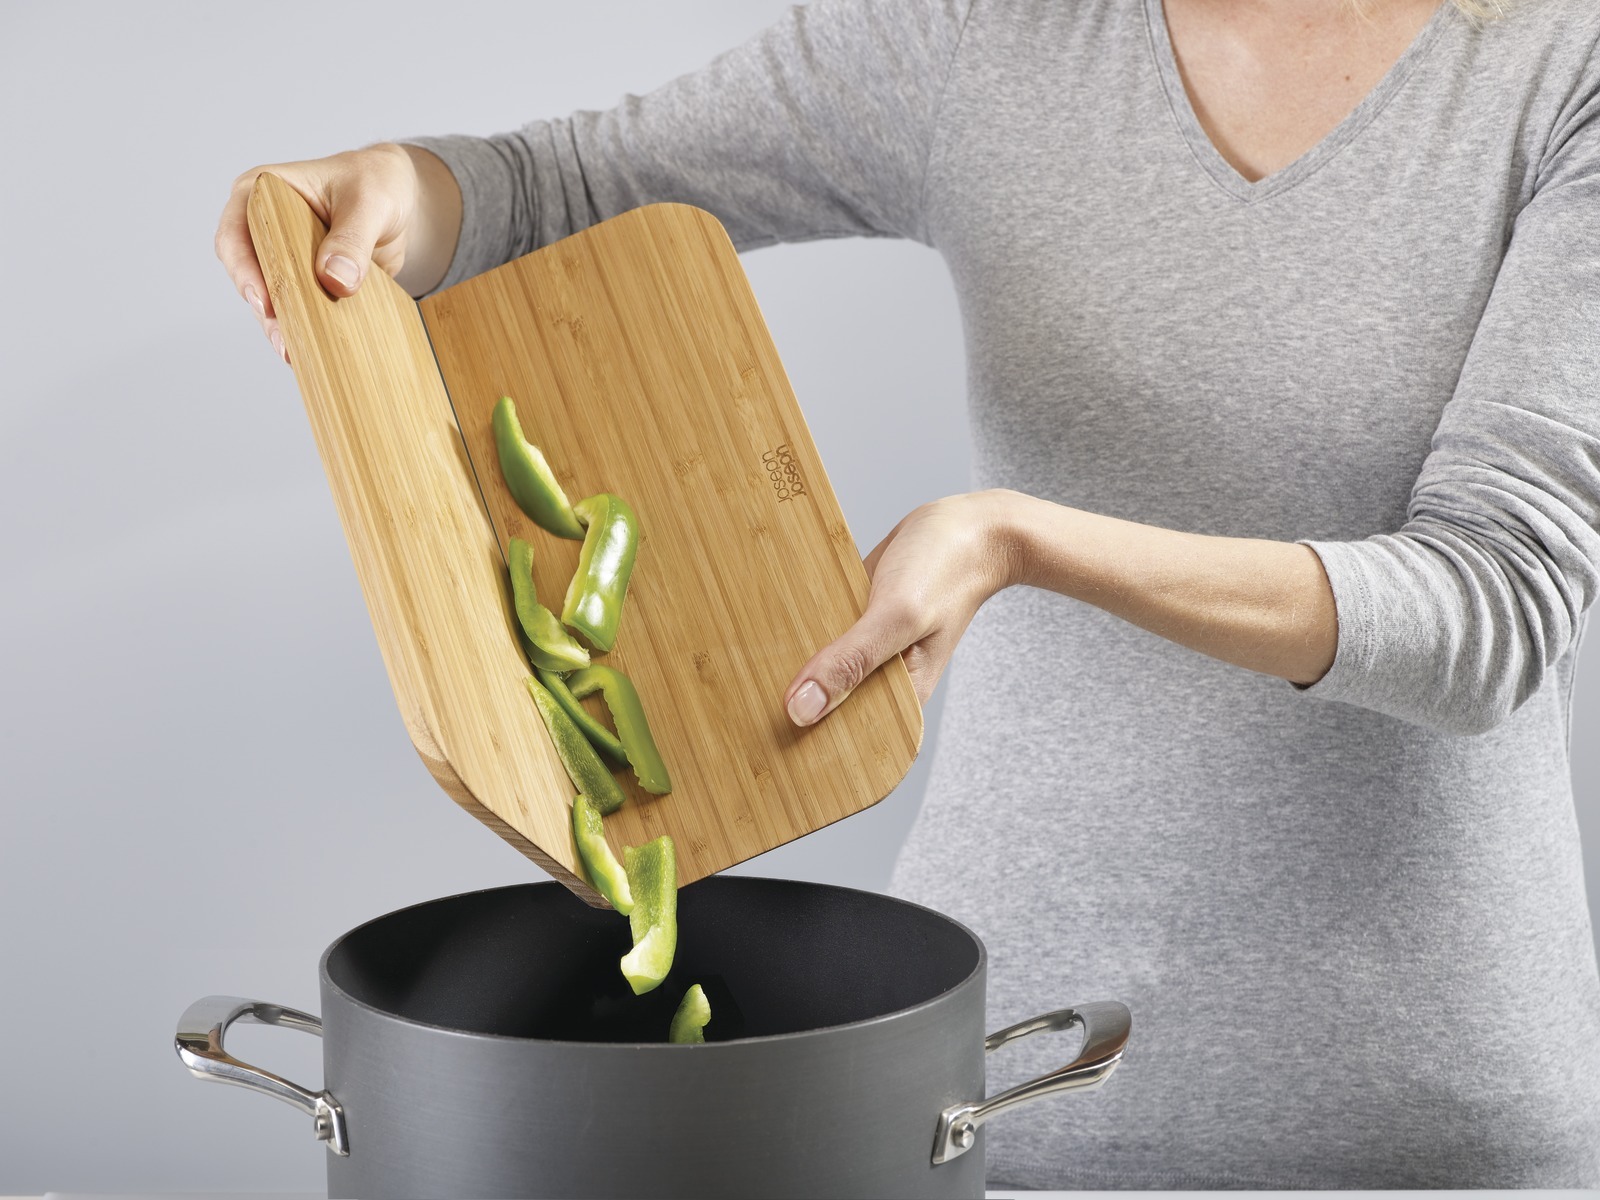
Bamboo boards from Joseph Joseph like the Index Bamboo Chopping Board Set are durable and resistant to knife scars and bacteria. The trademark angled cutting surfaces allow you to slide chopped food easily into a pan or bowl. Another advantage of bamboo over plastic or glass boards is that it is less damaging to your knives. The material is naturally self-healing, meaning that any knicks and cuts seal up quickly to maintain a smooth cutting surface.
Going with a bamboo Joseph Joseph board or set helps reduce your environmental impact in the kitchen. Bamboo sequesters carbon dioxide as it grows, fighting climate change. When the boards reach the end of their lifespan, bamboo is fully biodegradable. Making the sustainable choice shows you care about the future of our planet.
Plastic Boards are Budget-Friendly

If you’re looking for an affordable and durable chopping board option, Joseph Joseph has quality plastic boards like the Folding Chopping Board. Don’t turn up your nose at plastic just yet – today’s boards are BPA-free and dishwasher safe. The key is finding a high-quality plastic material that can stand up to regular use.
What plastic boards lack in natural appeal, they make up for in price point. For cooks on a budget, going with a plastic Joseph Joseph board can be easier on your wallet. The bright colors like the red Folding Chopping Board also provide a fun pop of color in your meal prepping. Clean up is easy by simply placing them in your dishwasher.
Consider a plastic board for cutting up meats to avoid cross-contamination with other foods. Many professional chef kitchens keep separate plastic boards solely for raw protein prep for food safety.
Wood Boards Have Natural Appeal
Cutting boards made from beautiful wood grains have an undeniable appeal. The Folio Chopping Board Set from Joseph Joseph features a chic walnut finish that instantly elevates your kitchen’s style. There are also maple and teak wood choices which are naturally antimicrobial and gentle on your knives.
While wood boards require a bit more maintenance than plastic or bamboo, many cooks find the extra effort worthwhile. Oiling your boards regularly prolongs the lifespan and preserves the integrity of the wood. Avoid soaking or putting wood boards in the dishwasher which can lead to cracking and warping.
If treated properly, a wood cutting board like the Joseph Joseph Index Chopping Board Set can last for many years as a kitchen staple. The rich wood tones and grain unique to each board create an elegant, natural look in your prep space.
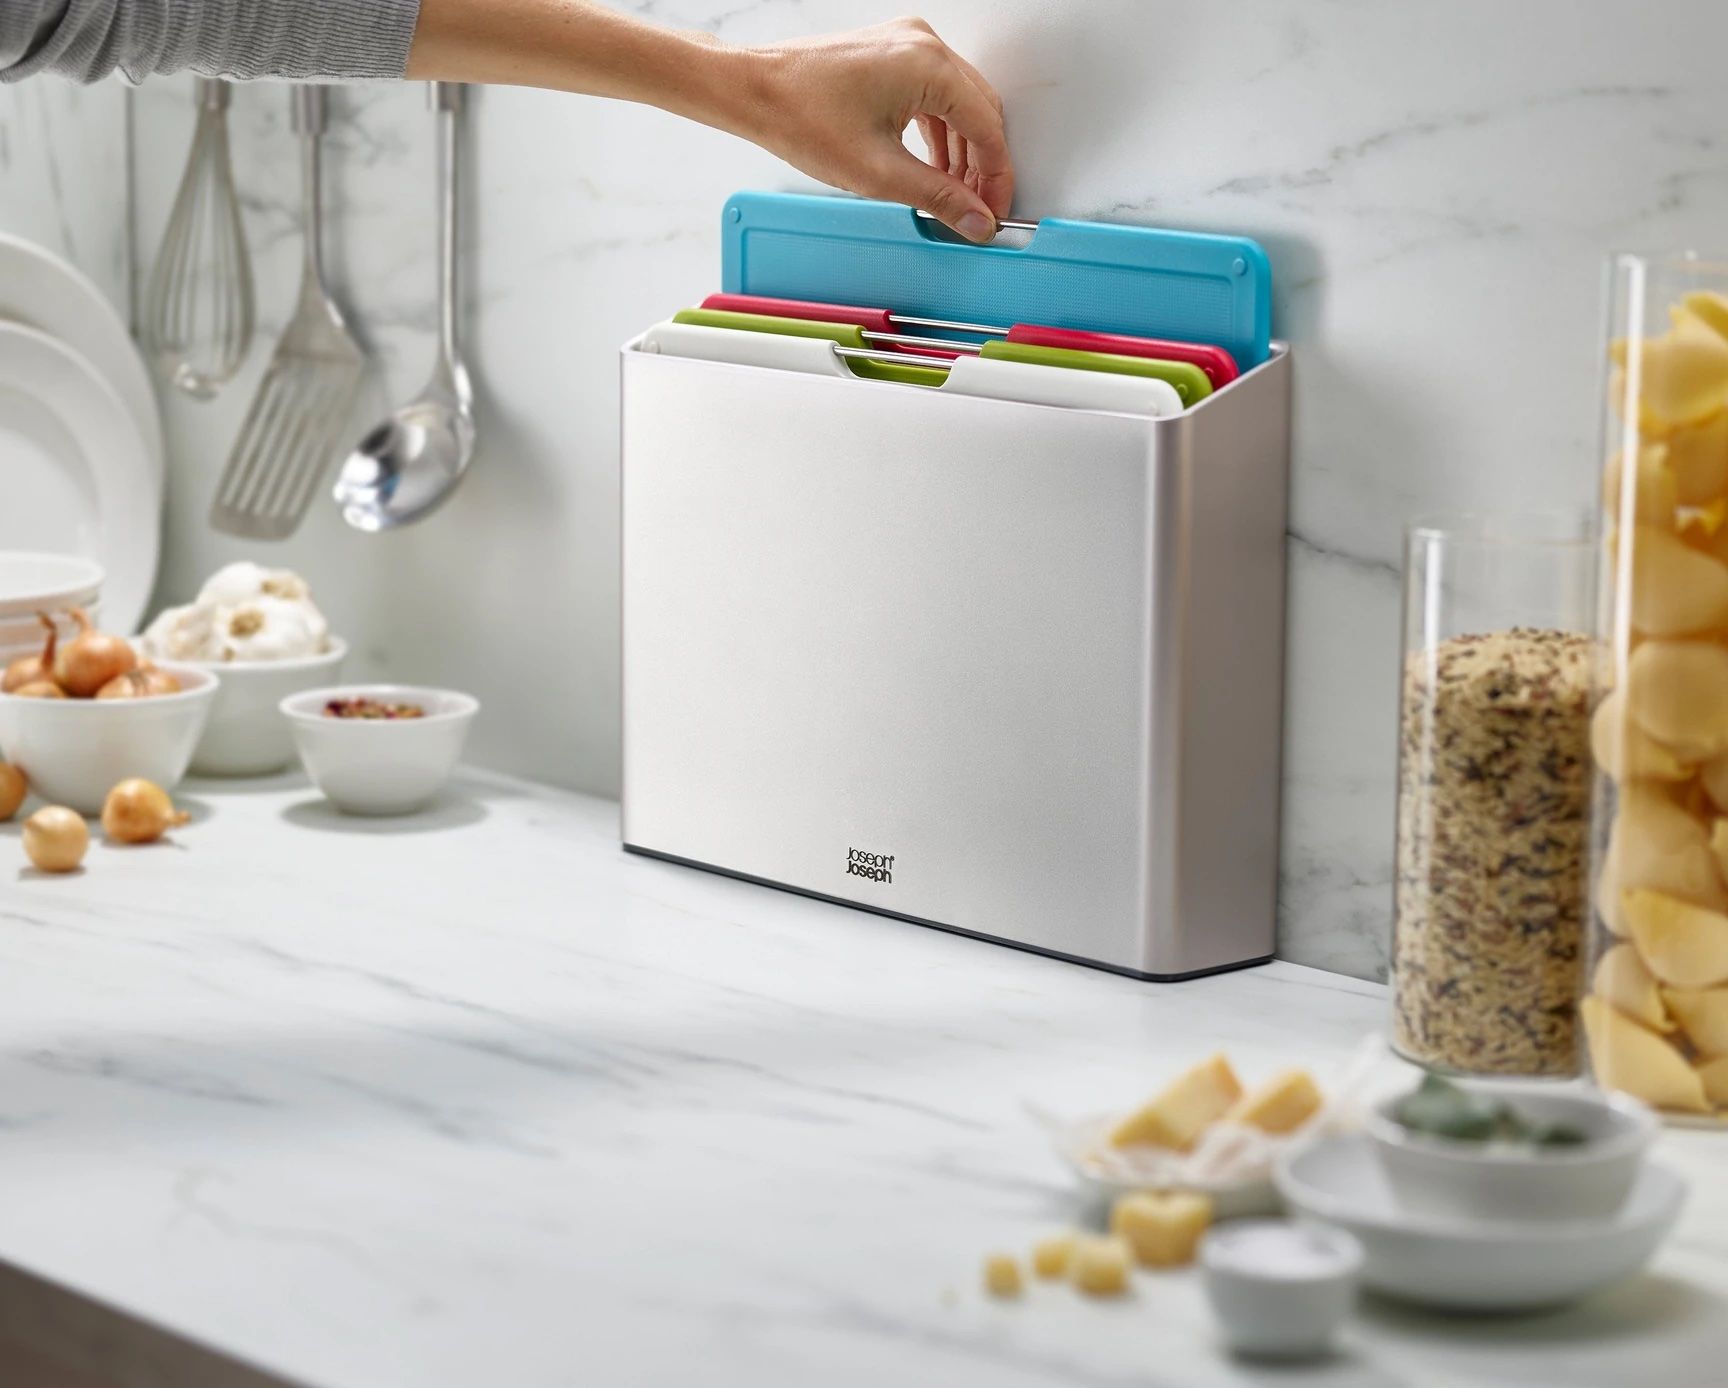
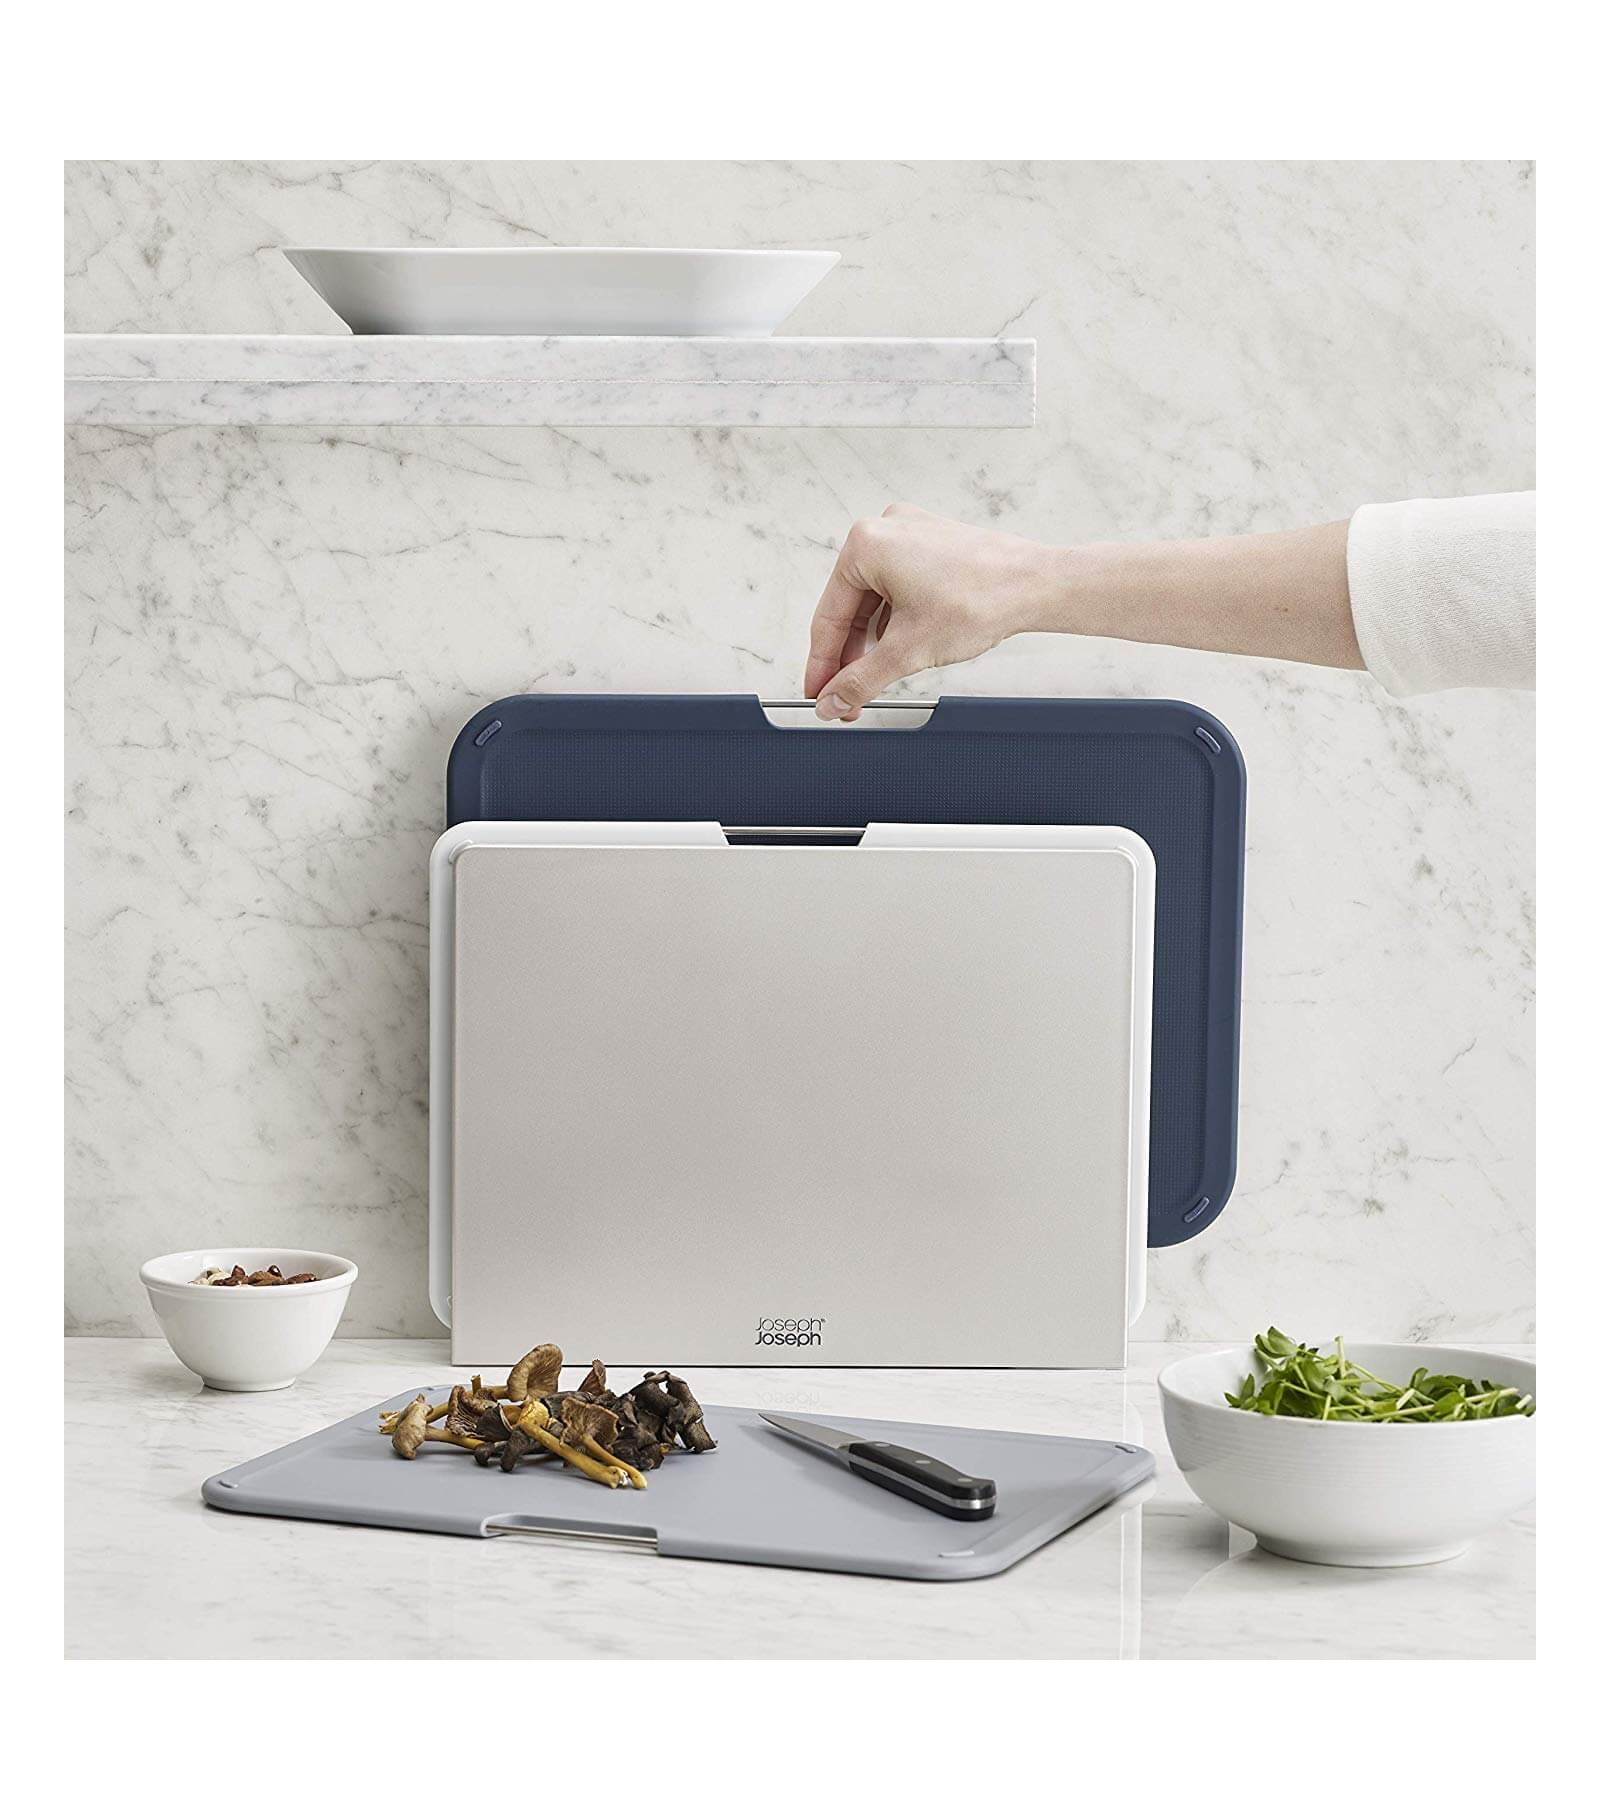
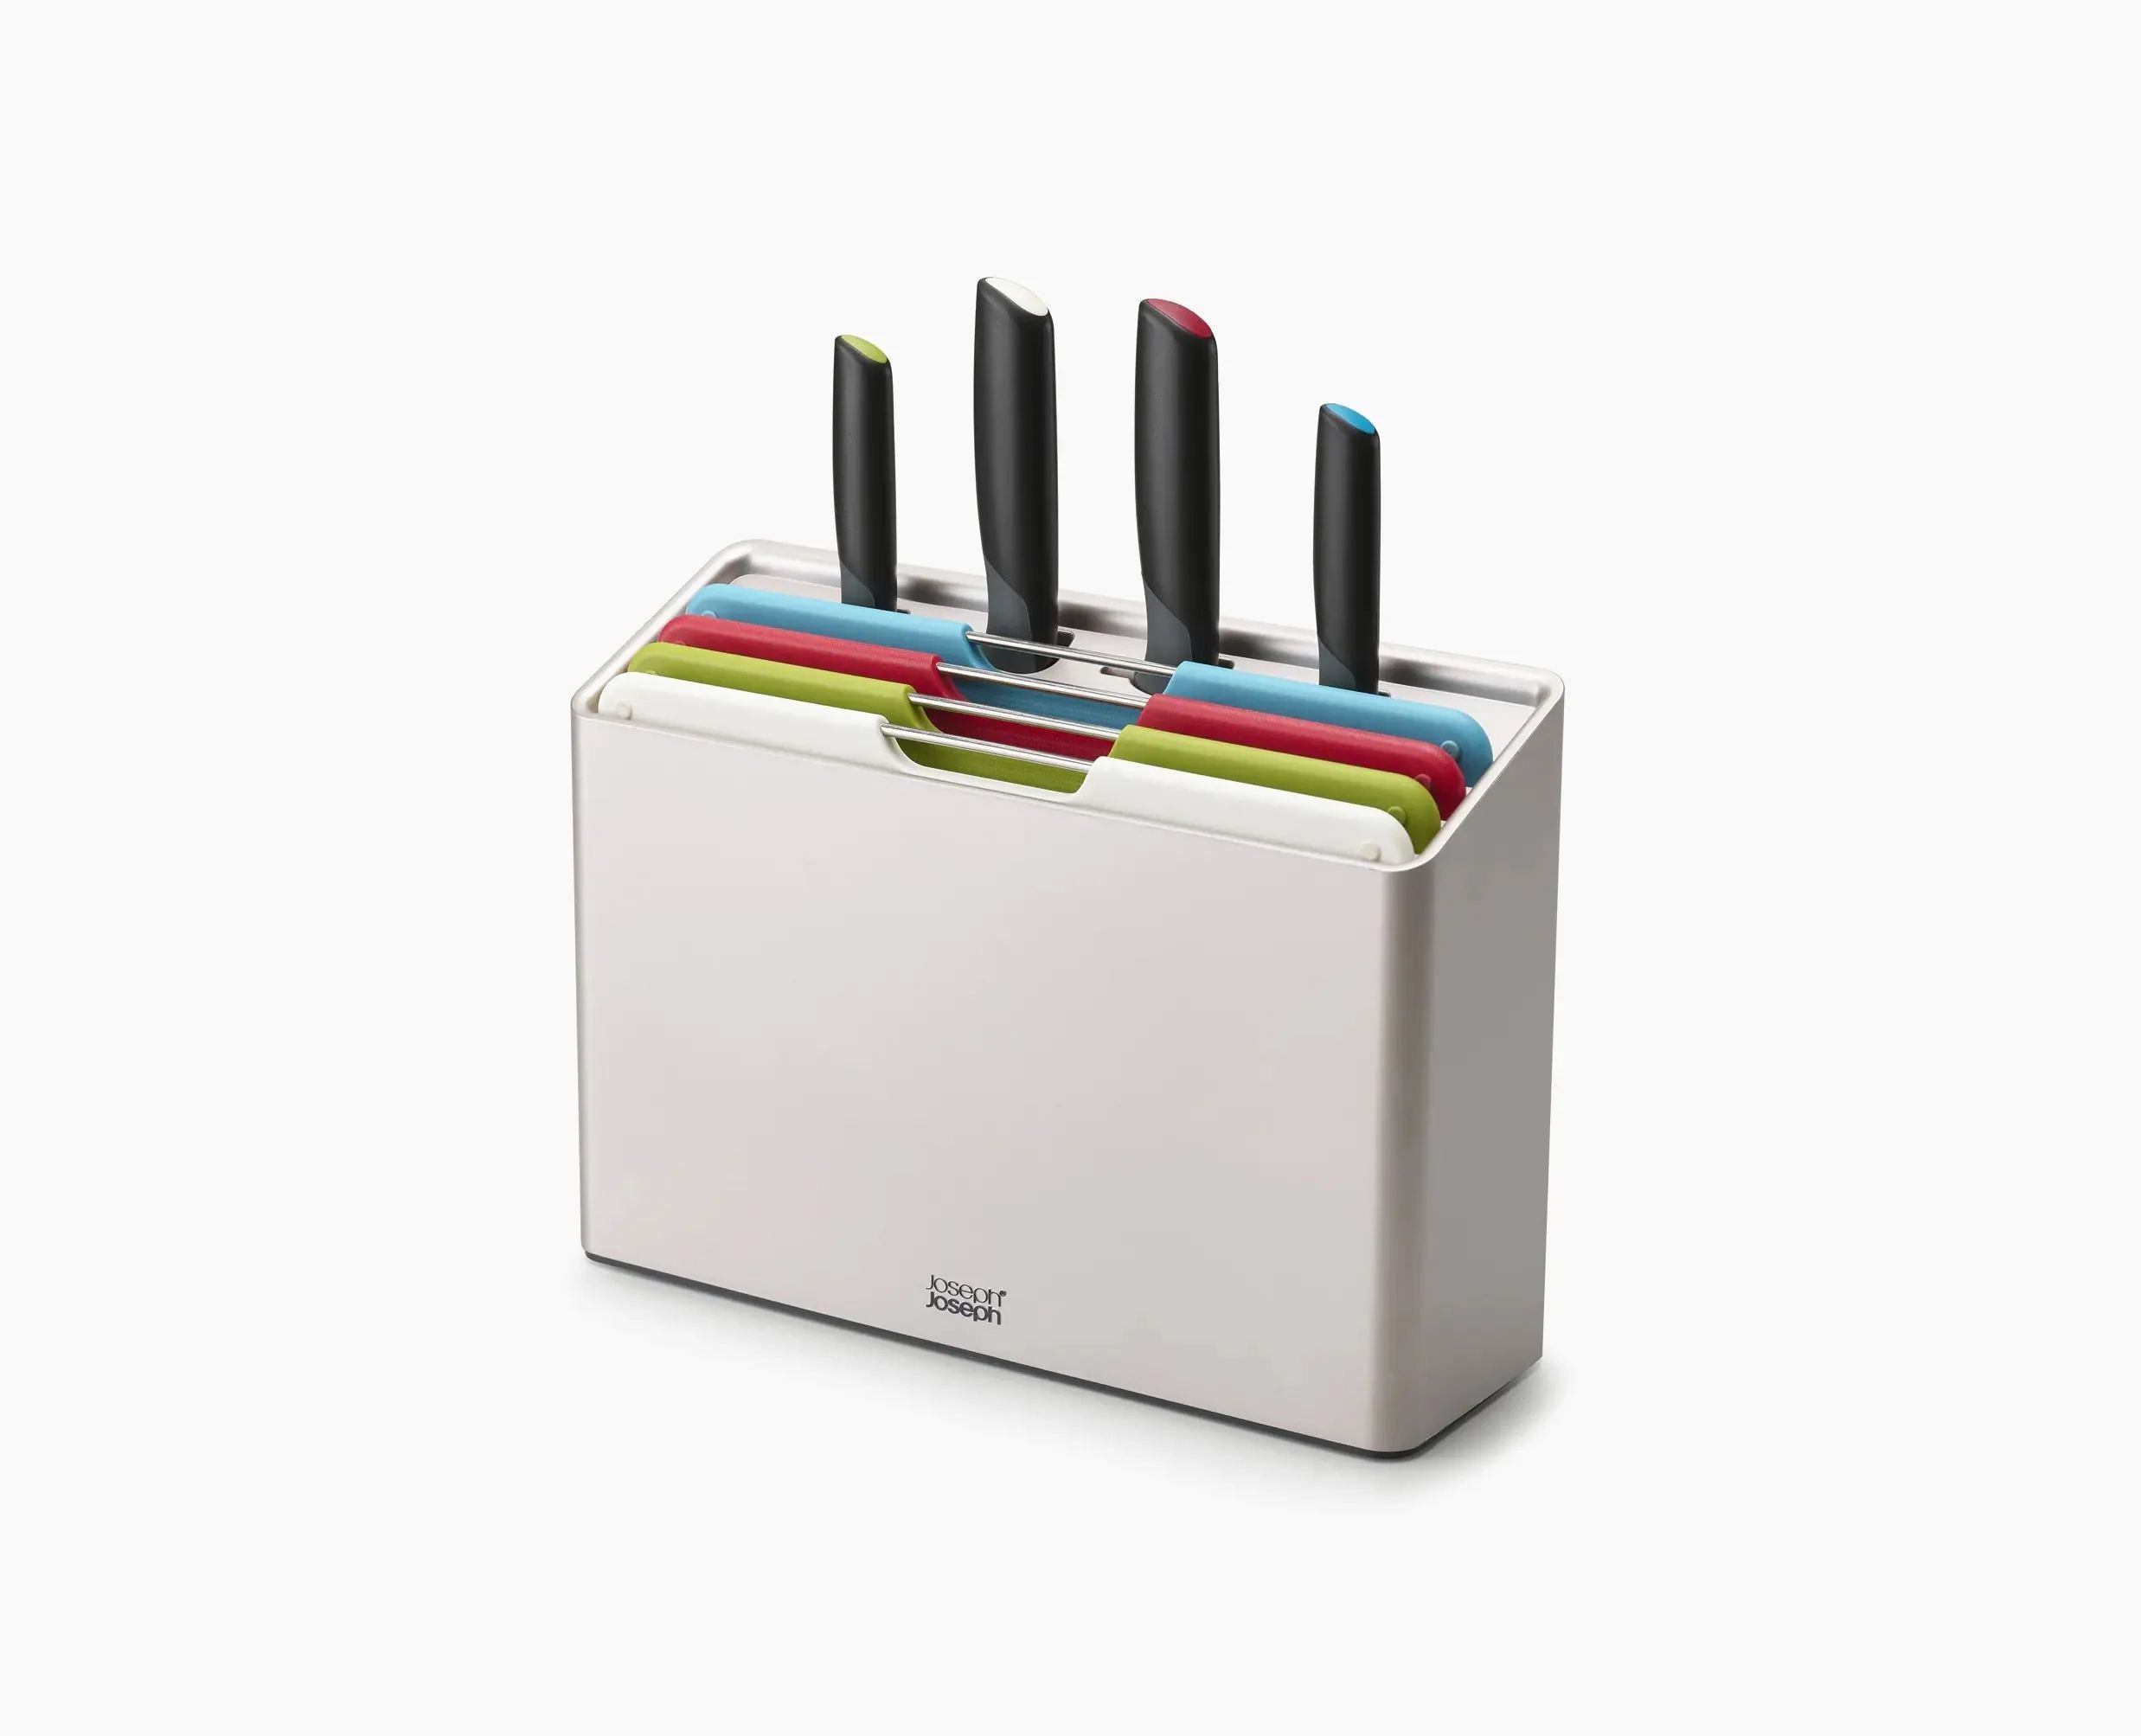
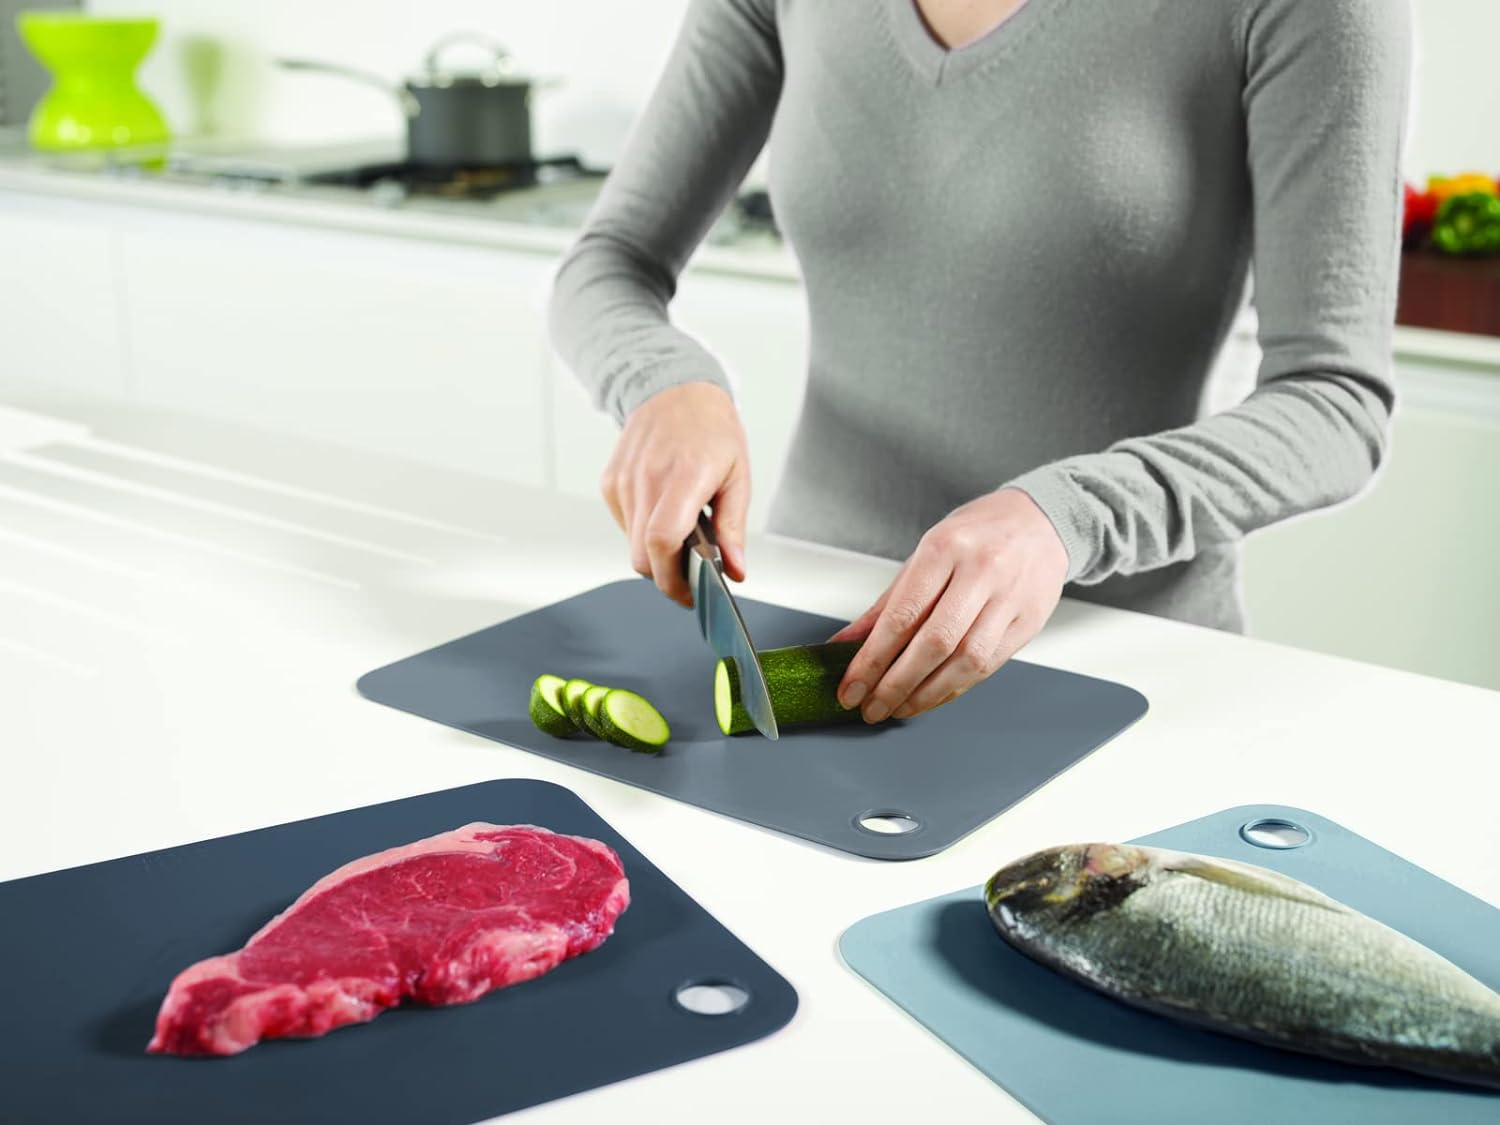
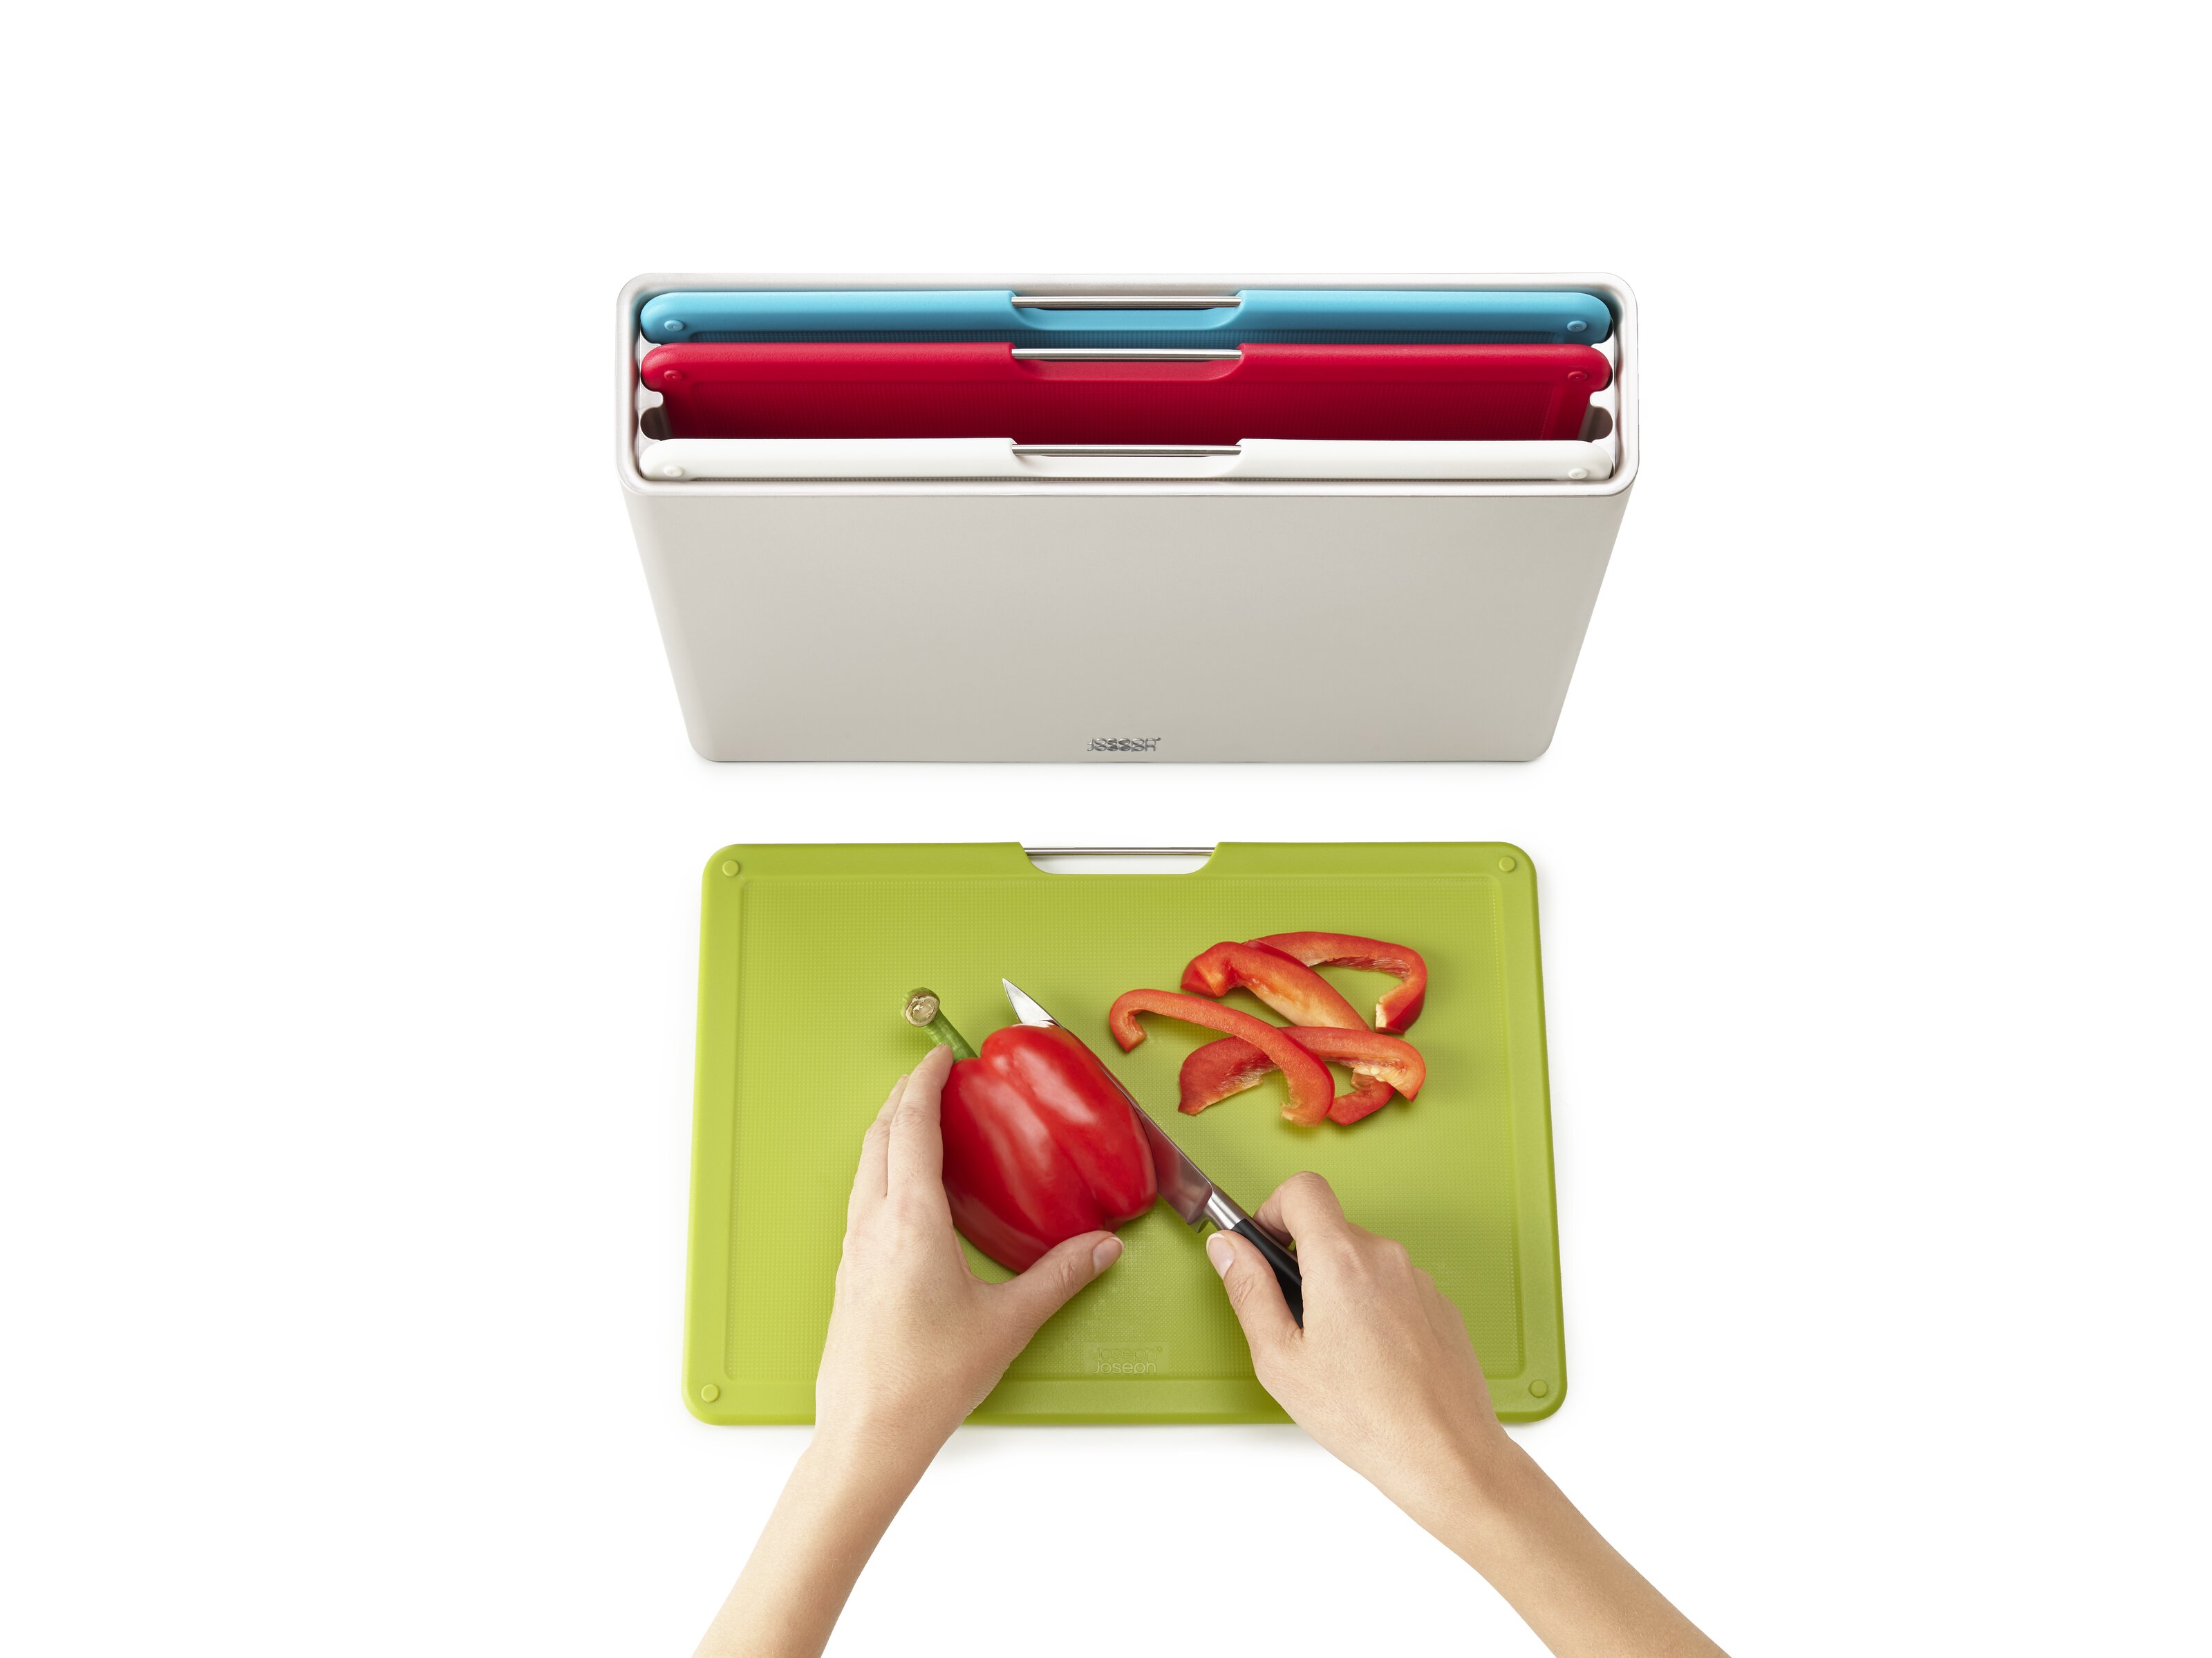
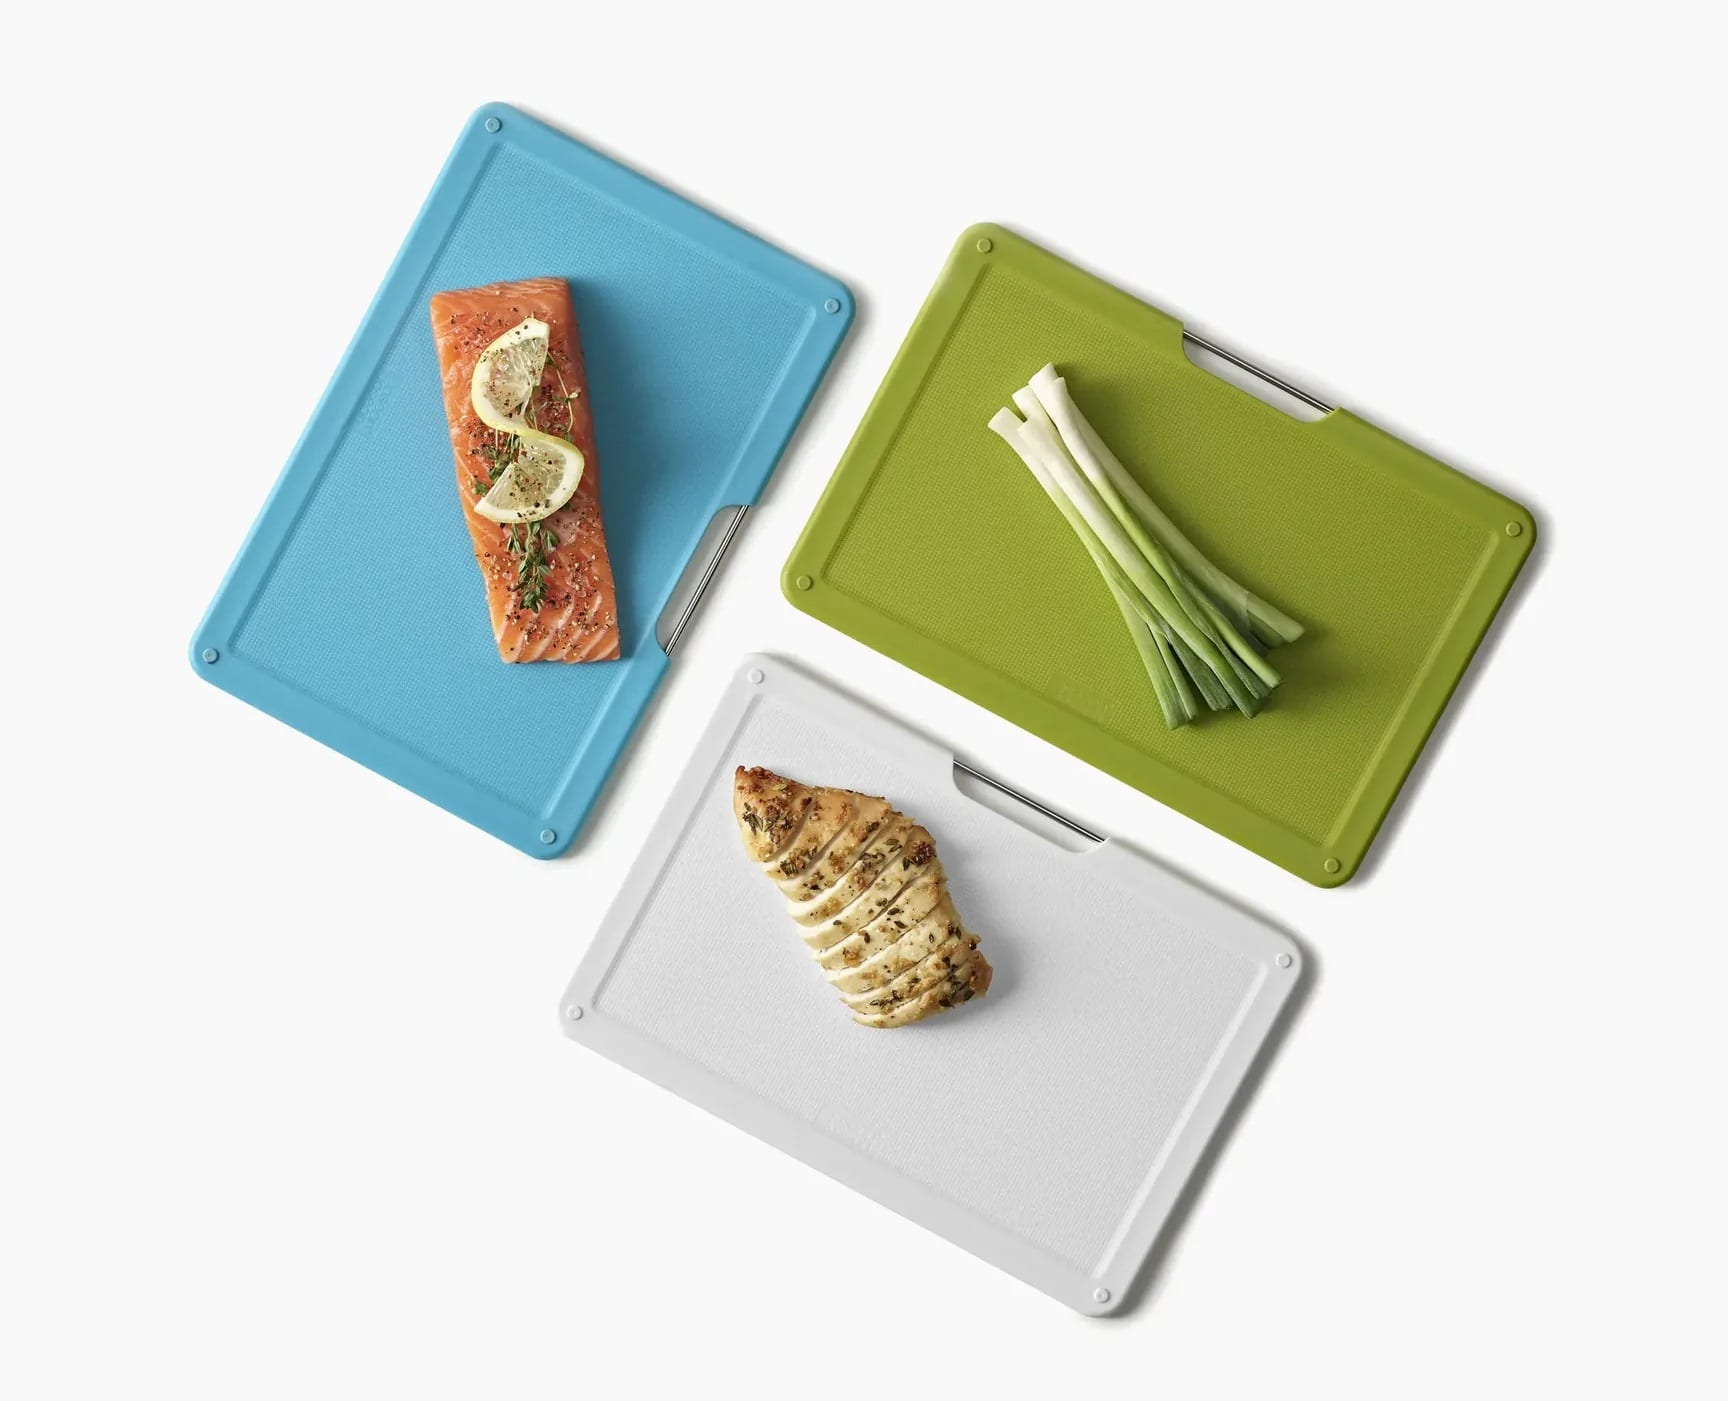
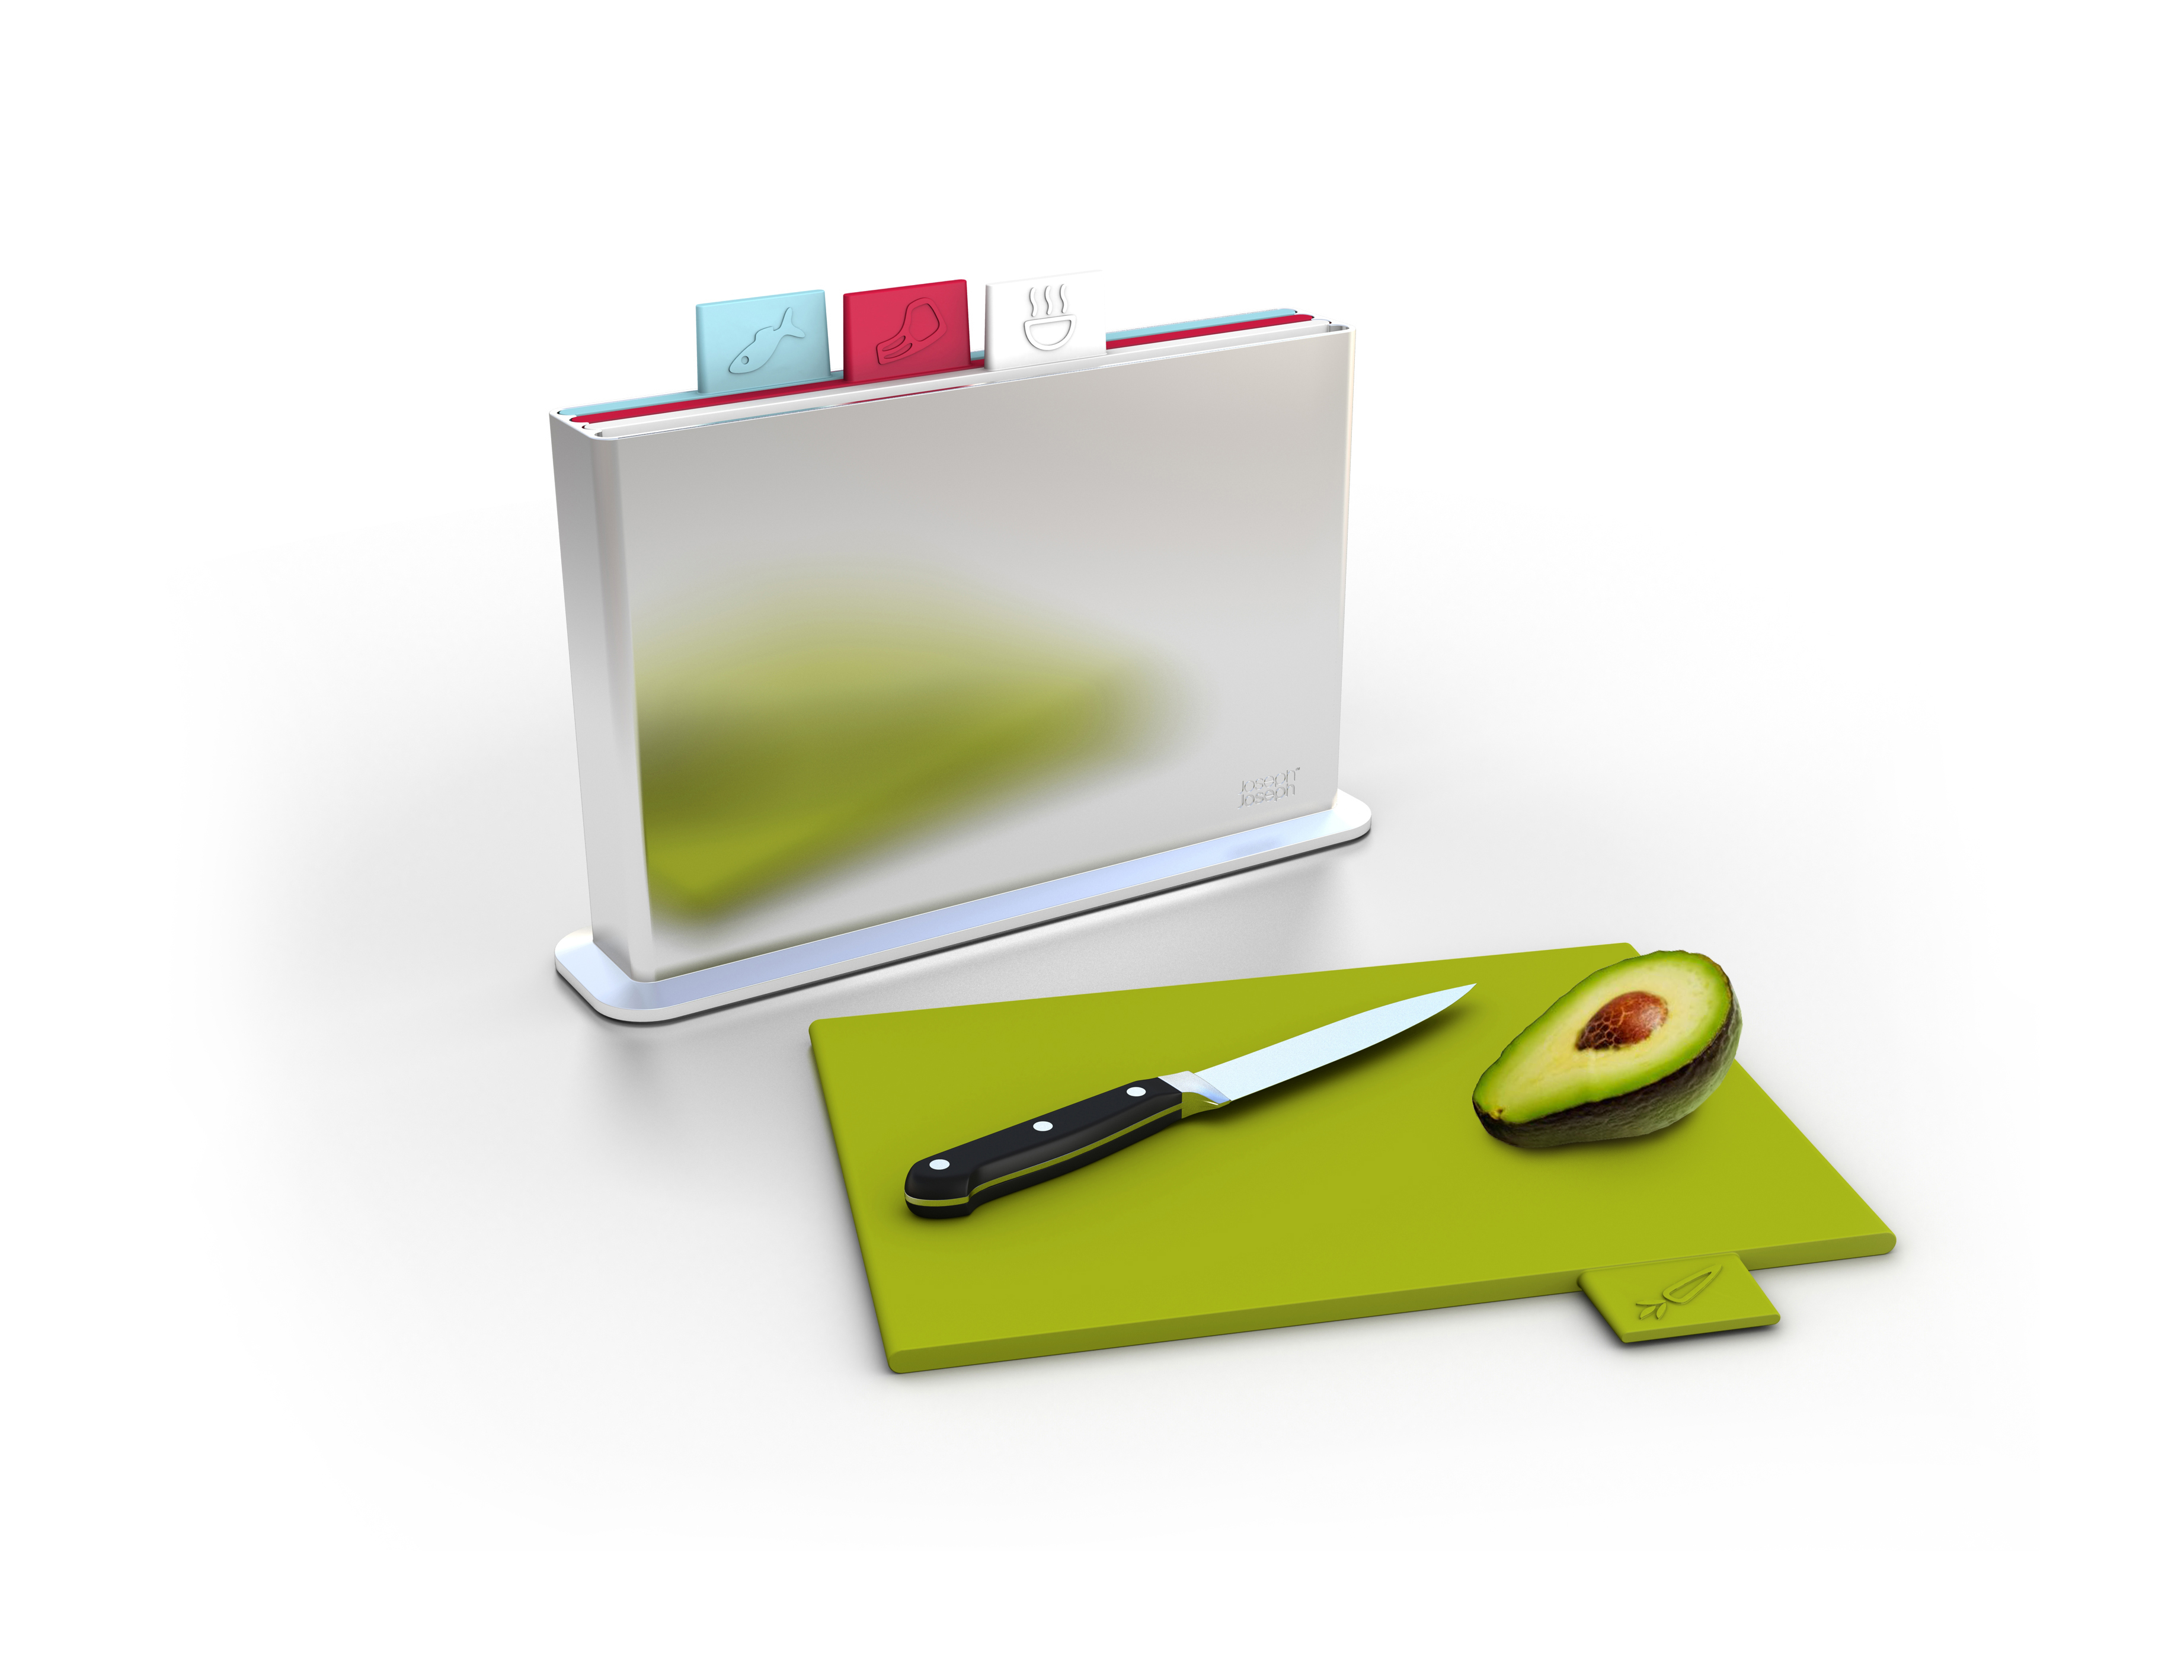
Index Board Organizes Prepping
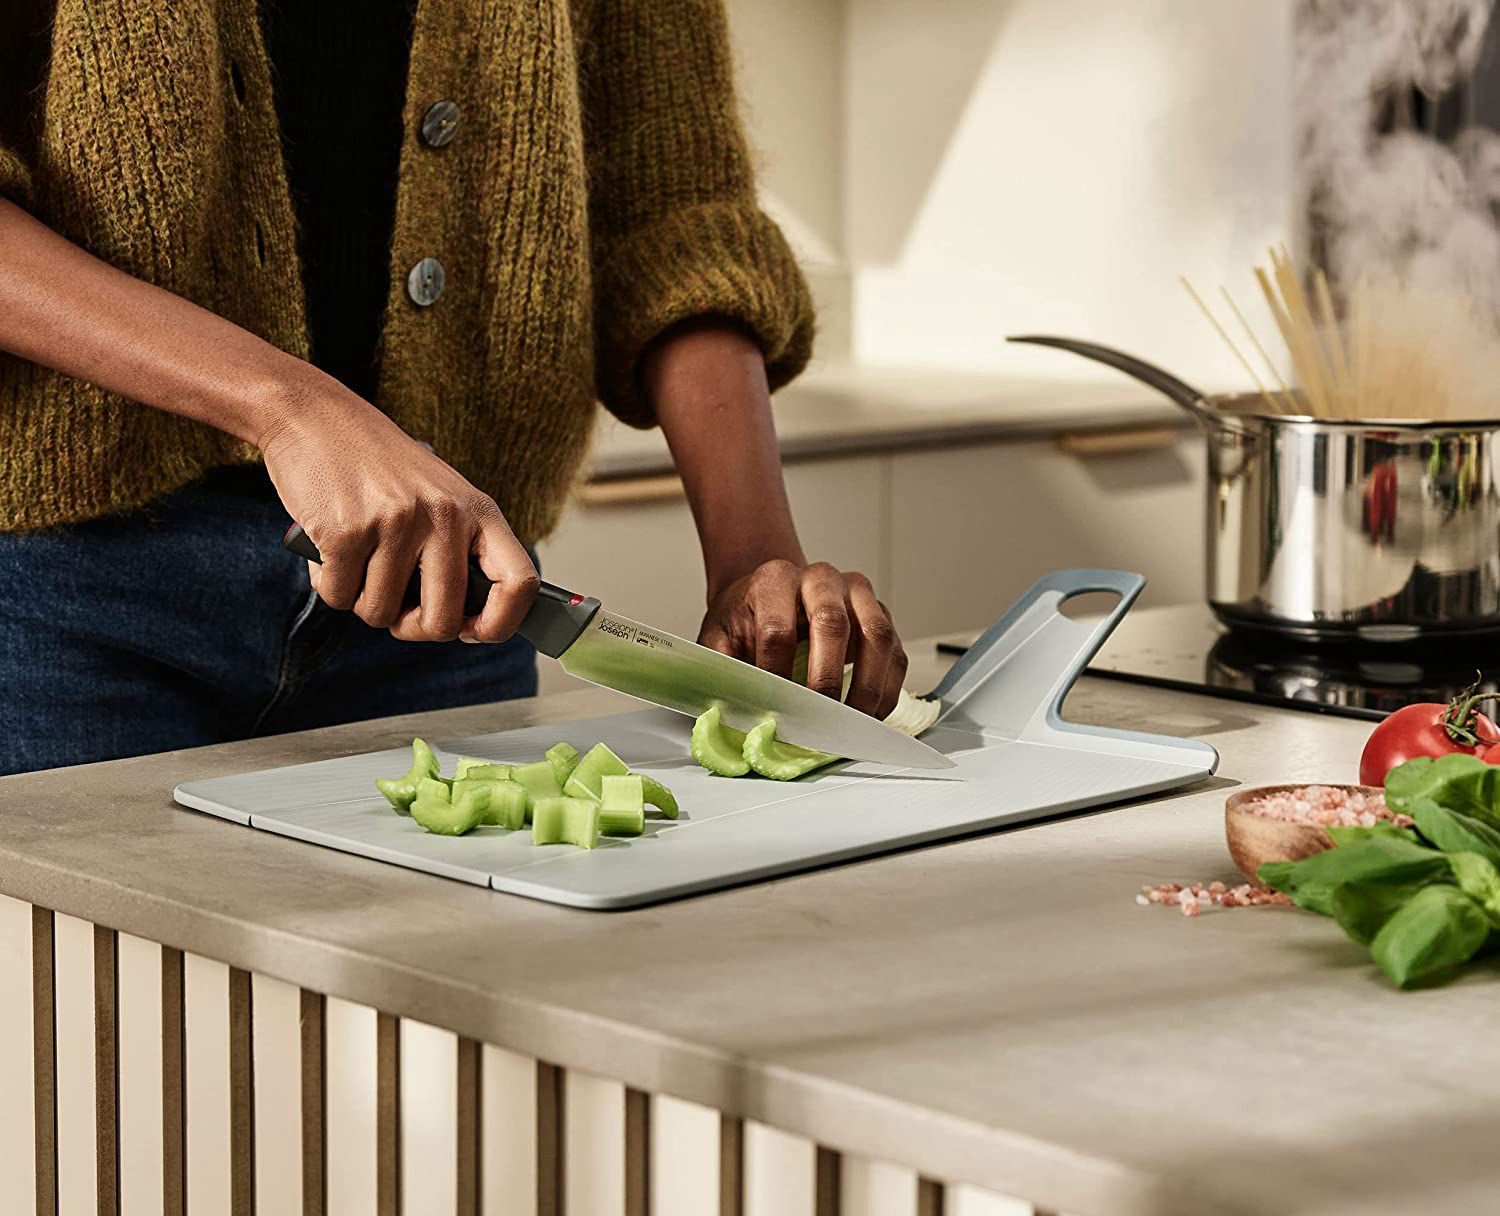
Joseph Joseph’s Index Chopping Board Set takes organization to the next level. The angled boards neatly contain prepped ingredients in place while you work. No more chasing onion pieces or carrots around your cutting board!
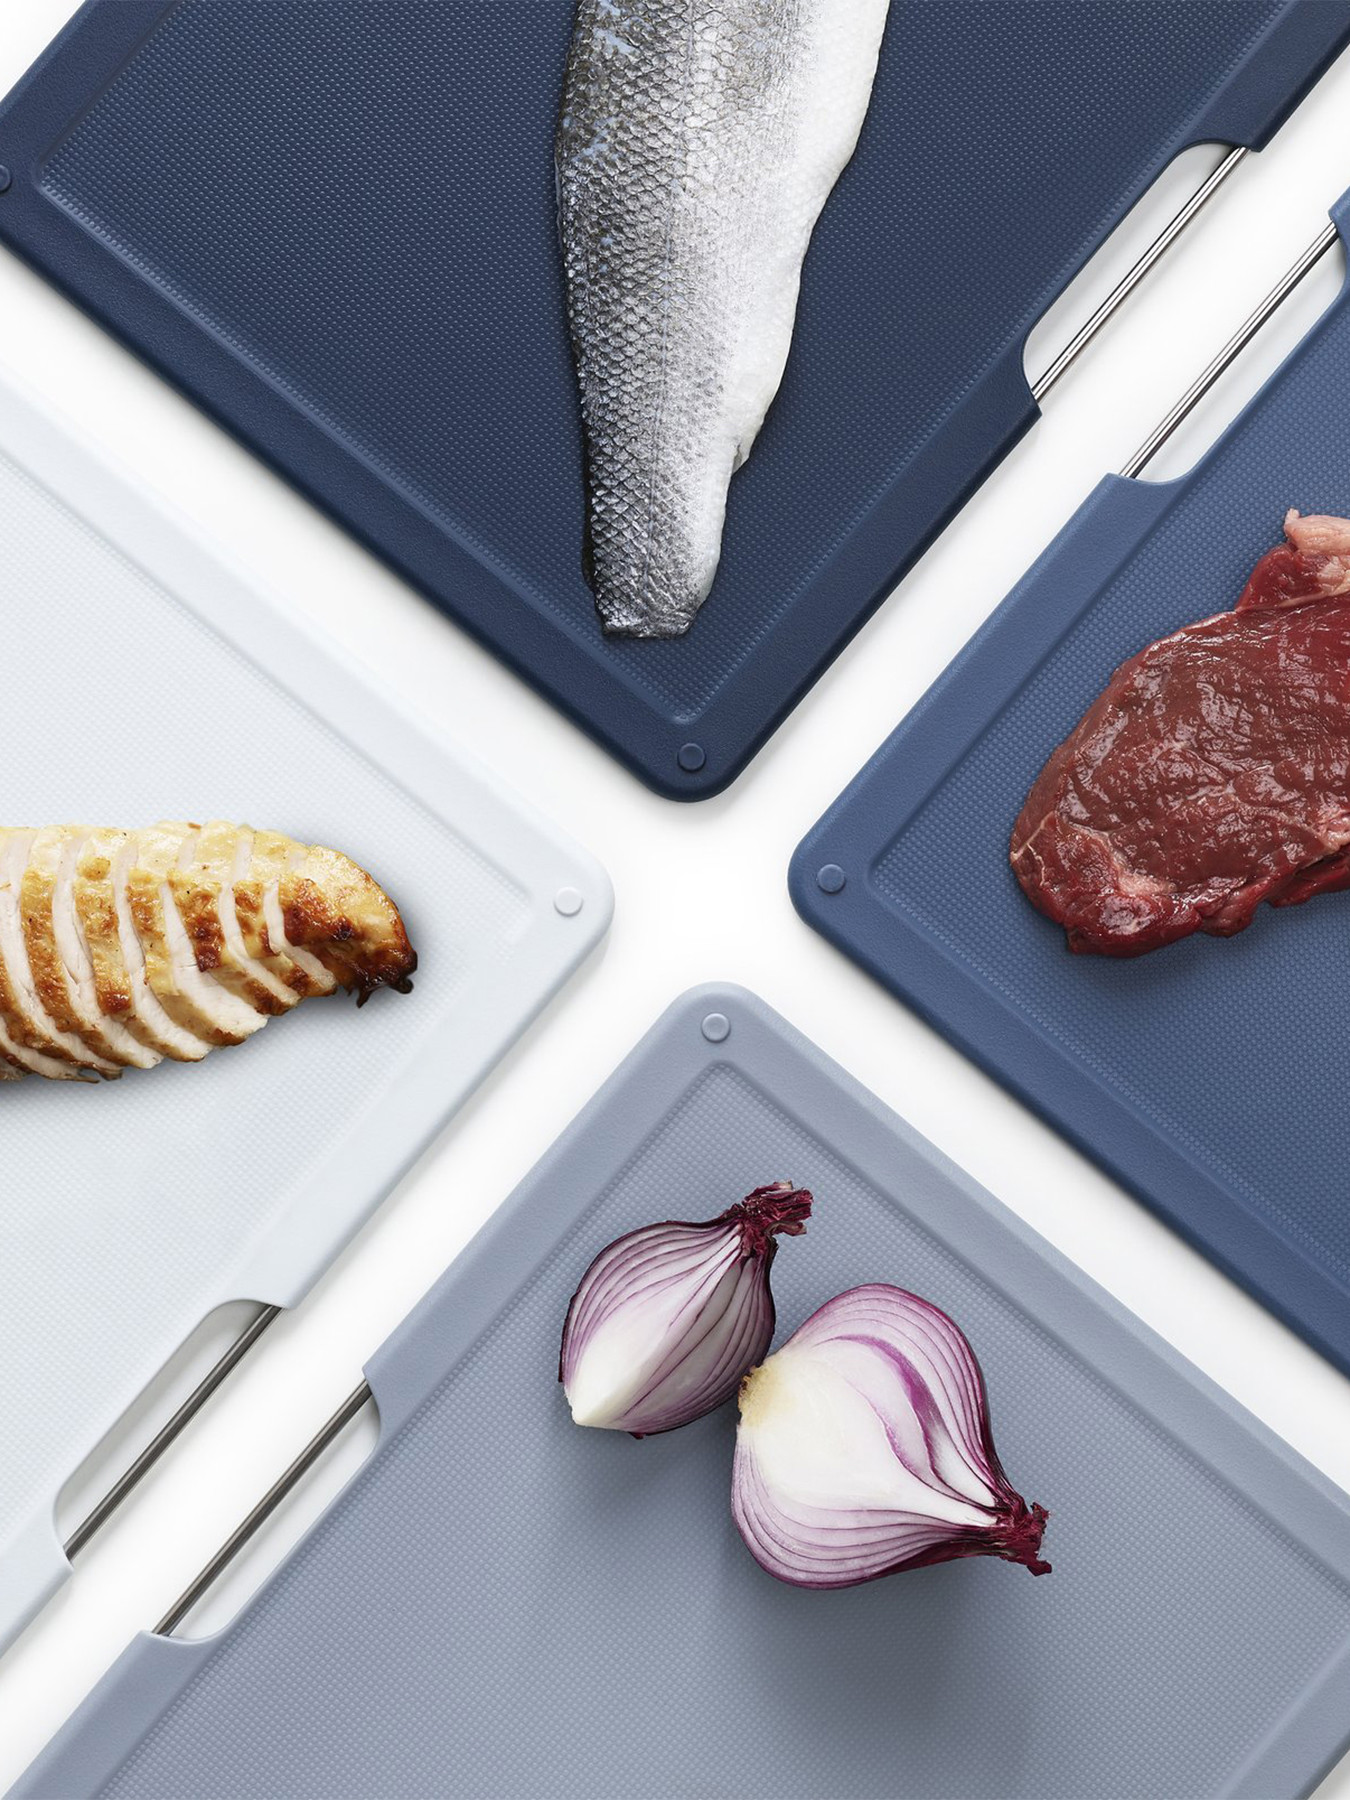
The Index set features four color-coded boards to prevent cross-contamination: red for meat, green for veggies, blue for fish, and white for dairy. This takes out the guesswork of keeping your foods separate for food prep safety. The boards stack together with tabs for compact storage.
Having a designated space for each food group helps streamline meal prep. You can chop all your veggies on the green Index board while fish cooks on the blue board beside it. The angled edges keep ingredients neatly in place so you can work quickly.
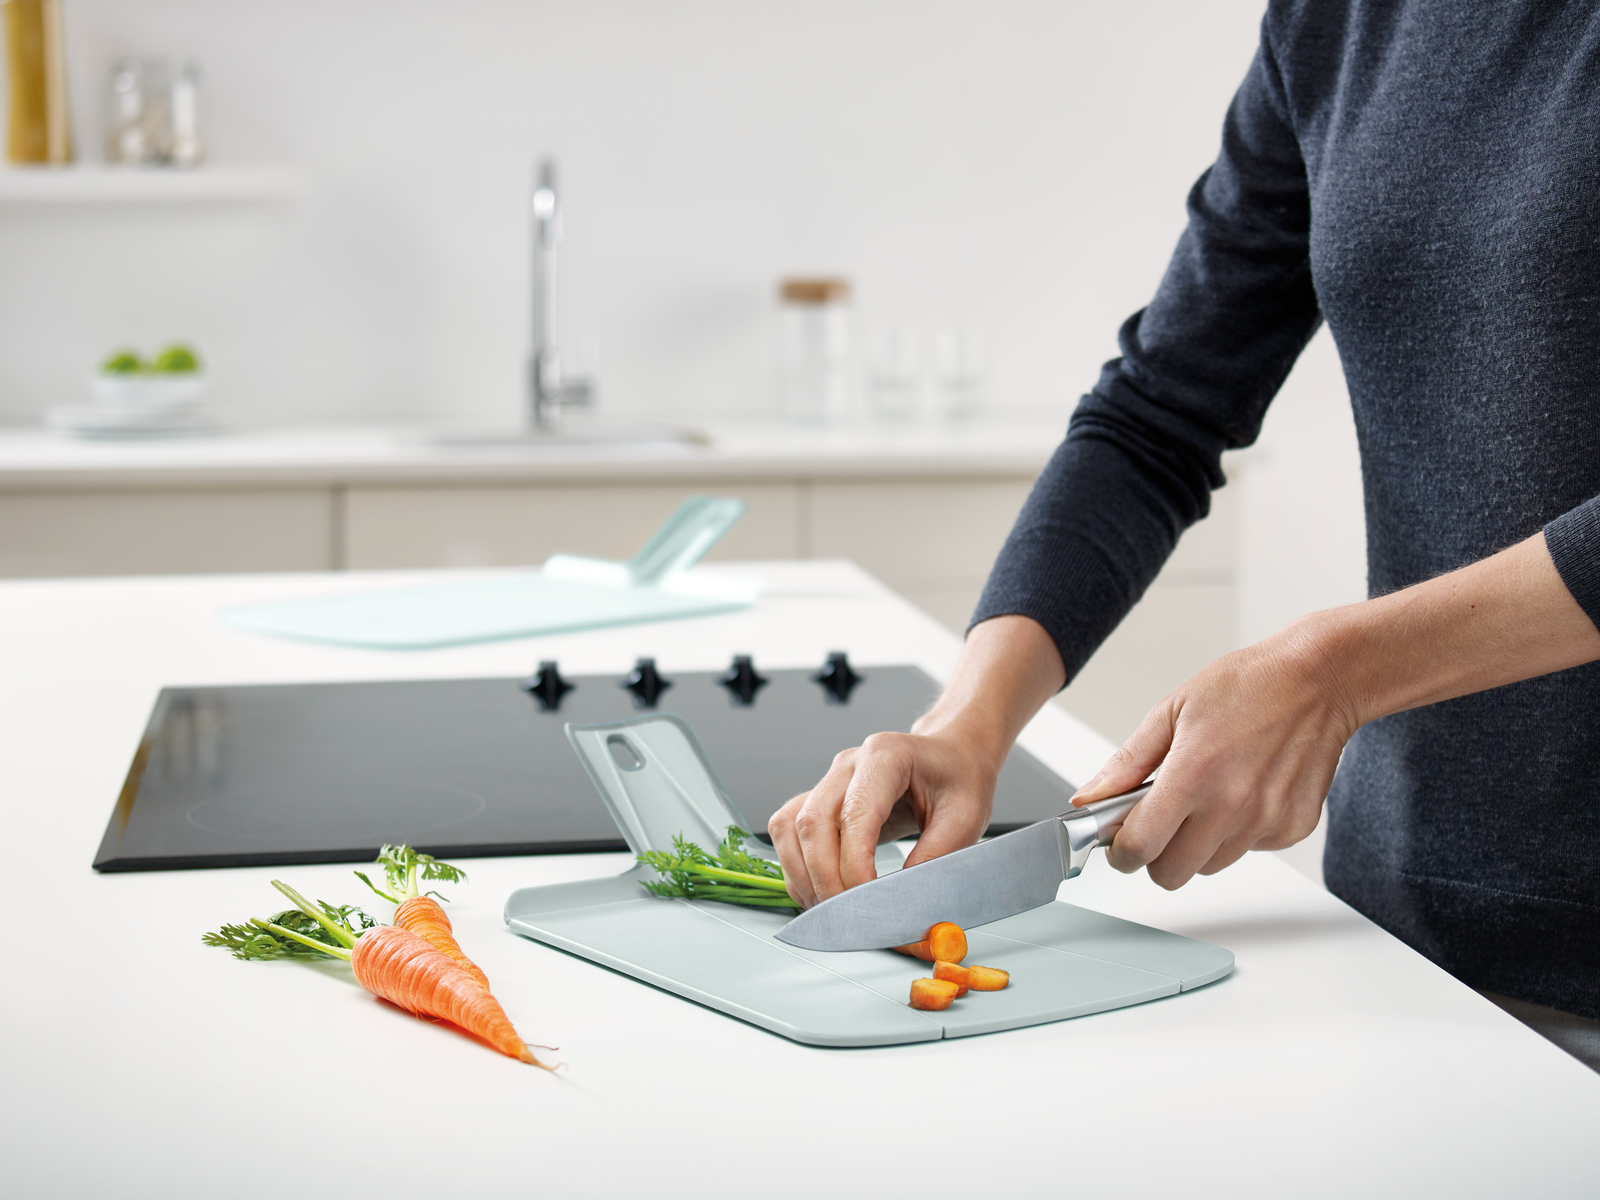
Folio Folds for Compact Storage
Short on kitchen storage space? Joseph Joseph’s Folio Chopping Board folds in half for slim storage in drawers or cabinets. When unfolded, it provides a generous prep surface no different than a standard board. Choose from plastic, bamboo, or wood material options.
The minimalist, portable design is perfect for small kitchens, RV living, or college dorm life. Don’t worry about cluttering up precious cabinet space with bulky boards. Simply store your Folio board out of sight.
For entertainers, keep a folding Joseph Joseph board on hand when prepping for get togethers. You can chop, slice, and dice to your heart’s content, then tuck it away in a drawer when guests arrive. No one will know your secret!
Chop&Slide Saves Counter Space
Joseph Joseph’s innovative Chop&Slide Board includes an integrated sliding tray that keeps chopped ingredients neatly contained. No more sweeping pile of veggie scraps into your hand to move them from cutting board to pan!
The chopping board surface is extra deep to provide ample prep room. Once the tray is pulled out, diced onions, garlic, herbs slide seamlessly into your waiting pot or pan. You save time not having to transfer back and forth across the kitchen.
The sliding tray also preserves precious counter real estate. You don’t need a separate landing zone on the counter to keep chopped ingredients contained. With the Chop&Slide board, everything is together in one space-saving unit.
Mix Materials for Functionality
A combination bamboo and plastic cutting board like the Index Polypropylene Chopping Board gives you the best of both worlds. Use the bamboo side for most ingredients to be gentle on knives and limit scarring. The BPA-free plastic side is ideal for cutting meat and preventing cross-contamination.
This versatile Joseph Joseph board provides two prepping surfaces while taking up the space of one. The polypropylene side stands up to vigorous scrubbing and is dishwasher safe. Meanwhile, the bamboo side brings natural style and sustainability to your kitchen.
Dual-material boards are a smart solution for the minimalist kitchen. Stash your Index board on the counter or in a drawer to always have the right surface ready when you need it.
Non-Slip Feet for Safety

A quality chopping board needs to stay firmly planted in place during use to prevent accidents. Joseph Joseph cutting boards feature non-slip feet on the bottom to keep the board grounded as you chop and slice. No more chasing a slipping, sliding board around the counter!
The last thing you want while wielding a sharp knife is your cutting board skidding away. With non-slip feet, Joseph Joseph boards maintain grip on countertops. This keeps you safe and focused on your cooking.
rubberized non-slip feet also prevent the board from scratching your counters. Friction keeps the board in place without damaging your existing kitchen surfaces.
Dishwasher Safe for Convenience
Look for Joseph Joseph cutting boards and sets labeled as “dishwasher safe” for easy cleaning. Their plastic and polypropylene boards can handle high heat and soapy dishwasher cycles.
Skip the chore of hand washing and scrubbing boards after each use. Simply pop them in the dishwasher and let your appliance do the work. Then the boards are clean and ready for meal prep again.
The Index Chopping Board Set colors are molded into the board material so they won’t fade in the dishwasher. Joseph Joseph boards are designed to be extremely durable to withstand frequent machine washing.
Stylish Designs Coordinate Decor
In addition to their outstanding functionality, Joseph Joseph boards make a stylish design statement. Their innovative shapes, sleek tabs, and modern color choices tie together contemporary kitchen decor.
Display your Joseph Joseph Index or Folio board sets on your countertop or kitchen island. Guests will be intrigued by the angled chopping surfaces and clever foldable design. Quality construction ensures the boards look great for years.
Choose coordinating colors like the gray Index Chopping Boards to complement your existing decor. Or make a bold statement with the bright red Folding Chopping Board. Joseph Joseph boards elevate both your meal prep and decor.
Plastic Boards are Budget-Friendly
Kitchen upgrades can get pricey, so choosing budget-friendly options is key. Joseph Joseph offers quality plastic chopping boards that go easy on your wallet without sacrificing performance. Cost-conscious cooks will appreciate the value these boards provide.
Inexpensive doesn’t have to mean cheap quality. Joseph Joseph designs plastic boards to handle heavy daily use with colors that pop. The Folding Chopping Board comes in red, green, or blue shades to brighten up meal prep. Don’t let the reasonable price tag fool you – this board chops with the best of them.
Easy cleanability makes plastic boards a smart money move. Simply pop them in the dishwasher after each use so they’re ready to go again. No special oiling or hand washing required to maintain plastic boards from Joseph Joseph.
Wood Boards Have Natural Appeal
There’s no denying the visual warmth and appeal of a nice wood cutting board. Joseph Joseph offers wood board options like the Folio Chopping Board Set in beautiful walnut. The rich wood grain and smooth finish look stunning in any kitchen.
While wood boards require a bit more care than plastic, many home chefs feel it’s worth the effort. Oiling regularly maintains the integrity of the wood so your board lasts for years. Avoid soaking or putting wood boards in the dishwasher which can damage the material.
With proper maintenance, a wood board like the Joseph Joseph Index Chopping Board becomes a treasured kitchen staple. The unique wood patterns and tones lend an organic, rustic feel during meal prep.
Index Board Organizes Prepping
Joseph Joseph’s Index Chopping Board Set takes organization to the next level. The angled boards neatly contain prepped ingredients in place while you work. No more chasing onion pieces or carrots around your cutting board!
The Index set features four color-coded boards to prevent cross-contamination: red for meat, green for veggies, blue for fish, and white for dairy. This takes out the guesswork of keeping your foods separate for food prep safety.
Having a designated space for each food group helps streamline meal prep. You can chop all your veggies on the green Index board while fish cooks on the blue board beside it. The angled edges keep ingredients neatly in place so you can work quickly.
Folio Folds for Compact Storage
If you’re tight on kitchen storage space, Joseph Joseph’s Folio Chopping Board folds in half for slim storage in drawers or cabinets. When unfolded, it provides a generous prep surface no different than a standard board.
The minimalist, portable design is perfect for small kitchens, RVs, or college dorm life. Don’t worry about cluttering up precious cabinet space with bulky boards. Simply tuck your Folio board out of sight when not in use.
For entertainers, keep a folding Joseph Joseph board on hand when prepping for get togethers. Chop, slice, and dice to your heart’s content, then store it away discreetly in a drawer when guests arrive!
Chop&Slide Saves Counter Space
Joseph Joseph’s innovative Chop&Slide Board includes an integrated sliding tray that contains chopped ingredients neatly. No more sweeping veggie scraps into your hand to transfer them from cutting board to pan!
The chopping board surface is extra deep to allow ample room for prep. Once the tray is pulled out, diced onions, garlic, herbs slide seamlessly into your waiting pot or pan. You save time not having to transfer back and forth across the kitchen.
The sliding tray also preserves precious counter space. You don’t need a separate landing zone on the counter to contain chopped ingredients. With the Chop&Slide board, everything is together in one space-saving unit.
Mix Materials for Functionality

For the best of both worlds, choose a combination board like Joseph Joseph’s Index Polypropylene Chopping Board. The bamboo side is gentle on knives while the BPA-free plastic side tackles meat cutting.
This versatile two-in-one board provides different prepping surfaces while taking up the space of one. The polypropylene side stands up to vigorous scrubbing and dishwasher heat. Meanwhile, the bamboo side lends natural style and sustainability.
Dual-material boards are smart for minimalist kitchens. Stash your Index board on the counter or in a drawer to always have the right surface ready when you need it.
Non-Slip Feet for Safety
Quality cutting boards should stay firmly planted during use, and Joseph Joseph boards feature non-slip feet for stability. Your board won’t go slipping and sliding around the counter with you wielding a sharp knife.
Non-slip feet maintain grip on countertops so you can focus on prepping. Rubberized grips also prevent the board from scratching your existing counters. Friction keeps the board in place without damaging surfaces underneath.
With Joseph Joseph’s innovative designs, you don’t have to sacrifice safety for functionality. Non-slip feet provide peace of mind that your board will stay grounded during meal prep.
Dishwasher Safe for Convenience
Make clean up a breeze by choosing Joseph Joseph boards labeled “dishwasher safe” like their plastic and polypropylene options. These durable boards can handle high heat washing and soapy dishwasher cycles.
After prepping, simply pop your boards in the dishwasher and let the machine do the scrubbing. Then they’re clean and prepped for the next meal. Joseph Joseph boards are designed to withstand frequent machine washing.
Even the Index Chopping Board Set retains its bright colors wash after wash. The colors are molded into the durable board material so they won’t fade in the dishwasher.
Stylish Designs Coordinate Decor
In addition to their outstanding functionality, Joseph Joseph boards make a stylish kitchen design statement. Their innovative shapes, tabs, and color choices effortlessly tie together contemporary decor.
Display your Joseph Joseph Index or Folio sets on the countertop or kitchen island. Guests will be intrigued by the angled chopping surfaces and clever foldable design. Quality construction means the boards will look great for years.
Choose coordinating colors like the gray Index boards to complement your existing decor. Or make a bold statement with the vibrant red Folding Chopping Board. Joseph Joseph boards elevate both meal prep and style.
Wood Boards Have Natural Appeal

There’s an undeniable visual warmth and rustic appeal to a nice wood cutting board. Joseph Joseph incorporates beautiful wood grain options like walnut in their Folio Chopping Board Set. The smooth sanded finish and unique wood patterns look stunning in any kitchen.
While wood requires a bit more care than plastic, many home chefs feel it’s worth the effort. Regular oiling maintains the integrity of the wood so your board can last for years. Avoid soaking or putting wood boards in the dishwasher which can lead to cracking and warping.
With proper maintenance, a wood board like the Joseph Joseph Index Chopping Board Set becomes a treasured meal prep staple. The wood tones and grains lend an organic, natural look and feel to your kitchen.
Index Board Organizes Prepping
Joseph Joseph takes cutting board organization to the next level with their Index Chopping Board Set. The angled boards neatly contain chopped ingredients in place as you work. No more chasing onions and carrots around your cutting board!
The Index set features color-coded boards to prevent cross-contamination: red for meat, green for veggies, blue for fish, and white for dairy. This eliminates guesswork in keeping foods separate.
Having a designated space for each food group helps streamline meal prep. Chop all veggies on the green Index board while fish cooks on the blue board. The angled edges keep ingredients neatly contained so you can work efficiently.
Folio Folds for Compact Storage
If you’re tight on kitchen storage space, Joseph Joseph’s Folio Chopping Board folds in half for slim storage in drawers or cabinets. When unfolded, it offers a generous prep surface equal to a standard board.
The minimalist, portable design suits small kitchens, RVs, or college dorms. Don’t worry about bulky boards monopolizing precious cabinet space – simply tuck your Folio board out of sight when not in use.
For entertainers, keep a folding Joseph Joseph board on hand for get together prep. Once guests arrive, discreetly store it away out of sight. Your secret recipe for party hosting success!
Chop&Slide Saves Counter Space
Joseph Joseph’s innovative Chop&Slide Board features an integrated sliding tray that contains chopped ingredients neatly. No more sweeping veggie scraps into your hand to transfer from cutting board to pan!
The chopping board surface area is extra deep to allow ample room for prep work. Once pulled out, the tray lets diced onions, garlic, herbs slide seamlessly into your waiting pot or pan. You save time not having to transfer back and forth across the kitchen.
The sliding tray also preserves precious counter real estate. Unlike other boards requiring a separate landing zone on the counter, Chop&Slide keeps everything neatly together in one space-saving unit.
Mix Materials for Functionality
For the best of both worlds, opt for a combo board like Joseph Joseph’s Index Polypropylene Chopping Board. The bamboo side gently preps ingredients while the BPA-free plastic side handles meat cutting.
This versatile 2-in-1 board provides different prep surfaces while taking up one board’s space. The polypropylene side tackles tough scrubbing and dishwasher heat. Meanwhile, the bamboo brings natural style and eco-friendly appeal.
Dual-material boards are smart for minimalist kitchens. Keep your Index board on the counter or in a drawer to always have the right surface on hand when needed.
Non-Slip Feet for Safety
Quality boards should stay firmly in place during use, and Joseph Joseph boards have non-slip feet for stability. Your board won’t go sliding around dangerously with knife in hand.
The non-slip grip maintains traction on counters so you can focus on prep work. Rubberized feet also prevent scratching existing counters. Friction keeps the board grounded without damaging surfaces underneath.
With Joseph Joseph’s innovative designs, you don’t sacrifice safety for functionality. Non-slip feet give peace of mind your board will stay put during meal prep.
Dishwasher Safe for Convenience
Simplify clean up by choosing Joseph Joseph boards labeled “dishwasher safe” like their durable plastic and polypropylene options. These boards can handle high heat washing and soapy dishwasher cycles.
After prepping is complete, just pop boards in the dishwasher and let the machine tackle scrubbing. Then they’re clean and prepped for next mealtime. Joseph Joseph boards are designed to withstand frequent dishwashing.
Even the Index Chopping Board Set retains its bright colors after repeated washing. The hues are molded into the durable board material, so they won’t fade in the dishwasher.
Stylish Designs Coordinate Decor
Beyond their outstanding functionality, Joseph Joseph boards make a stylish kitchen design statement. Their innovative shapes, tabs, and color options effortlessly tie together contemporary decor.
Display your Joseph Joseph Index or Folio sets on the countertop or kitchen island. Guests will be intrigued by the angled chopping surfaces and clever foldable design. Quality materials ensure the boards look great for years.
Choose coordinating hues like the gray Index boards to complement your existing decor. Or make a bold statement with the vibrant red Folding Chopping Board. Joseph Joseph boards elevate both meal prep and style.
Index Board Organizes Prepping
Joseph Joseph takes cutting board organization to the next level with their innovative Index Chopping Board Set. The angled chopping surfaces neatly contain prepped ingredients in place while you work. No more chasing carrot and onion pieces around your cutting board!
The Index set features color-coded boards for different food groups to prevent cross-contamination: red for raw meats, green for produce, blue for fish, and white for dairy. This handy coding system eliminates any guesswork in keeping your foods properly separated.
Having a dedicated prep space for each category helps streamline meal preparation. You can chop away on the green Index board for all your vegetables while the fish fillets cook away on the neighboring blue board. The angled edges keep ingredients neatly corralled in place so you can work efficiently.
Folio Folds for Compact Storage
If you’re tight on kitchen storage space, Joseph Joseph’s Folio Chopping Board folds in half for slim storage in drawers or cabinets. When unfolded, it provides a generous prep surface equal to any regular board.
The minimalist, portable design is perfect for small kitchens, RVs, or college dorm living. No need to worry about a bulky board monopolizing your precious cabinet real estate – simply tuck the Folio board out of sight when not in use.
For entertainers, keep a folding Joseph Joseph board on hand when prepping for get-togethers or parties. Once the guests arrive, discreetly store it away out of sight and out of mind. Your secret to party prep success!
Chop&Slide Saves Counter Space
Joseph Joseph’s innovative Chop&Slide Board features an integrated sliding tray that keeps chopped ingredients neatly contained. No more sweeping veggie scraps into your hand to transfer from cutting board to cooking pan!
The ample chopping board surface provides deep prep space. Once pulled out, the tray lets diced onions, garlic, herbs slide seamlessly right into your waiting pot or pan. You save time not having to transfer ingredients back and forth across the kitchen.
The sliding tray also preserves precious counter real estate. Unlike other boards requiring a separate landing zone, the Chop&Slide keeps everything in one space-saving, self-contained unit.
Folio Folds for Compact Storage
If your kitchen is limited on storage space, Joseph Joseph’s Folio Chopping Board folds in half for slim storage in drawers or cabinets. When unfolded, it offers a full-sized, generous prep surface for all your chopping needs.
The minimalist, portable design is ideal for small kitchens, RVs, or college dorm living situations. No need to worry about a large, bulky board monopolizing your precious cabinet space – just tuck the Folio board out of sight when not in use.
For entertainers, keep a folding Joseph Joseph board on hand when prepping appetizers or meals for get-togethers. Once the guests arrive, discreetly store it away out of sight. Your secret recipe for party prep success!
Chop&Slide Saves Counter Space
Joseph Joseph’s innovative Chop&Slide Board features an integrated sliding tray that neatly contains chopped ingredients. No more sweeping veggie scraps into your hand to transfer from cutting board to cooking pan!
The ample chopping board surface area provides deep prep space. Once pulled out, the tray lets diced onions, garlic, herbs slide seamlessly right into your waiting pot or pan. You save time not having to transfer ingredients back and forth across the kitchen.
The sliding tray also preserves precious counter real estate. Unlike other boards requiring a separate landing zone, the Chop&Slide keeps everything in one space-saving, self-contained unit.
Mix Materials for Functionality
For the best of both worlds, opt for a combination board like Joseph Joseph’s Index Polypropylene Chopping Board. The bamboo side gently preps ingredients while the BPA-free plastic side handles meat cutting.
This versatile 2-in-1 board provides different prep surfaces while taking up the space of one. The polypropylene side tackles tough scrubbing and dishwasher heat. Meanwhile, the bamboo brings natural style and eco-friendly appeal.
Dual-material boards are smart for minimalist kitchens. Keep your Index board on the counter or in a drawer to always have the right surface on hand when needed.
Non-Slip Feet for Safety
Quality boards should stay firmly grounded during use, and Joseph Joseph boards have non-slip feet for stability. Your board won’t go sliding around the counter with knife in hand.
The non-slip grip maintains traction on countertops so you can focus on prep work. Rubberized feet also prevent scratching existing counters. Friction keeps the board in place without damaging surfaces underneath.
With Joseph Joseph’s innovative designs, you don’t have to sacrifice safety for functionality. Non-slip feet provide peace of mind that your board will stay securely put during meal prep.
Dishwasher Safe for Convenience
Simplify clean up by choosing Joseph Joseph boards labeled “dishwasher safe” like their durable plastic and polypropylene options. These boards can handle high heat washing and soapy dishwasher cycles.
After prepping is complete, just pop the boards in the dishwasher and let the machine tackle the scrubbing. Then they’re clean and prepped for the next mealtime. Joseph Joseph boards are designed to withstand frequent machine dishwashing.
Even the Index Chopping Board Set retains its bright colors after repeated washings. The hues are molded into the durable board material, so they won’t fade in the dishwasher.
Stylish Designs Coordinate Decor
Beyond their outstanding functionality, Joseph Joseph boards make a stylish kitchen design statement. Their innovative shapes, tabs, and color options effortlessly tie together contemporary decor.
Display your Joseph Joseph Index or Folio sets on the countertop or kitchen island. Guests will be intrigued by the angled chopping surfaces and clever foldable design. Quality materials ensure the boards look great for years.
Choose coordinating hues like the gray Index boards to complement your existing decor. Or make a bold statement with the vibrant red Folding Chopping Board. Joseph Joseph boards elevate both meal prep and style.
Folio Folds for Compact Storage
If your kitchen is limited on storage space, Joseph Joseph’s Folio Chopping Board folds in half for slim storage in drawers or cabinets. When unfolded, it provides a full-sized, generous prep surface for all your chopping needs.
The minimalist, portable design is perfect for small kitchens, RVs, or college dorms. No need to worry about a large, bulky board monopolizing your precious cabinet real estate – simply tuck the Folio board out of sight when not in use.
For entertainers, keep a folding Joseph Joseph board on hand when prepping appetizers or meals for get-togethers. Once guests arrive, discreetly store it away out of sight. Your entertainment prep secret weapon!
Chop&Slide Saves Counter Space
Joseph Joseph’s innovative Chop&Slide Board features an integrated sliding tray that neatly contains chopped ingredients. No more sweeping veggie scraps into your hand to transfer from cutting board to cooking pan!
The ample chopping surface provides deep prep space. Once pulled out, the tray lets diced onions, garlic, herbs slide seamlessly into your waiting pot or pan. You save time not having to transfer ingredients back and forth across the kitchen.
The sliding tray also preserves precious counter real estate. Unlike other boards requiring a separate landing zone, the Chop&Slide keeps everything in one space-saving, self-contained unit.
Mix Materials for Functionality
For the best of both worlds, choose a combo board like Joseph Joseph’s Index Polypropylene Chopping Board. The bamboo side gently preps ingredients while the BPA-free plastic side handles meat cutting.
This versatile 2-in-1 board provides different prep surfaces while taking up one board’s space. The polypropylene side tackles tough scrubbing and dishwasher heat. Meanwhile, the bamboo brings natural style and eco-friendly appeal.
Dual-material boards are smart for minimalist kitchens. Keep your Index board on the counter or in a drawer to always have the right surface on hand when you need it.
Non-Slip Feet for Safety
Quality boards should stay firmly grounded during use, and Joseph Joseph boards have non-slip feet for stability. Your board won’t go sliding around the counter with knife in hand.
The non-slip grip maintains traction on countertops so you can focus on prep work. Rubberized feet also prevent scratching existing counters. Friction keeps the board in place without damaging surfaces underneath.
With Joseph Joseph’s innovative designs, you don’t have to sacrifice safety for functionality. Non-slip feet provide peace of mind that your board will stay securely put during meal prep.
Dishwasher Safe for Convenience
Simplify clean up by choosing Joseph Joseph boards labeled “dishwasher safe” like their durable plastic and polypropylene options. These boards can handle high heat washing and soapy dishwasher cycles.
After prepping is complete, just pop the boards in the dishwasher and let the machine tackle the scrubbing. Then they’re clean and prepped for the next mealtime. Joseph Joseph boards are designed to withstand frequent machine dishwashing.
Even the Index Chopping Board Set retains its bright colors after repeated washings. The hues are molded into the durable board material, so they won’t fade in the dishwasher.
Stylish Designs Coordinate Decor
Beyond their outstanding functionality, Joseph Joseph boards make a stylish kitchen design statement. Their innovative shapes, tabs, and color options effortlessly tie together contemporary decor.
Display your Joseph Joseph Index or Folio sets on the countertop or kitchen island. Guests will be intrigued by the angled chopping surfaces and clever foldable design. Quality materials ensure the boards look great for years.
Choose coordinating hues like the gray Index boards to complement your existing decor. Or make a bold statement with the vibrant red Folding Chopping Board. Joseph Joseph boards elevate both meal prep and style.
Chop&Slide Saves Counter Space
Joseph Joseph’s innovative Chop&Slide Board features an integrated sliding tray that keeps chopped ingredients neatly contained. No more sweeping veggie scraps into your hand to transfer from cutting board to cooking pan!
The ample chopping board surface provides deep prep space. Once pulled out, the tray lets diced onions, garlic, herbs slide seamlessly right into your waiting pot or pan. You save time not having to transfer ingredients back and forth across the kitchen.
The sliding tray also preserves precious counter real estate. Unlike other boards requiring a separate landing zone, the Chop&Slide keeps everything in one space-saving, self-contained unit.
Mix Materials for Functionality
For the best of both worlds, opt for a combination board like Joseph Joseph’s Index Polypropylene Chopping Board. The bamboo side gently preps ingredients while the BPA-free plastic side handles meat cutting.
This versatile 2-in-1 board provides different prep surfaces while taking up the space of one. The polypropylene side tackles tough scrubbing and dishwasher heat. Meanwhile, the bamboo brings natural style and eco-friendly appeal.
Dual-material boards are smart for minimalist kitchens. Keep your Index board on the counter or in a drawer to always have the right surface on hand when needed.
Non-Slip Feet for Safety
Quality boards should stay firmly in place during use, and Joseph Joseph boards have non-slip feet for stability. Your board won’t go sliding around dangerously with knife in hand.
The non-slip grip maintains traction on counters so you can focus on prep work. Rubberized feet also prevent scratching existing counters. Friction keeps the board grounded without damaging surfaces underneath.
With Joseph Joseph’s innovative designs, you don’t sacrifice safety for functionality. Non-slip feet give peace of mind your board will stay put during meal prep.
Chop&Slide Saves Counter Space

Joseph Joseph’s innovative Chop&Slide Board features an integrated sliding tray that keeps chopped ingredients neatly contained. No more sweeping veggie scraps into your hand to transfer from cutting board to cooking pan!
The ample chopping board surface provides deep prep space. Once pulled out, the tray lets diced onions, garlic, herbs slide seamlessly right into your waiting pot or pan. You save time not having to transfer ingredients back and forth across the kitchen.
The sliding tray also preserves precious counter real estate. Unlike other boards requiring a separate landing zone, the Chop&Slide keeps everything in one space-saving, self-contained unit.
Mix Materials for Functionality
For the best of both worlds, opt for a combination board like Joseph Joseph’s Index Polypropylene Chopping Board. The bamboo side gently preps ingredients while the BPA-free plastic side handles meat cutting.
This versatile 2-in-1 board provides different prep surfaces while taking up the space of one. The polypropylene side tackles tough scrubbing and dishwasher heat. Meanwhile, the bamboo brings natural style and eco-friendly appeal.
Dual-material boards are smart for minimalist kitchens. Keep your Index board on the counter or in a drawer to always have the right surface on hand when needed.
Non-Slip Feet for Safety
Quality boards should stay firmly in place during use, and Joseph Joseph boards have non-slip feet for stability. Your board won’t go sliding around dangerously with knife in hand.
The non-slip grip maintains traction on counters so you can focus on prep work. Rubberized feet also prevent scratching existing counters. Friction keeps the board grounded without damaging surfaces underneath.
With Joseph Joseph’s innovative designs, you don’t sacrifice safety for functionality. Non-slip feet give peace of mind your board will stay put during meal prep.
Mix Materials for Functionality
For the best of both worlds, choose a combination board like Joseph Joseph’s Index Polypropylene Chopping Board. The bamboo side gently preps ingredients while the BPA-free plastic side handles meat cutting.
This versatile 2-in-1 board provides different prep surfaces while taking up one board’s space. The polypropylene side tackles tough scrubbing and dishwasher heat. Meanwhile, the bamboo brings natural style and eco-friendly appeal.
Dual-material boards are smart for minimalist kitchens. Keep your Index board on the counter or in a drawer to always have the right surface on hand when you need it.
Non-Slip Feet for Safety
:max_bytes(150000):strip_icc()/foldingcuttingboard-552b31641e3a4fba8850f4fccf678ec9.jpg)
Quality boards should stay firmly planted during use, and Joseph Joseph boards feature non-slip feet for stability. Your board won’t go slipping and sliding around the counter with you wielding a sharp knife.
Non-slip feet maintain grip on countertops so you can focus on prepping. Rubberized grips also prevent the board from scratching your existing counters. Friction keeps the board in place without damaging surfaces underneath.
With Joseph Joseph’s innovative designs, you don’t have to sacrifice safety for functionality. Non-slip feet provide peace of mind that your board will stay grounded during meal prep.
Dishwasher Safe for Convenience
Make clean up a breeze by choosing Joseph Joseph boards labeled “dishwasher safe” like their plastic and polypropylene options. These durable boards can handle high heat washing and soapy dishwasher cycles.
After prepping, simply pop your boards in the dishwasher and let the machine do the scrubbing. Then they’re clean and prepped for the next meal. Joseph Joseph boards are designed to withstand frequent machine washing.
Even the Index Chopping Board Set retains its bright colors wash after wash. The colors are molded into the durable board material so they won’t fade in the dishwasher.
Non-Slip Feet for Safety
Quality chopping boards need to stay firmly planted during use to prevent accidents. Joseph Joseph cutting boards feature non-slip feet on the bottom to keep the board grounded as you chop and slice. No more chasing a slipping, sliding board around the counter!
The rubberized non-slip feet maintain grip on countertops. This keeps you safe and focused on your cooking.
The feet also prevent the board from scratching your counters. Friction keeps the board in place without damaging your existing kitchen surfaces.
Mix Materials for Functionality
For the best of both worlds, choose a combination board like Joseph Joseph’s Index Polypropylene Chopping Board. The bamboo side gently preps ingredients while the BPA-free plastic side handles meat cutting.
This versatile 2-in-1 board provides different prep surfaces while taking up one board’s space. The polypropylene side tackles tough scrubbing and dishwasher heat. Meanwhile, the bamboo brings natural style and eco-friendly appeal.
Dual-material boards are smart for minimalist kitchens. Keep your Index board on the counter or in a drawer to always have the right surface on hand when you need it.
Non-Slip Feet for Safety
Quality boards should stay firmly planted during use, and Joseph Joseph boards feature non-slip feet for stability. Your board won’t go slipping and sliding around the counter with you wielding a sharp knife.
Non-slip feet maintain grip on countertops so you can focus on prepping. Rubberized grips also prevent the board from scratching your existing counters. Friction keeps the board in place without damaging surfaces underneath.
With Joseph Joseph’s innovative designs, you don’t have to sacrifice safety for functionality. Non-slip feet provide peace of mind that your board will stay grounded during meal prep.
Dishwasher Safe for Convenience
Make clean up a breeze by choosing Joseph Joseph boards labeled “dishwasher safe” like their plastic and polypropylene options. These durable boards can handle high heat washing and soapy dishwasher cycles.
After prepping, simply pop your boards in the dishwasher and let the machine do the scrubbing. Then they’re clean and prepped for the next meal. Joseph Joseph boards are designed to withstand frequent machine washing.
Even the Index Chopping Board Set retains its bright colors wash after wash. The colors are molded into the durable board material so they won’t fade in the dishwasher.
Non-Slip Feet for Safety
Quality chopping boards need to stay firmly planted during use to prevent accidents. Joseph Joseph cutting boards feature non-slip feet on the bottom to keep the board grounded as you chop and slice. No more chasing a slipping, sliding board around the counter!
The rubberized non-slip feet maintain grip on countertops. This keeps you safe and focused on your cooking.
The feet also prevent the board from scratching your counters. Friction keeps the board in place without damaging your existing kitchen surfaces.
Dishwasher Safe for Convenience
Simplify clean up by choosing Joseph Joseph boards labeled “dishwasher safe” like their durable plastic and polypropylene options. These boards can handle high heat washing and soapy dishwasher cycles.
After prepping, simply pop your boards in the dishwasher and let the machine do the scrubbing. Then they’re clean and prepped for the next meal. Joseph Joseph boards are designed to withstand frequent machine washing.
Even the Index Chopping Board Set retains its bright colors wash after wash. The colors are molded into the durable board material so they won’t fade in the dishwasher.
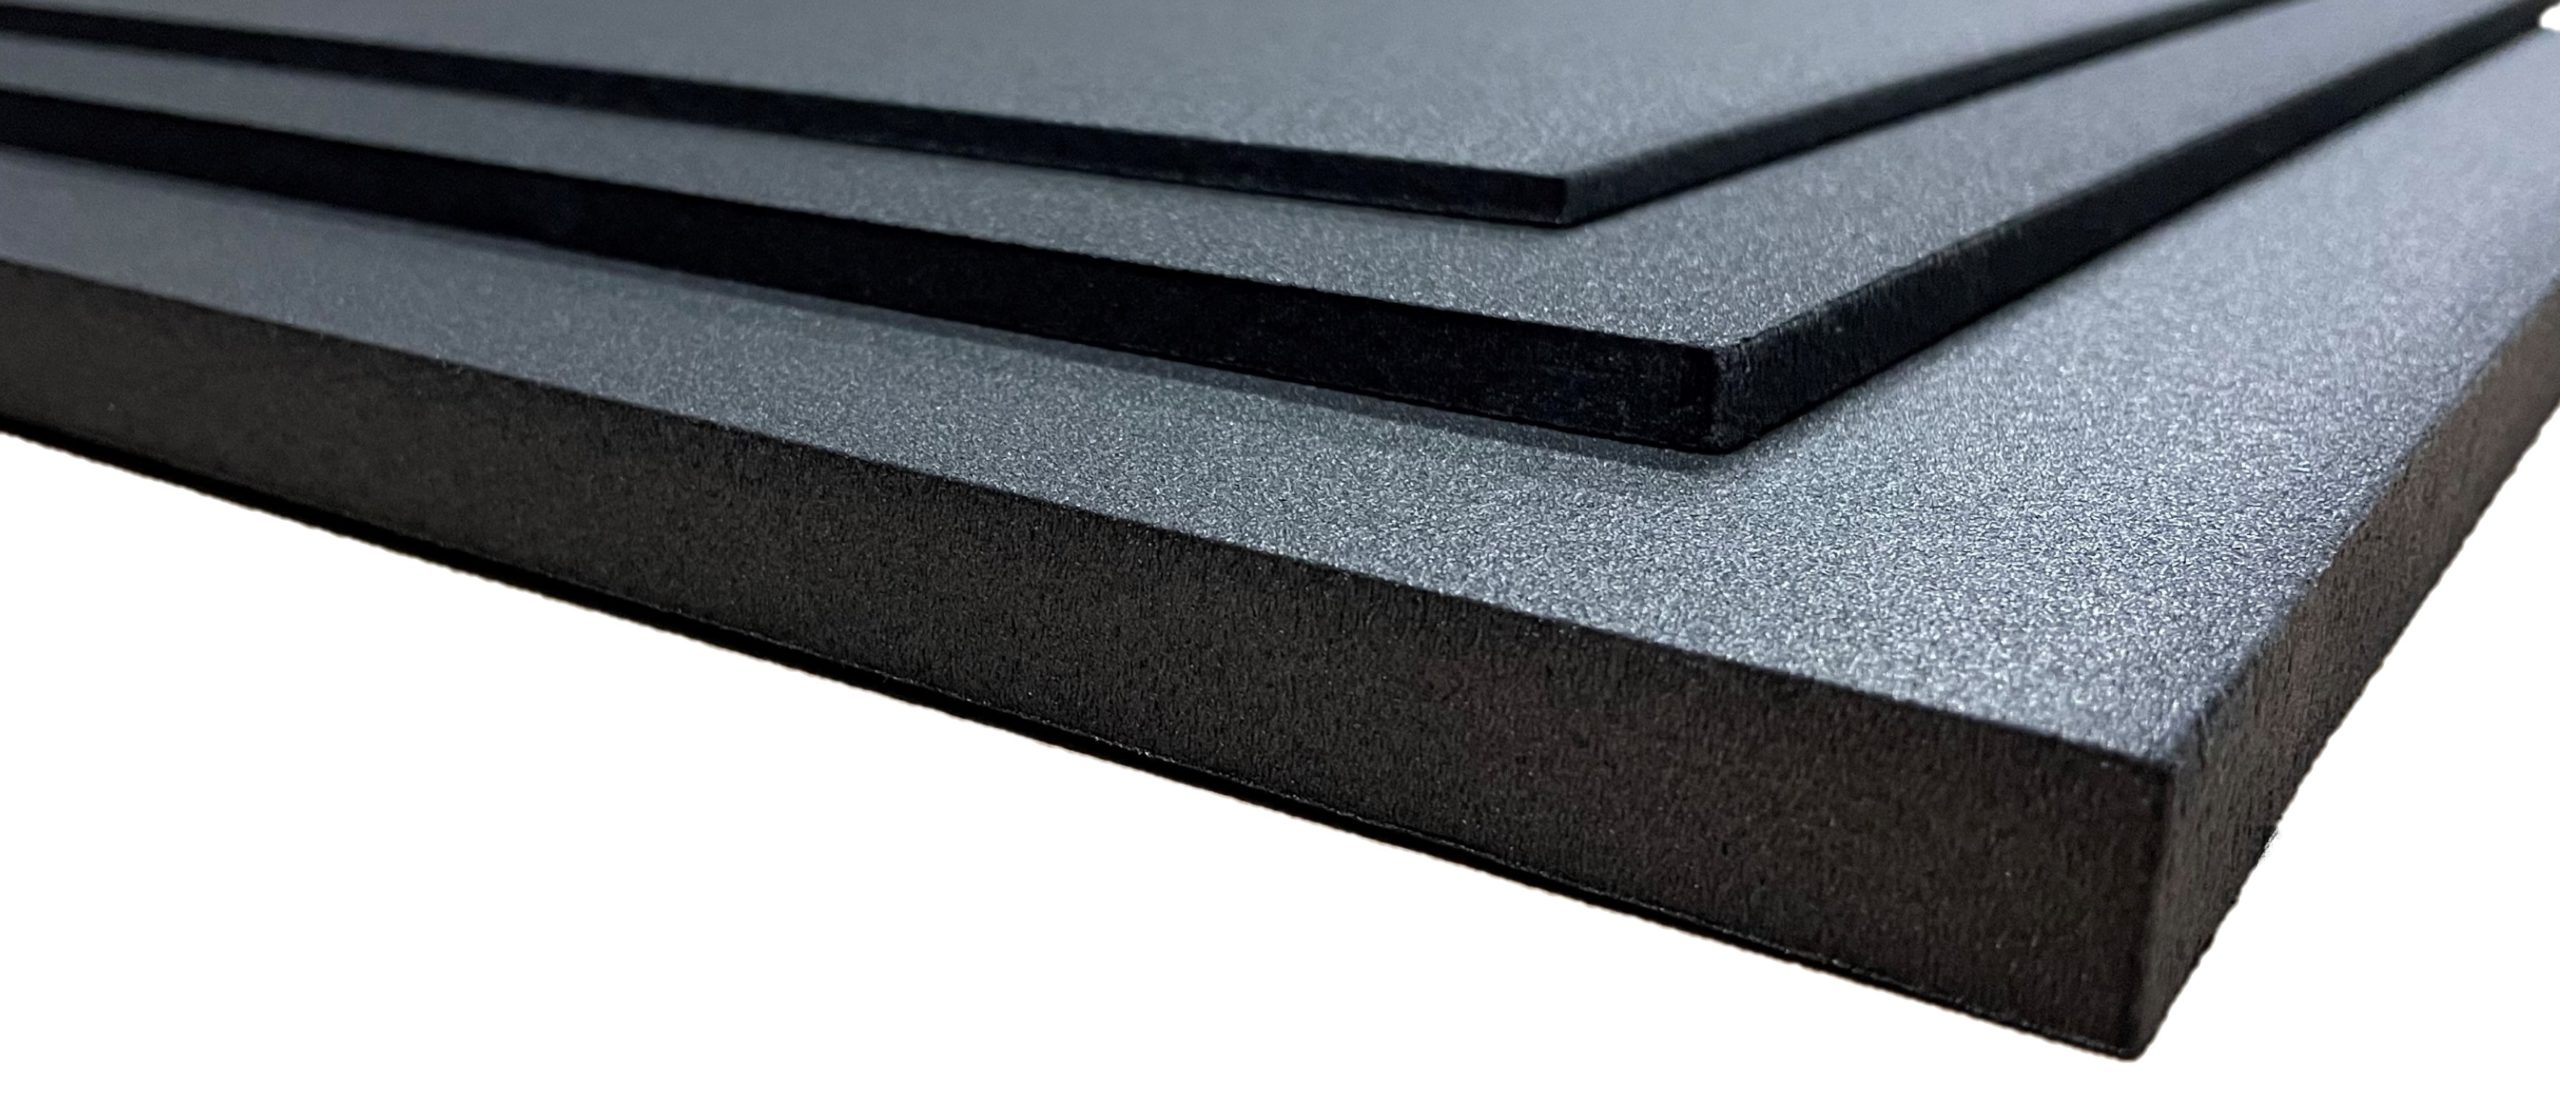
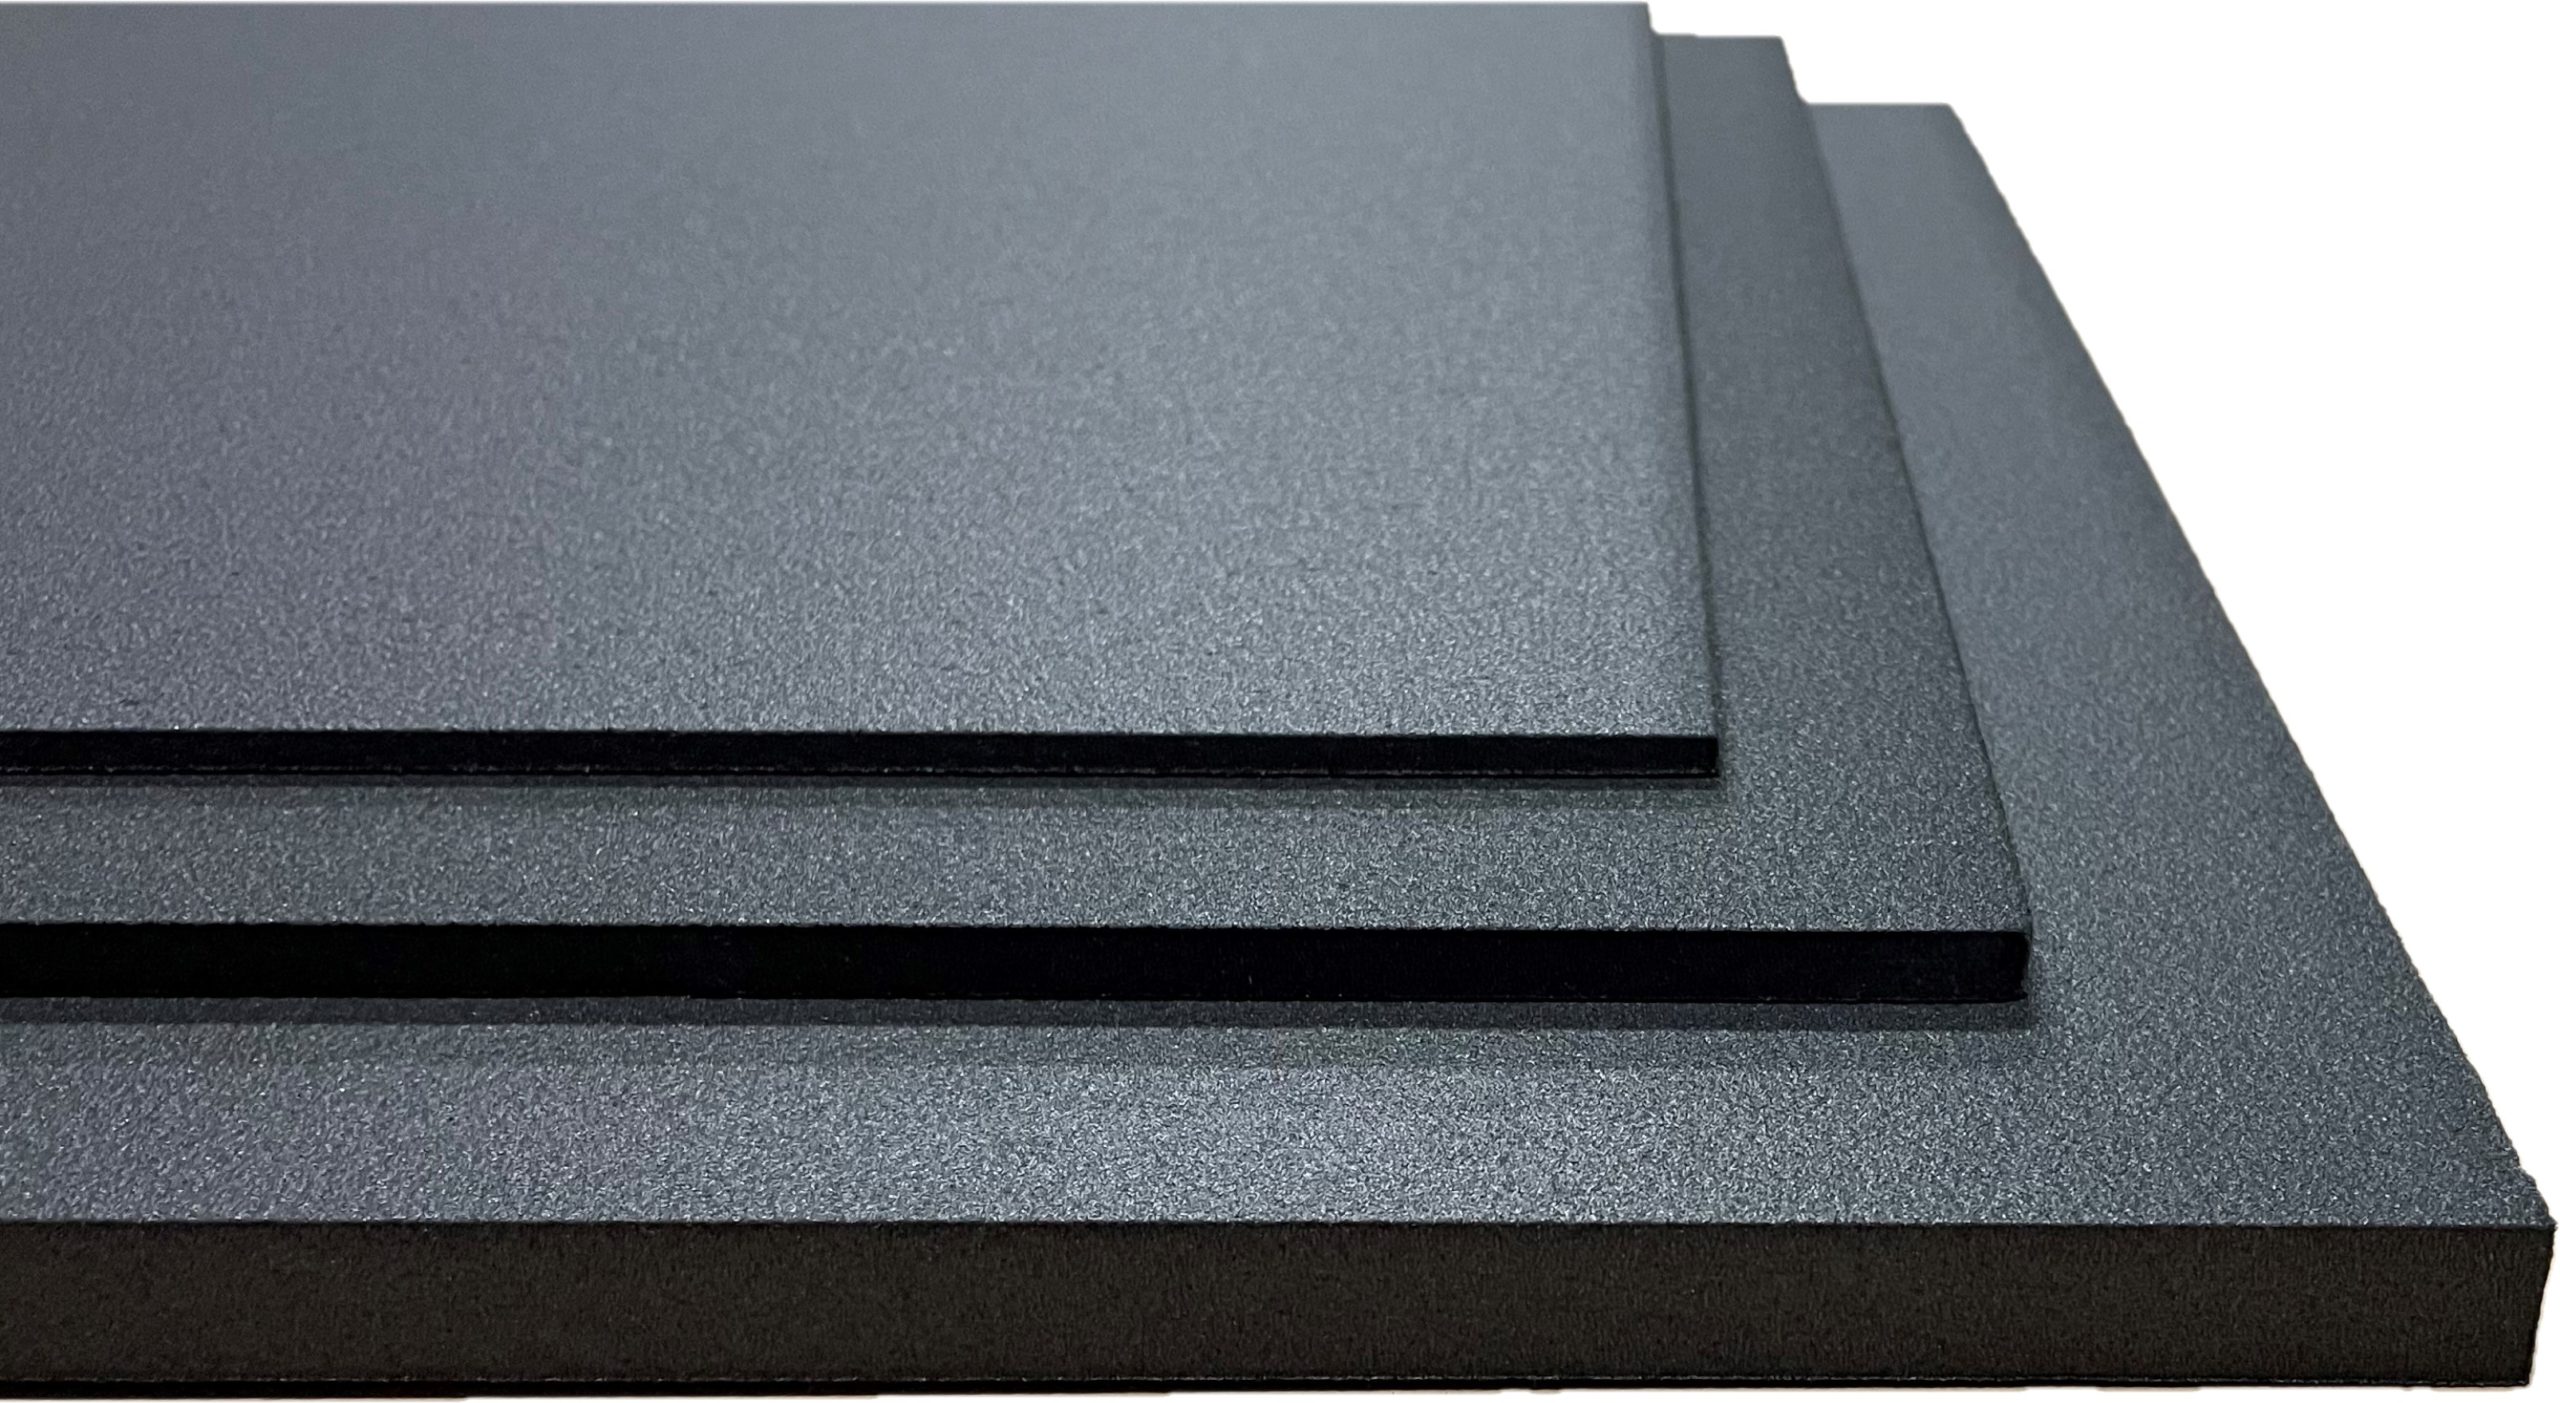
Stylish Designs Coordinate Decor
In addition to their outstanding functionality, Joseph Joseph boards make a stylish design statement. Their innovative shapes, sleek tabs, and modern color choices tie together contemporary kitchen decor.
Display your Joseph Joseph Index or Folio board sets on your countertop or kitchen island. Guests will be intrigued by the angled chopping surfaces and clever foldable design. Quality construction ensures the boards look great for years.
Choose coordinating colors like the gray Index Chopping Boards to complement your existing decor. Or make a bold statement with the bright red Folding Chopping Board. Joseph Joseph boards elevate both your meal prep and decor.
Non-Slip Feet for Safety
Quality chopping boards need to stay firmly planted during use to prevent accidents. Joseph Joseph cutting boards feature non-slip feet on the bottom to keep the board grounded as you chop and slice. No more chasing a slipping, sliding board around the counter!
The rubberized non-slip feet maintain grip on countertops. This keeps you safe and focused on your cooking.
The feet also prevent the board from scratching your counters. Friction keeps the board in place without damaging your existing kitchen surfaces.
Dishwasher Safe for Convenience
Simplify clean up by choosing Joseph Joseph boards labeled “dishwasher safe” like their durable plastic and polypropylene options. These boards can handle high heat washing and soapy dishwasher cycles.
After prepping, simply pop your boards in the dishwasher and let the machine do the scrubbing. Then they’re clean and prepped for the next meal. Joseph Joseph boards are designed to withstand frequent machine washing.
Even the Index Chopping Board Set retains its bright colors wash after wash. The colors are molded into the durable board material so they won’t fade in the dishwasher.
Stylish Designs Coordinate Decor
In addition to their outstanding functionality, Joseph Joseph boards make a stylish design statement. Their innovative shapes, sleek tabs, and modern color choices tie together contemporary kitchen decor.
Display your Joseph Joseph Index or Folio board sets on your countertop or kitchen island. Guests will be intrigued by the angled chopping surfaces and clever foldable design. Quality construction ensures the boards look great for years.
Choose coordinating colors like the gray Index Chopping Boards to complement your existing decor. Or make a bold statement with the bright red Folding Chopping Board. Joseph Joseph boards elevate both your meal prep and decor.
Dishwasher Safe for Convenience

Simplify clean up by choosing Joseph Joseph boards labeled “dishwasher safe” like their durable plastic and polypropylene options. These boards can handle high heat washing and soapy dishwasher cycles.
After prepping, simply pop your boards in the dishwasher and let the machine do the scrubbing. Then they’re clean and prepped for the next meal. Joseph Joseph boards are designed to withstand frequent machine washing.
Even the Index Chopping Board Set retains its bright colors wash after wash. The colors are molded into the durable board material so they won’t fade in the dishwasher.
Stylish Designs Coordinate Decor
In addition to their outstanding functionality, Joseph Joseph boards make a stylish design statement. Their innovative shapes, sleek tabs, and modern color choices tie together contemporary kitchen decor.
Display your Joseph Joseph Index or Folio board sets on your countertop or kitchen island. Guests will be intrigued by the angled chopping surfaces and clever foldable design. Quality construction ensures the boards look great for years.
Choose coordinating colors like the gray Index Chopping Boards to complement your existing decor. Or make a bold statement with the bright red Folding Chopping Board. Joseph Joseph boards elevate both your meal prep and decor.
Consider Your Needs

When selecting Joseph Joseph chopping boards, consider your kitchen’s needs. Do you regularly meal prep large quantities and need maximum board space? Are you tight on cabinet storage and need a space-saving foldable design? Keep your prep style, storage, and decor in mind.
Dishwasher Safe for Convenience
Simplify clean up by choosing Joseph Joseph boards labeled “dishwasher safe” like their durable plastic and polypropylene options. These boards can handle high heat washing and soapy dishwasher cycles.
After prepping, simply pop your boards in the dishwasher and let the machine do the scrubbing. Then they’re clean and prepped for the next meal. Joseph Joseph boards are designed to withstand frequent machine washing.
Even the Index Chopping Board Set retains its bright colors wash after wash. The colors are molded into the durable board material so they won’t fade in the dishwasher.
Stylish Designs Coordinate Decor
In addition to their outstanding functionality, Joseph Joseph boards make a stylish design statement. Their innovative shapes, sleek tabs, and modern color choices tie together contemporary kitchen decor.
Display your Joseph Joseph Index or Folio board sets on your countertop or kitchen island. Guests will be intrigued by the angled chopping surfaces and clever foldable design. Quality construction ensures the boards look great for years.
Choose coordinating colors like the gray Index Chopping Boards to complement your existing decor. Or make a bold statement with the bright red Folding Chopping Board. Joseph Joseph boards elevate both your meal prep and decor.
Consider Your Needs
When selecting Joseph Joseph chopping boards, consider your kitchen’s needs. Do you regularly meal prep large quantities and need maximum board space? Are you tight on cabinet storage and need a space-saving foldable design? Keep your prep style, storage, and decor in mind.
Read Online Reviews
Checking online product reviews can provide valuable insight into Joseph Joseph boards. Look for pros and cons from real customers using the boards daily. This helps ensure you select the right board for your unique needs.
Compare Prices
Be sure to compare prices across retailers when shopping for Joseph Joseph boards. Sales and promotions can help you snag a great deal. Setting price drop alerts can also notify you if the board you want goes on sale.


.jpg?1689674430864)