Stainless Steel Build for Durability
When investing in a wheatgrass juicer, opting for one with a stainless steel build is key for durability. Stainless steel is rust and corrosion resistant, meaning it can withstand exposure to wheatgrass juice over time without degrading. Models made completely of stainless steel parts will have a much longer lifespan than plastic options.
Look for stainless steel in vital juicing components like the auger, grinding teeth, juice bowl, and strainer basket. High quality stainless steel alloys resist stains, are non-porous, and won’t absorb odors or tastes either. This keeps your wheatgrass tasting fresh and pure.
Stainless steel is also incredibly easy to keep clean. A simple rinse or toss in the dishwasher is all it takes. No need for scrubbing plastic parts that can degrade over time. The strength of stainless steel allows it to be manufactured with very tight tolerances too, giving you professional quality juicing day after day.
Manual or Electric Operation for Convenience

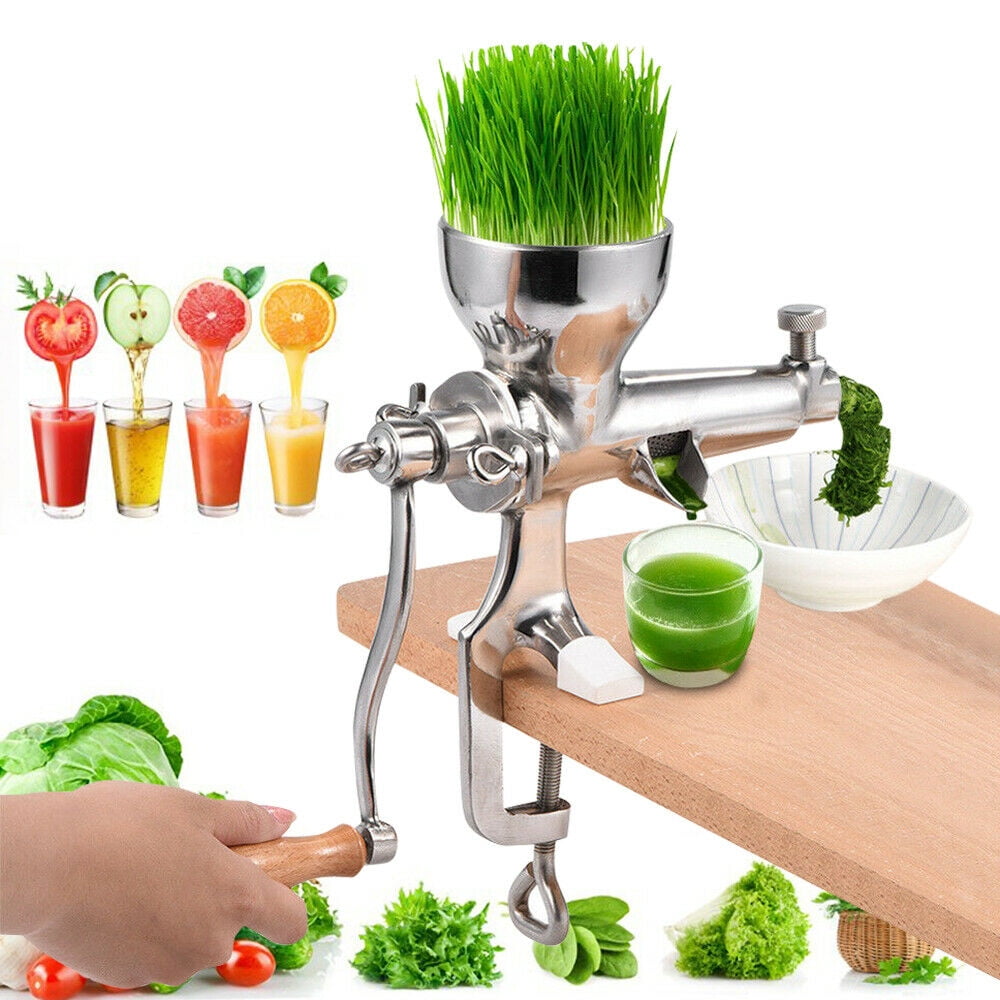
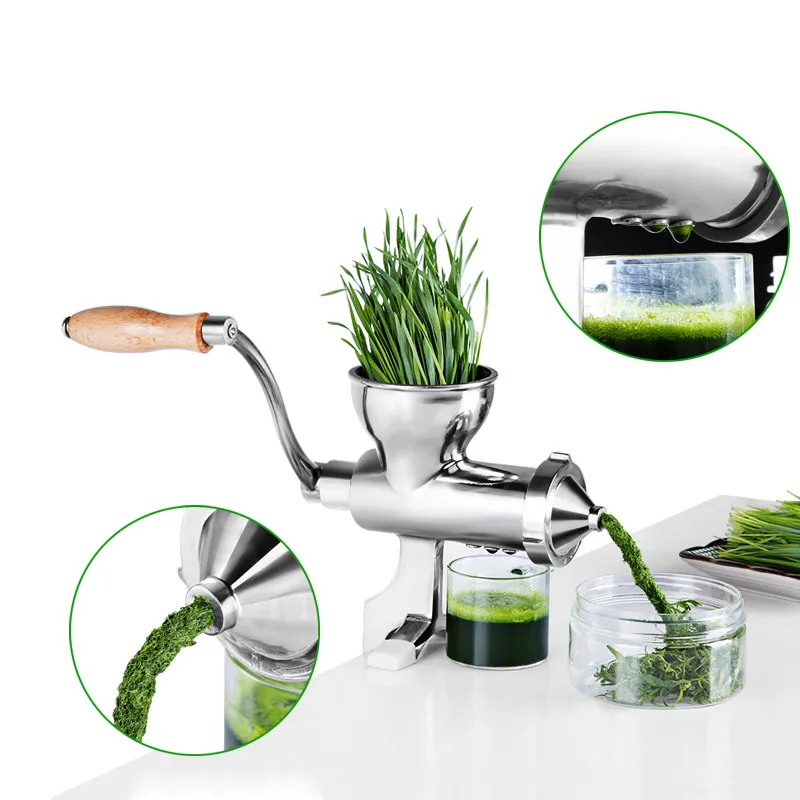
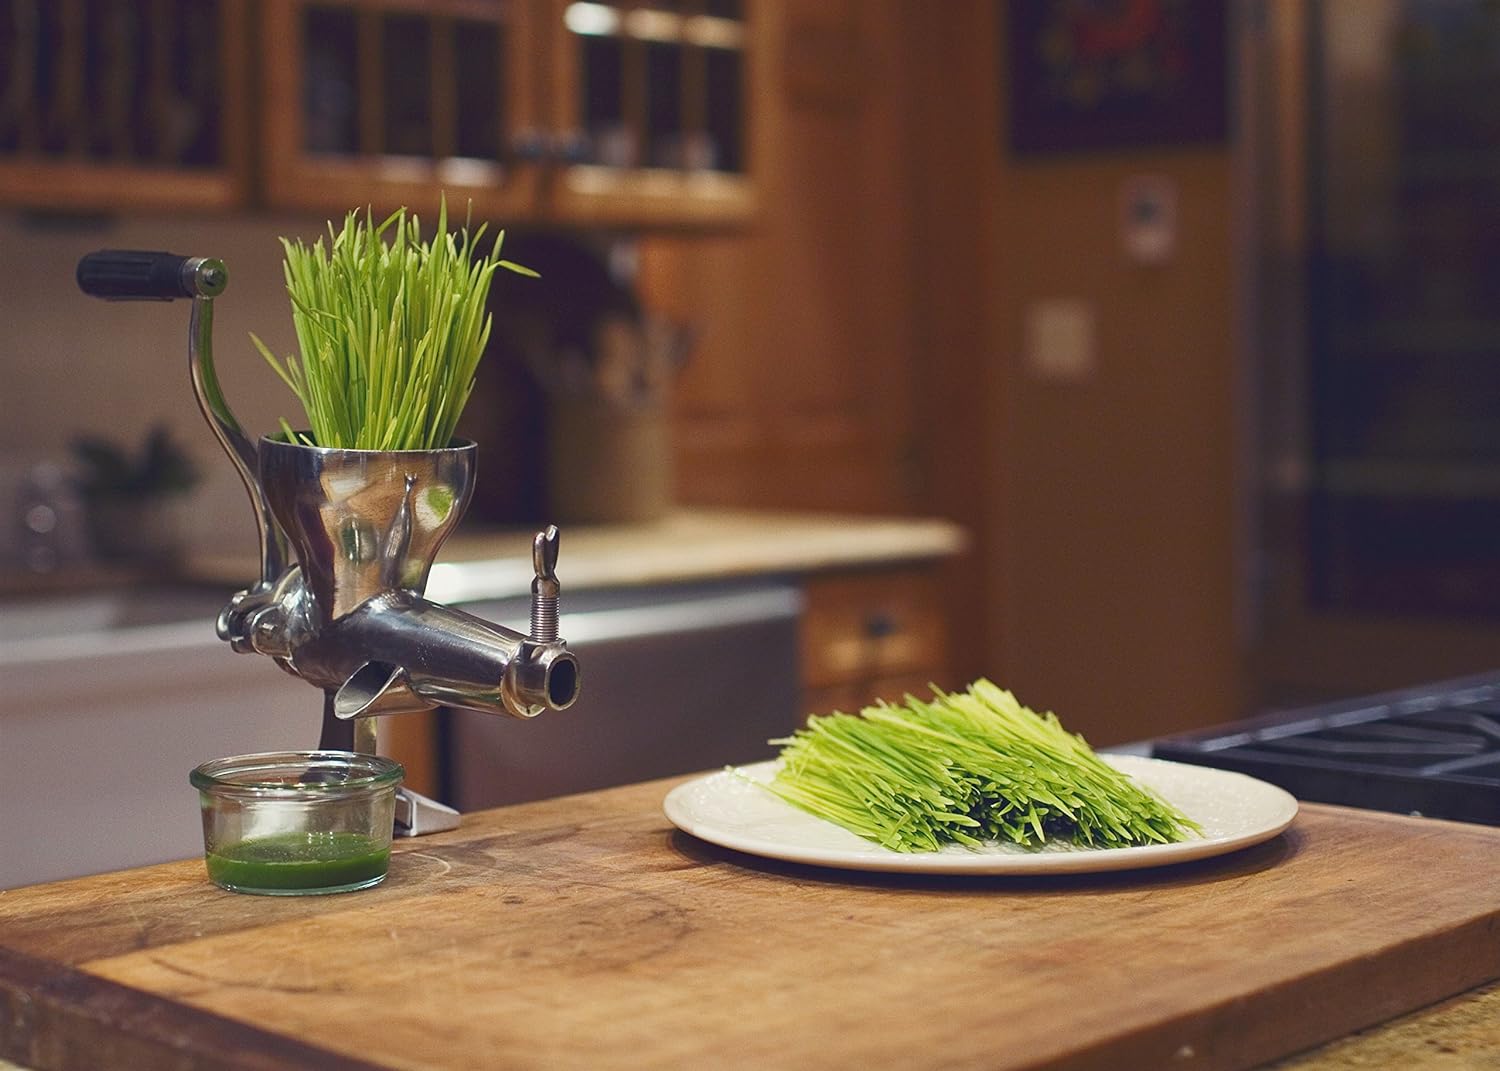
Wheatgrass juicers come in both manual and electric options depending on your needs. Manual juicers are operated entirely by hand, requiring some physical effort to crush and press the wheatgrass. Electric juicers automate this process with an internal motor.
Manual juicers excel at simplicity. Without any electrical components, they have fewer parts that can break. Their operation is straightforward and they’re extremely portable. You can easily take a compact manual juicer anywhere. The downside is needing to use elbow grease to operate it.
Electric juicers take over this manual labor for you. Simply load in the wheatgrass and flip a switch. Less effort is required on your end. The motorization often allows electric models to juice more quickly and efficiently too. But the electrical components do raise the price. Electric juicers also aren’t as portable.
Consider if you’ll primarily be juicing at home, where an electric model can help make the process easier, or traveling a lot, where a manual model may be ideal.
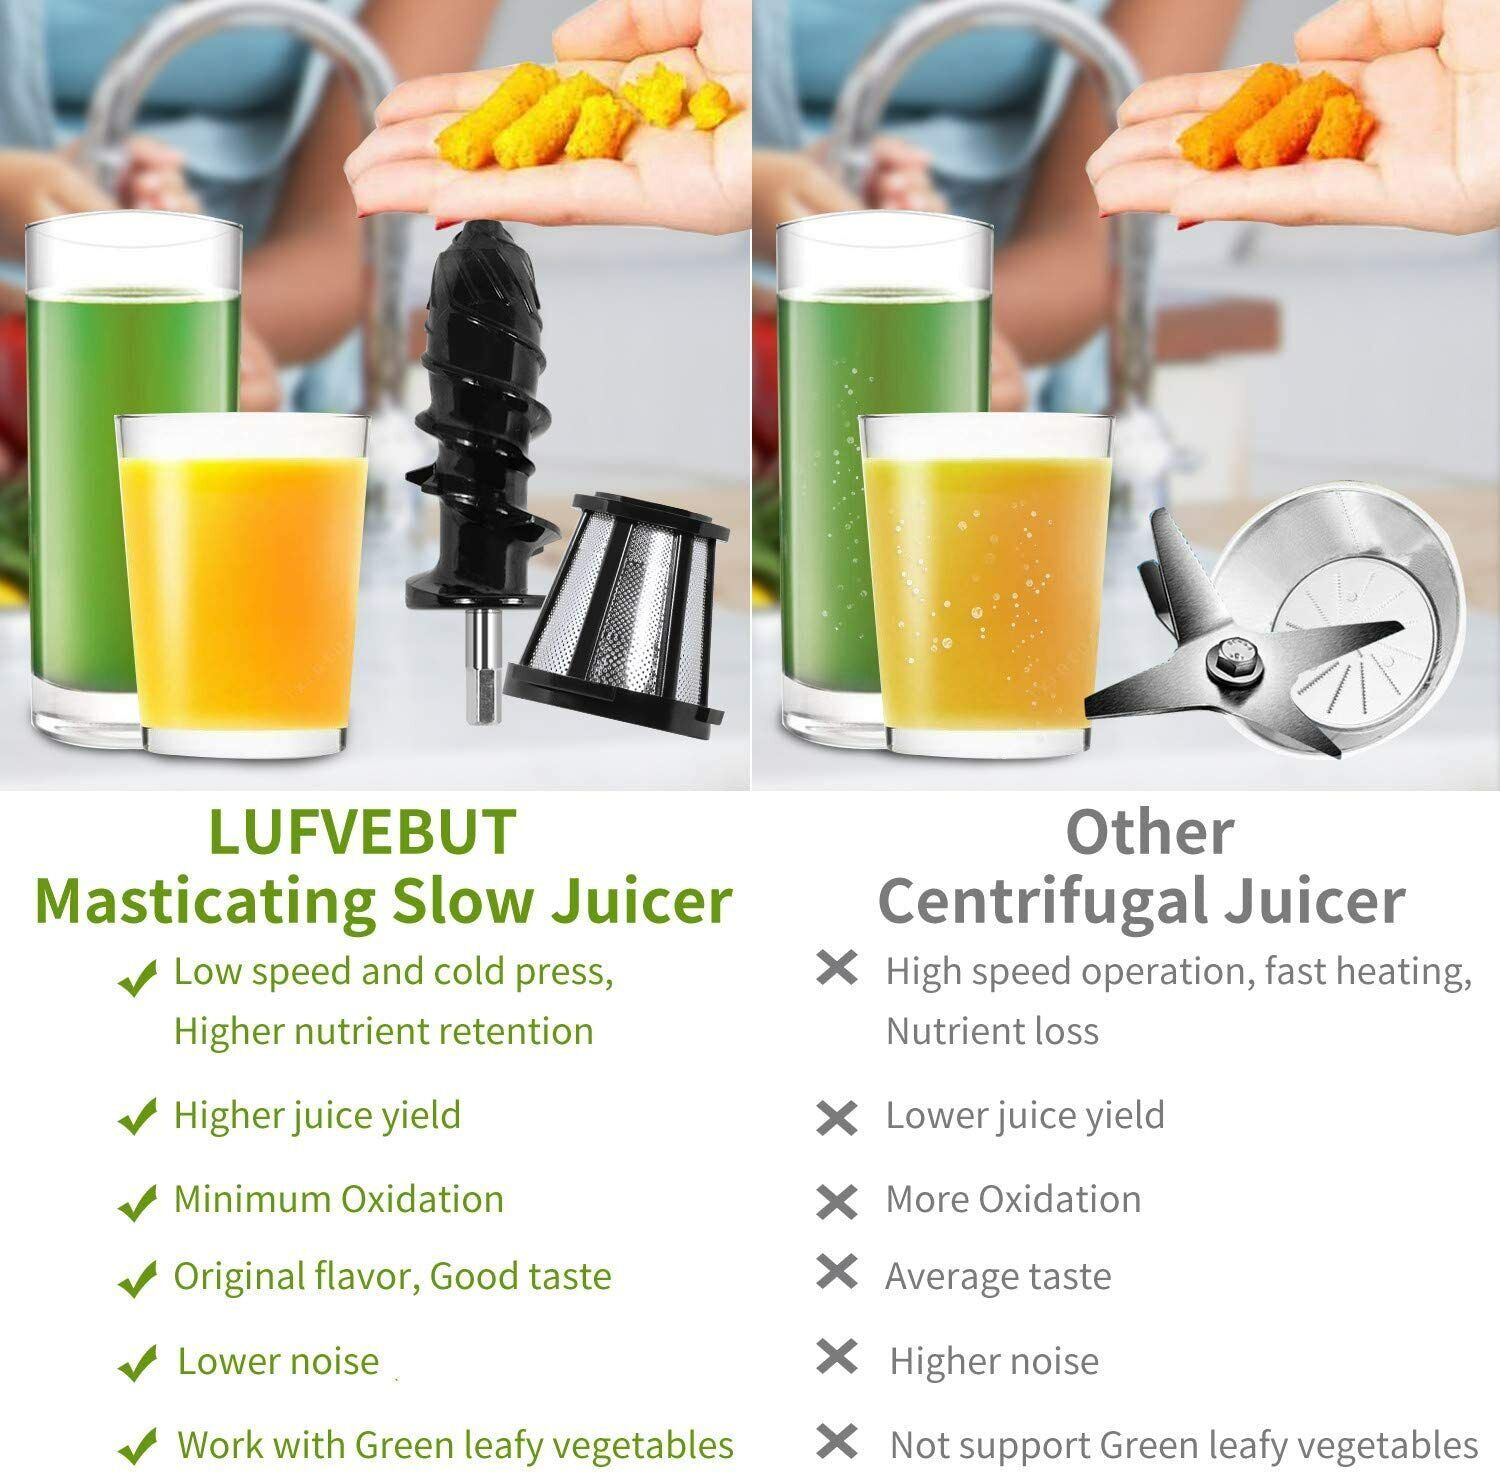
Masticating Design to Fully Extract Juice
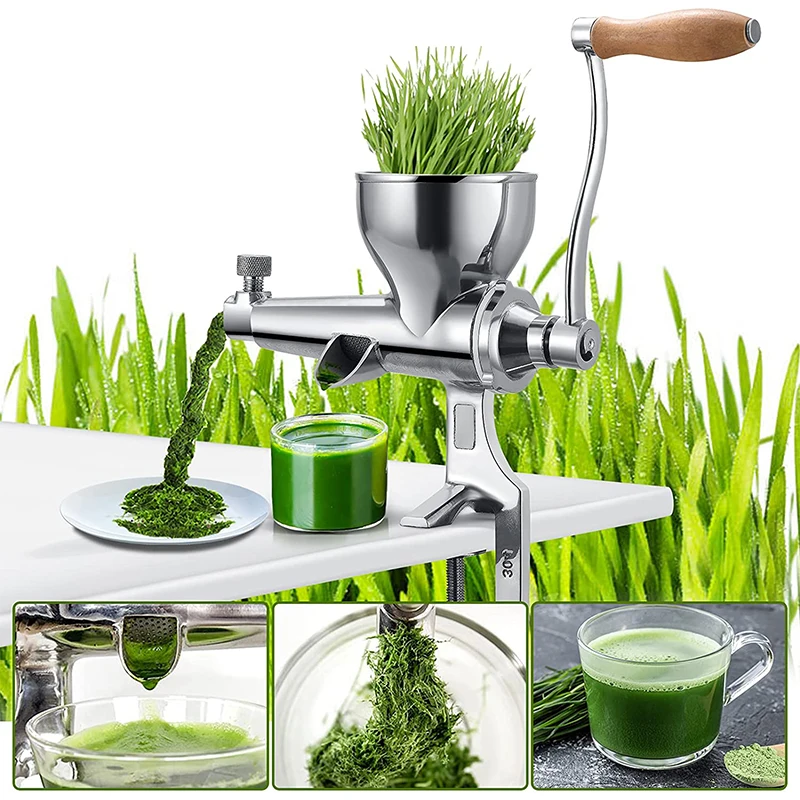
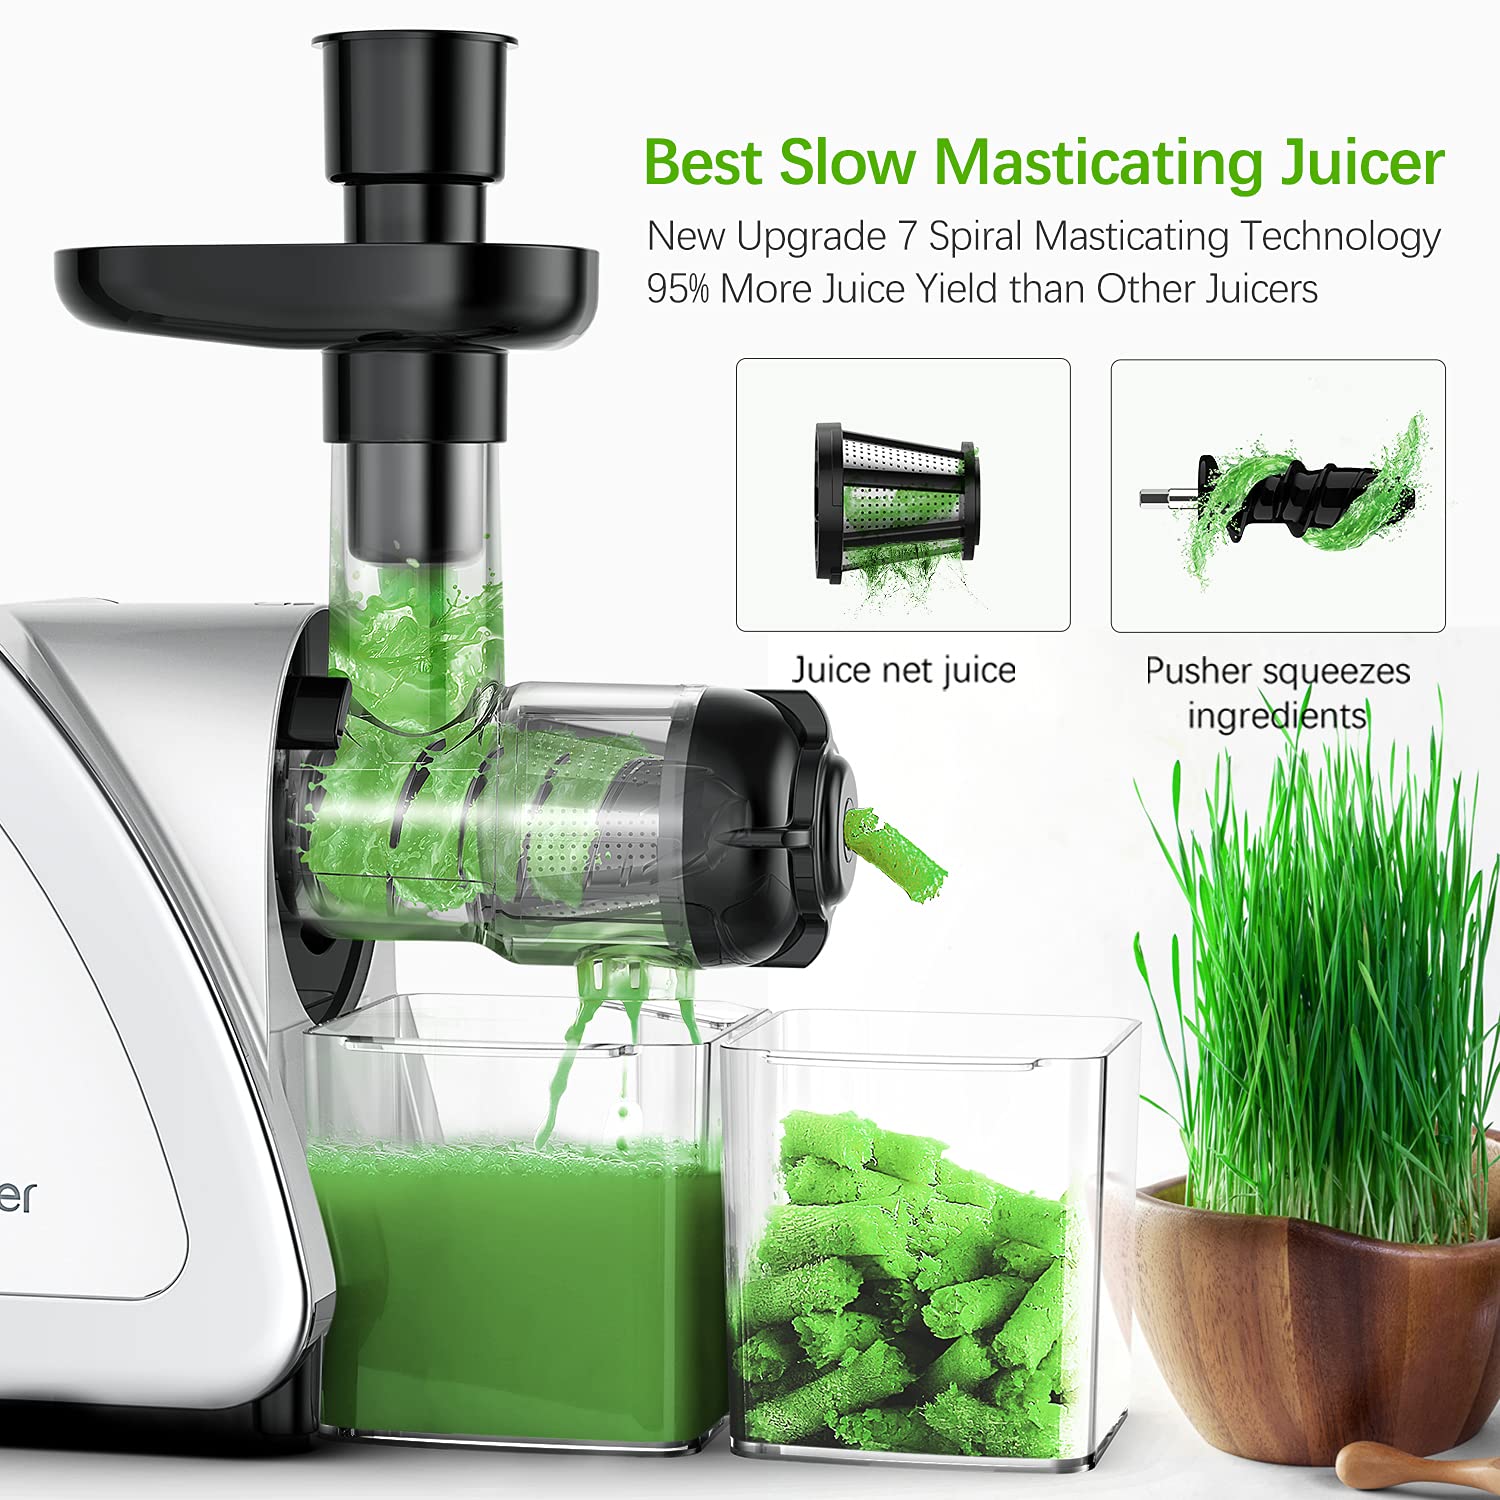
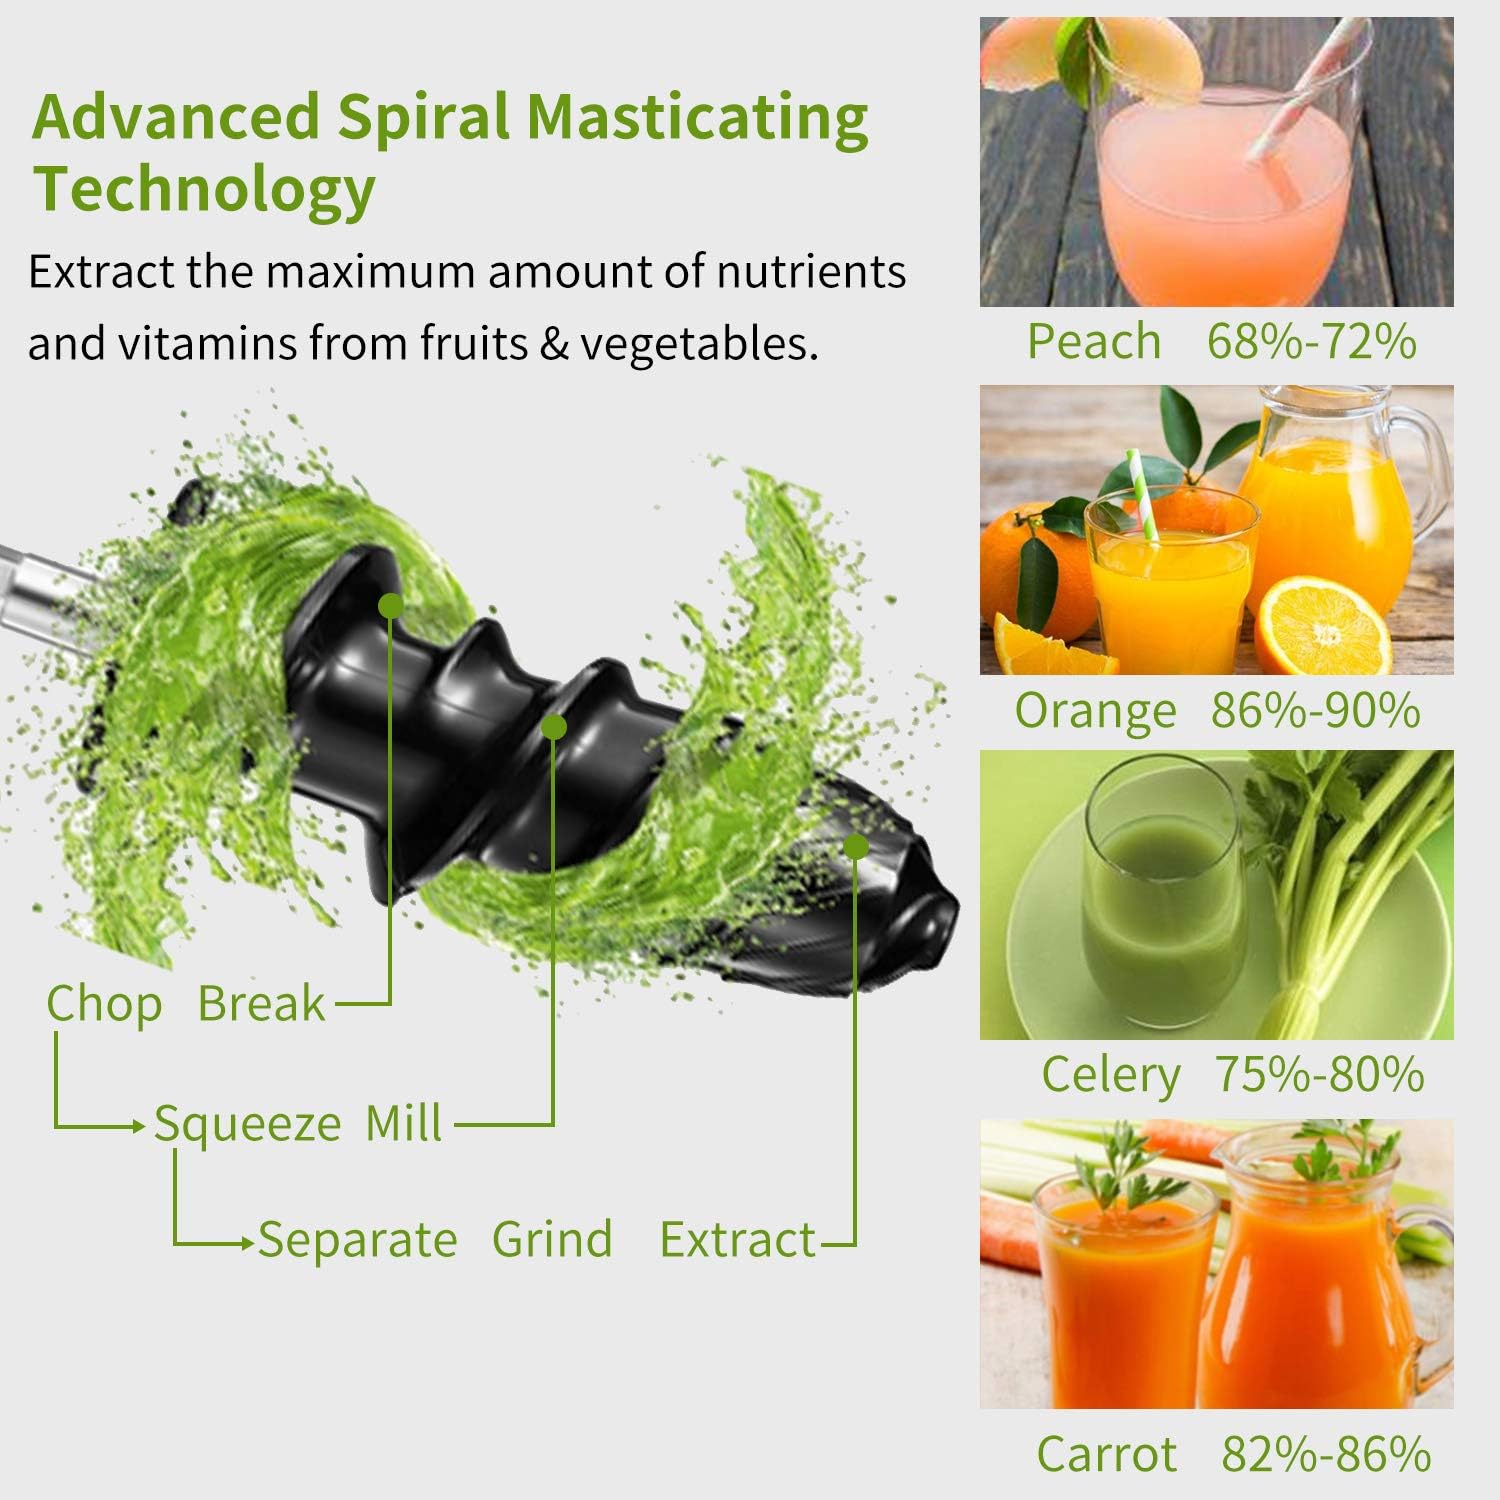
To get the highest yield and nutrition from wheatgrass, a masticating juicer is recommended. Masticating juicers slowly crush and press wheatgrass to “chew” out its liquid. This provides a very thorough extraction.
The auger in a masticating wheatgrass juicer churns produce against its chamber walls to separate pulp from juice. Juice gets squeezed out through small holes in the housing while dryer pulp remains inside until ejected. The slow speed protects delicate nutrients too.
In contrast, centrifugal juicers shred produce at very high speeds. This fast spinning generates heat and oxidation that can destroy some nutrients. The grating disk also isn’t as thorough at juicing greens like wheatgrass.
Masticating juicers excel at keeping juices cooler and providing higher yields. Over 80% of the liquid can be extracted from wheatgrass using this slower crushing method. Your juice will be truer to the source.
Easy to Clean with Dishwasher Safe Parts
Cleaning any appliance after each use can be a chore, particularly with the pulp that juicers produce. Look for wheatgrass juicers with dishwasher safe components to simplify cleanup.
Stainless steel parts mentioned previously are ideal for dishwasher cleaning. Durable plastics specifically designed for repeat dishwasher cycles also make cleanup a breeze. Opt for BPA-free plastics.
Also check that parts disassemble and reassemble intuitively. You shouldn’t have to wrestle with components to get them in and out of the dishwasher. Rubber components may need hand washing, so be sure they are designed for easy scrubbing access.
Few things are worse than needing to clean a cumbersome appliance multiple times a day. A dishwasher safe wheatgrass juicer saves you time and hassle.
Compact Size to Save Counter Space
Wheatgrass juicers come in a range of sizes, from more compact personal models to larger commercial machines. Consider the size of juicer that makes sense for your needs.
For home kitchen use, a personal sized wheatgrass juicer in the 5-10 inch width range is likely suitable. This allows conveniently juicing wheatgrass daily while still fitting easily on your counter. Models under 10 pounds are also lightweight enough to store between uses.
In a commercial setting like a juice bar, larger juicers in the 10+ inch width range are useful. Their bigger chambers and higher volume allow juicing larger quantities of wheatgrass more rapidly. But they do take up substantial counter real estate.
Measure your available space and think about your juicing frequency. Let this guide you in selecting a juicer size that fits both your needs and kitchen setup.
Large Chute for Whole Produce Juicing
In addition to wheatgrass, you may want to juice larger fruits, veggies, and leafy greens. Check if your potential wheatgrass juicer can handle these as well.
Models with wider feeding chutes of at least 1.5 inches can accommodate full produce. This allows juicing whole apples, beets, cucumbers, celery, and more without pre-chopping.
Narrower chutes found on many wheatgrass-specific machines require cutting everything into small pieces first. This takes more prep work.
Ideally get a wheatgrass juicer with both a small chute for compact greens like wheatgrass, and a larger chute for whole produce. This provides flexibility in what you can juice.
Reverse Function to Reduce Clogging
When juicing fibrous greens like wheatgrass, clogging can occasionally occur. Augers winding down jammed produce can burn out motors.
Look for wheatgrass juicers with a reverse function to help avoid this. Simply change the rotation direction to back augers out of jams. No need to open up the housing and dig out compacted pulp.
The reverse toggle also helps clean the juicing assembly after use. Run it empty for a bit to flush out remaining pulp. Models that only operate in one direction are more prone to clogging over time.
Don’t overlook this handy feature that saves you hassle and enhances juicer longevity.
High Juice Yield and Nutrient Retention
To maximize the nutritional benefits of wheatgrass, you want a juicer that extracts as much liquid as possible while retaining nutrients. Masticating juicers mentioned earlier excel at this.
Look for wheatgrass juicer models that boast at least 60-80% juice yields from produce. You don’t want pulpy, wet greens left over indicating poor extraction. Higher end masticating juicers even approach 90% yields.
Minimal heat buildup and oxidation from slow crushing also preserves more vitamins and enzymes. You want as much nutrition packed into your glass as possible. Why juice wheatgrass just to destroy its key antioxidants and chlorophyll?
Prioritize high juice yields and retention based on genuine testing. Don’t just take a manufacturer’s word on juicing efficiency.
Quiet Operation for Peaceful Juicing

Electric wheatgrass juicers vary quite a bit in noise levels. Models with powerful motors can be surprisingly loud, making early morning juicing sessions unpleasant.
See if noise ratings are provided in decibels for any electric juicers you’re considering. Under 60dB is ideal, equating to normal conversation volume. Louder machines in the 70dB+ range can disrupt your zen juicing time.
Also listen for descriptions like “quiet” or “silent” operation. Metal gears make less noise than loud plastic. And housed motors are quieter than exposed designs. Listen to the appliance in action if possible.
Peace and nutrition should go hand in hand when enjoying your fresh wheatgrass juice.
Durable Parts Built to Last for Heavy Use
Any appliance you use frequently, like a daily juicer, needs to stand the test of time. Inspect materials and manufacturing on potential wheatgrass juicers.
Thick, cold rolled stainless steel resists wear and tear over years of use. Tight machining tolerances prevent leaks as parts loosen. Durable plastics hold up to repeated dishwasher cycles without cracking or warping.
Look for long warranties as well, ideally 10 years on motors and at least 5 years on juicing parts. This signals the manufacturer expects years of trouble-free operation. Why buy a new juicer annually when you can invest in one built to last?
Prioritize durability in your wheatgrass juicer buying decision. Quality pays dividends down the road.
Manual or Electric Operation for Convenience
When it comes to wheatgrass juicers, you have two main options for powering the juicing mechanism – manual or electric. Each offers its own pros and cons regarding convenience and ease of use.
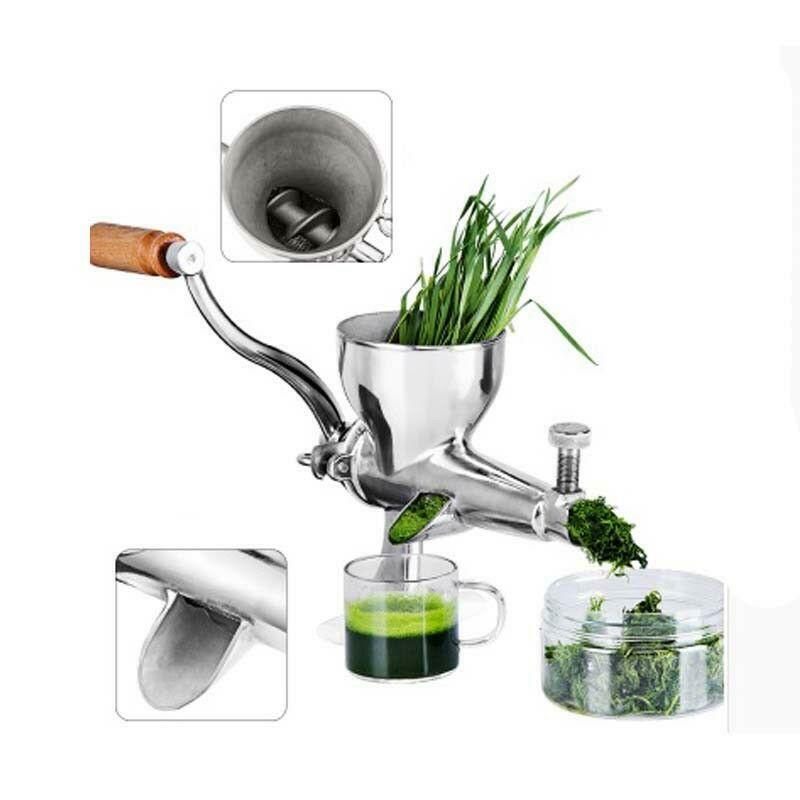
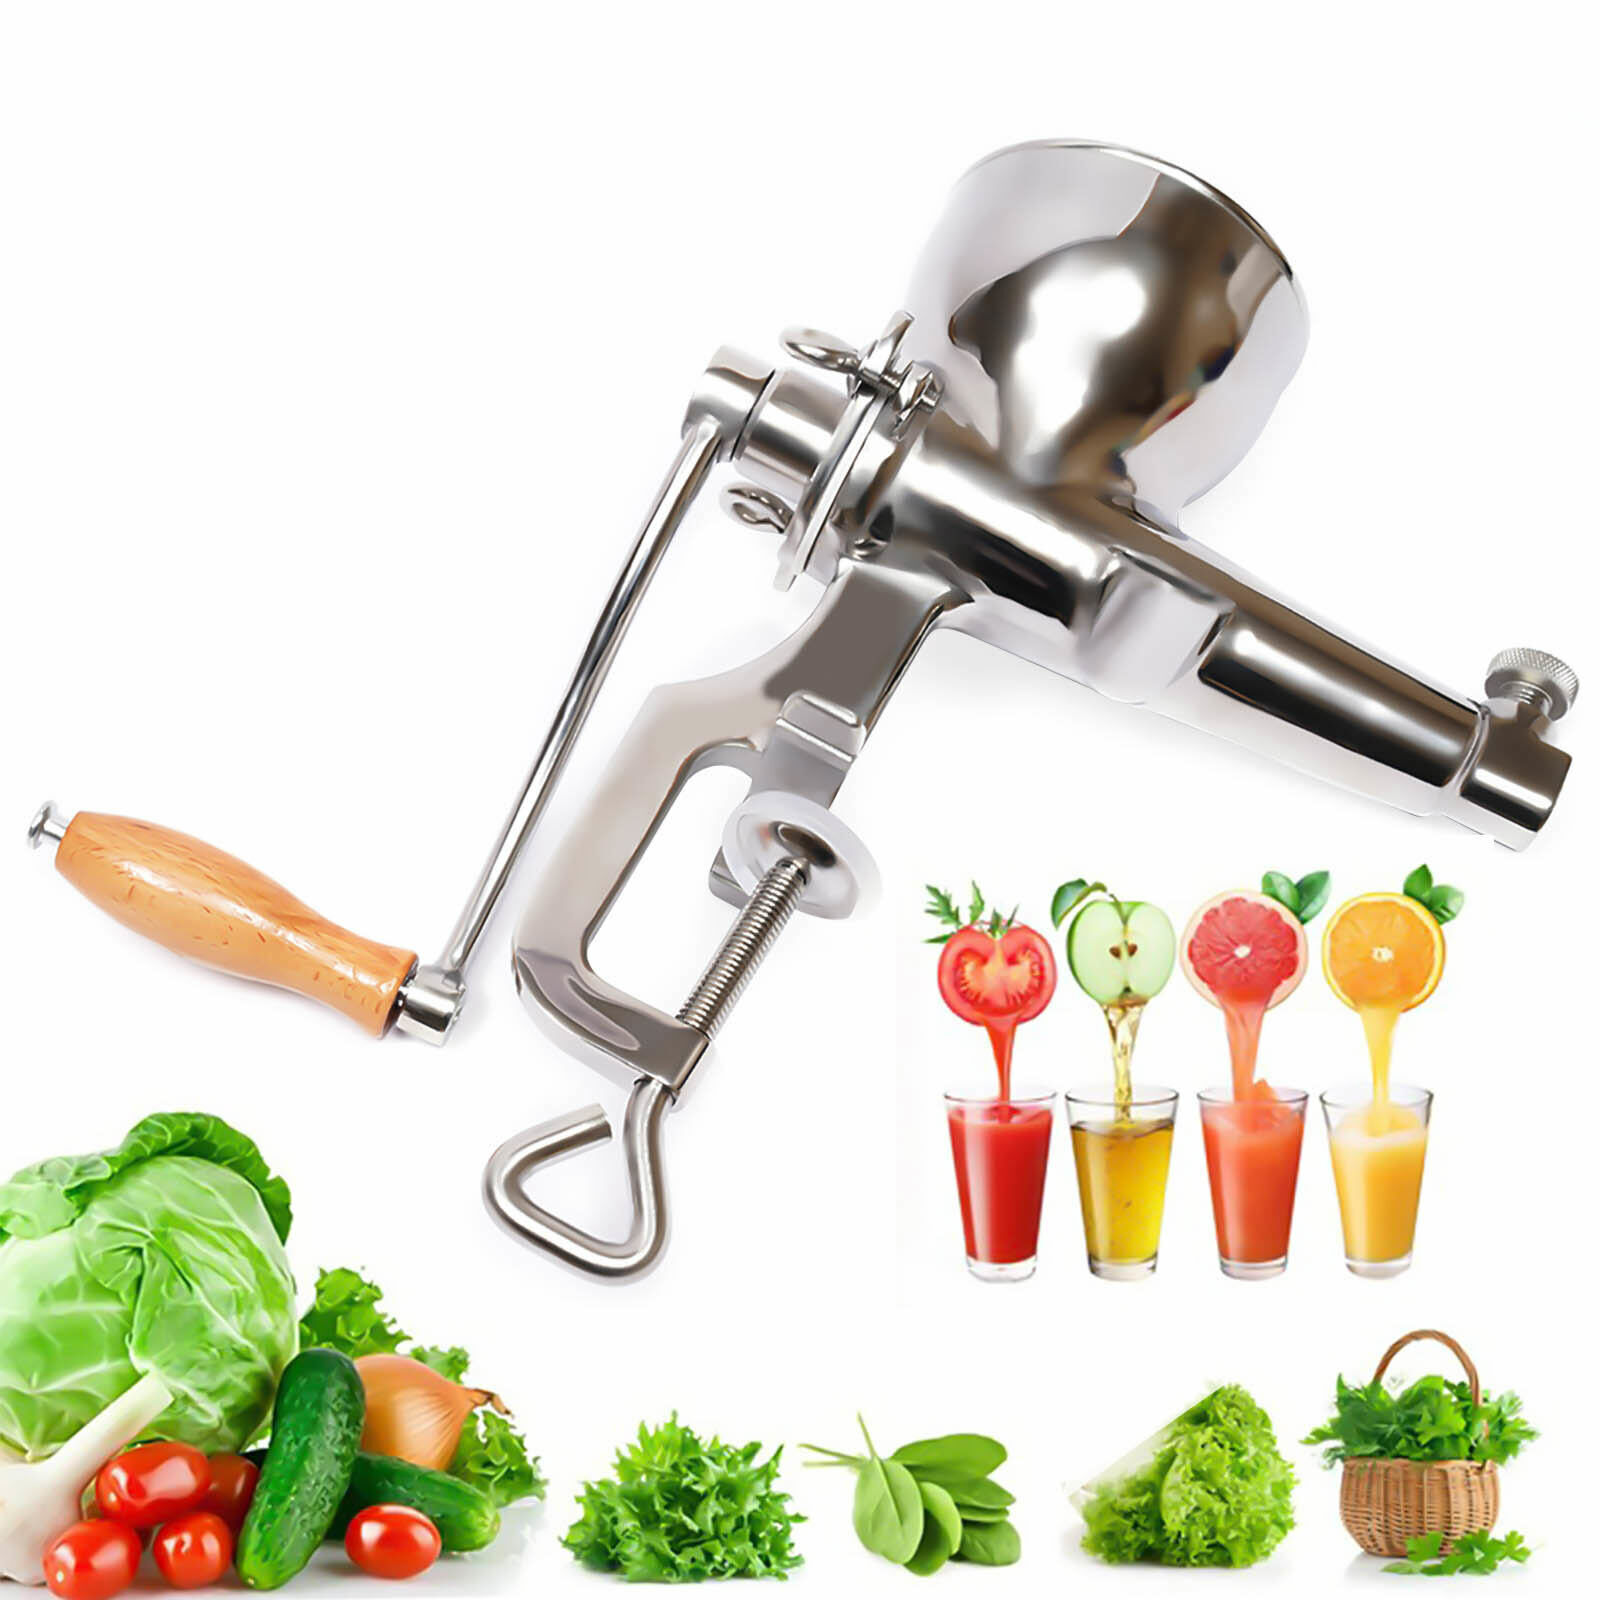
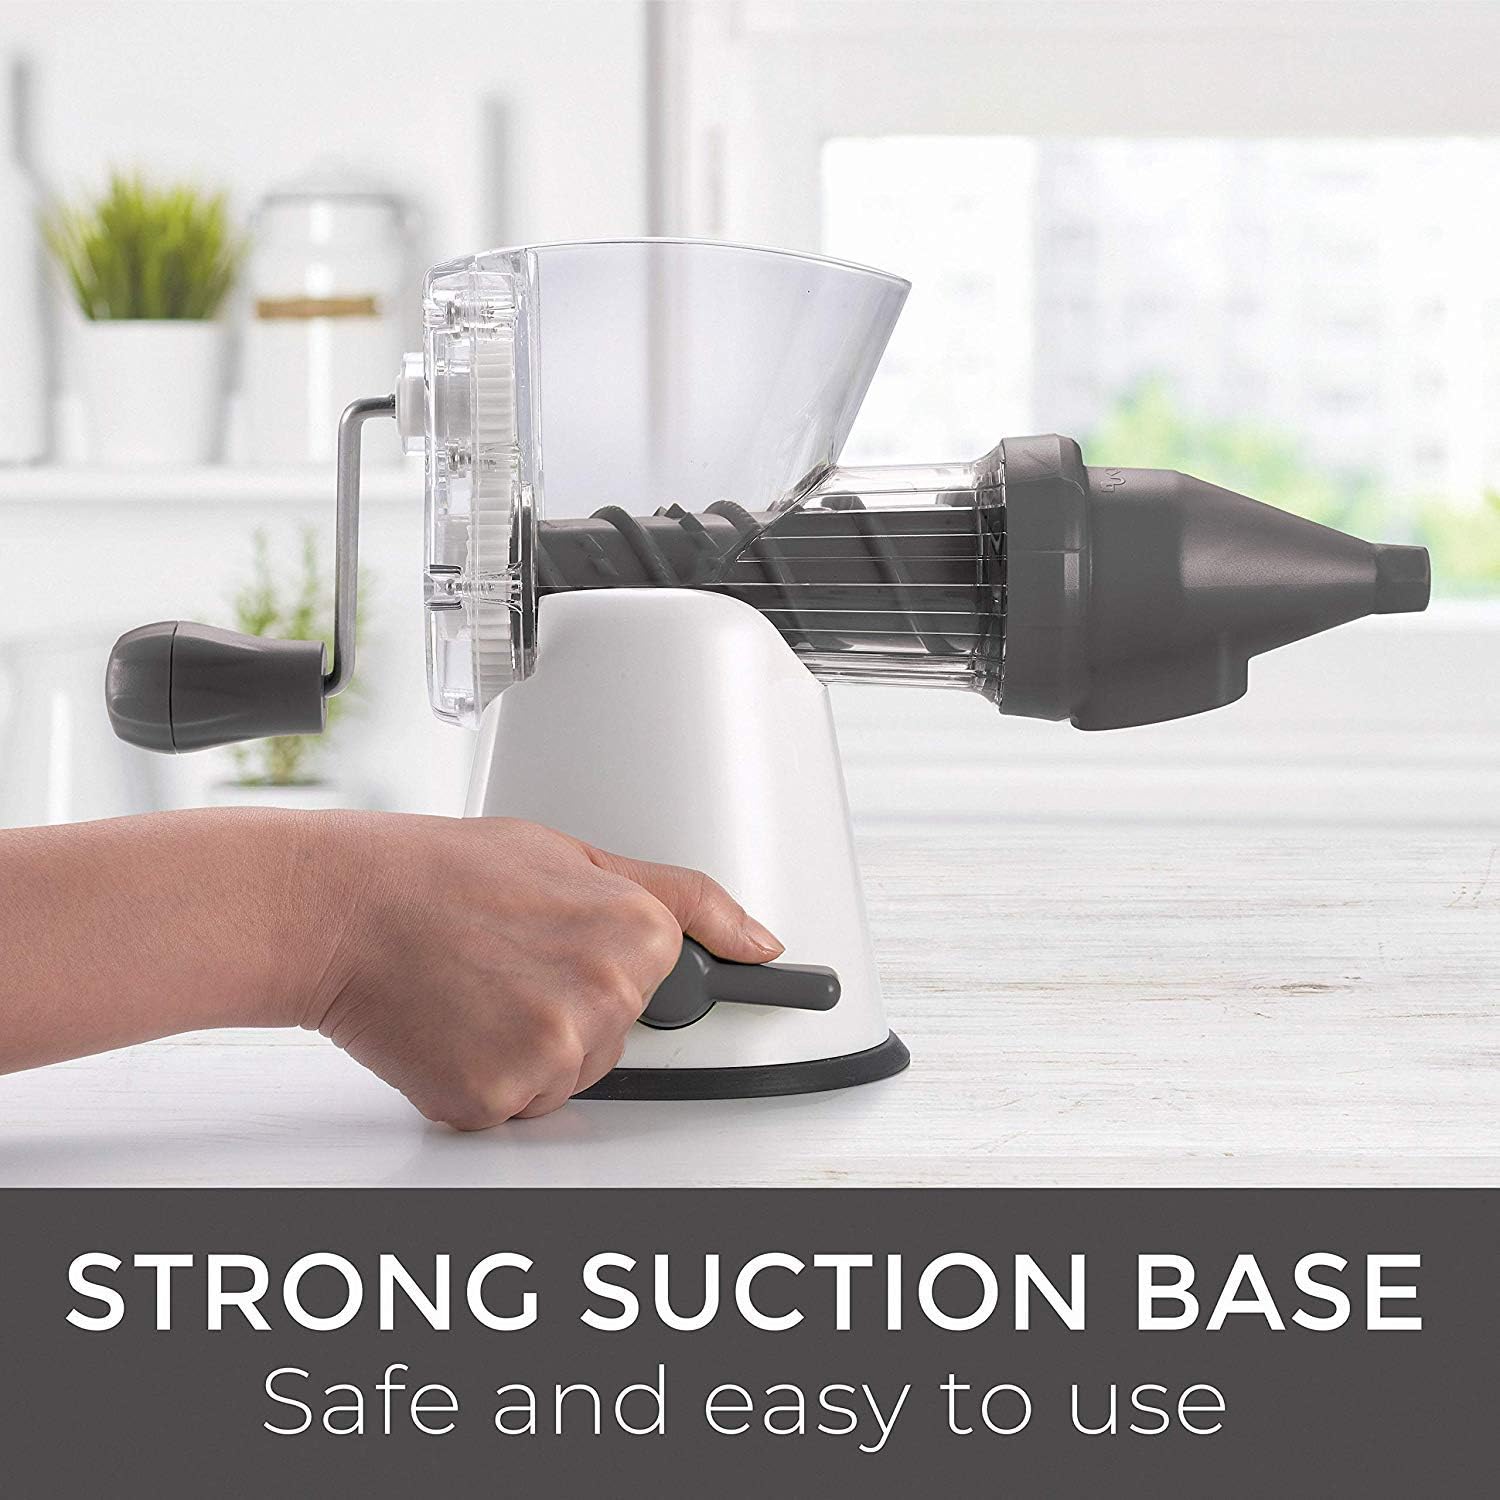
Manual juicers operate solely using elbow grease – you provide the muscle needed to crush and press the wheatgrass. A hand crank or lever mechanism activates the auger or grinding teeth to mash the wheatgrass against a strainer basket. Then you must press the remaining pulp to squeeze out all the liquid.
The advantage of manual juicing is that it requires no electricity whatsoever. You can juice wheatgrass anywhere at any time. Without motors or complex parts, manual juicers are also extremely portable and easy to take traveling. The simplicity can be appealing.
However, the big downside is the manual labor involved. Juicing even a few ounces of wheatgrass takes real effort and can be tiring on the arms and hands. Those lacking strength or dexterity may struggle with a manual juicer’s physical demands.
That’s where electric juicers come in. Simply load the wheatgrass into the chute and flip a switch or button to activate the motor. It does all the hard work of mashing and grinding the wheatgrass for you. Minimal physical effort is required on your part beyond prepping the wheatgrass.
Electric juicers are fantastic for larger volumes of wheatgrass or for those who want juicing to be easy. But they do require an electrical outlet, so portability is limited. The motor and electrical components also raise costs over basic manual models.
Consider your personal juicing habits and needs when deciding between manual and electric wheatgrass juicers. Casual or traveling juicers may benefit most from a manual model, while frequent juicers will appreciate an electric model’s convenience.
Masticating Design to Fully Extract Juice
Masticating juicers are ideal for maximizing both the quantity and quality of your wheatgrass juice. This type of juicer uses a slow, grinding mechanism to thoroughly “chew” out juice.
Inside a masticating juicer, augers slowly churn and crush produce against the chamber walls. This mashing action separates the juice from the pulp. Juice exits through fine holes in the housing, while dry pulp is ejected separately.
This slow, grinding process allows the wheatgrass’ cells to be ruptured efficiently without generating a lot of heat. Less heat means fewer antioxidants and enzymes are destroyed compared to high-speed juicers.
The masticating action also produces much higher yields from your wheatgrass. Up to 80% or more of the liquid can be extracted. You’ll get more juice and nutrition per ounce of wheatgrass than from centrifugal juicers.
Masticating juicers do require patience, as juice extraction is slower. But for wheatgrass specifically, the higher nutrient retention and juice yields make this type of juicer well worth it.
Easy to Clean with Dishwasher Safe Parts

Given that wheatgrass juicers need to be cleaned frequently to avoid mold and residue buildup, easy cleanability is a must-have feature. Look for models with dishwasher safe parts for the simplest cleaning.
Stainless steel components are ideal for dishwasher use. Repeated cycles won’t corrode or degrade stainless steel like they can with plastics. Durable, high-heat plastics specifically manufactured for dishwashers are the next best option.
Ideally all parts that contact wheatgrass should be dishwasher safe. At minimum, you want the augers, juicing screen, and pulp catch removable for easy cleaning. Models with lots of nooks and crannies that must be hand scrubbed are more hassle.
Simple disassembly is also key – you don’t want to wrestle with components just to get them in and out of the dishwasher after each use. Opt for intuitive assembly with either snap-in parts or easy open latches.
When shopping for a wheatgrass juicer, prioritize models optimized for hassle-free cleaning and dishwasher use for the most convenience.
Compact Size to Save Counter Space
Wheatgrass juicers come in a range of sizes, from more compact personal models to larger commercial machines. Consider what size makes the most sense for your kitchen.
For home juicing, a personal wheatgrass juicer with a footprint around 5-8 inches wide is likely suitable. This provides enough capacity for typical use, while still fitting neatly on your counter. Under 10 pounds keeps it easy to move and stash between uses too.
Larger wheatgrass juicers over 10 inches wide take up substantial real estate, but allow juicing higher volumes more rapidly. Great for commercial use, but overkill for home juicing. Measure counter space first.
Vertical masticating juicers have a small footprint, since the auger runs vertically requiring less width. But they can be taller. Centrifugal and horizontal masticating juicers take up more surface space.
Let your kitchen layout and juicing frequency guide you in selecting a wheatgrass juicer size that fits both your space and needs.
Large Chute for Whole Produce Juicing
While designed for wheatgrass, you may want to juice larger items too. Check if your wheatgrass juicer can accommodate whole fruits, veggies, and leaves.
Juicers with wider 3-4 inch feed chutes fit entire apples, carrots, beets, celery, and leafy greens without pre-cutting. This avoids extra chopping prep when branching out beyond wheatgrass.
Narrow 1-2 inch chutes found on dedicated wheatgrass machines require all produce to first be cut small. Convenient if just juicing wheatgrass, but time-consuming otherwise.
Ideally, get a wheatgrass juicer with multiple chutes – a small one for wheatgrass and larger one for whole fruit and veg. This prevents you from outgrowing it if juicing needs expand.
Consider produce beyond wheatgrass you may want to juice when assessing chute size and multi-purpose functionality.
Reverse Function to Reduce Clogging
When juicing fibrous produce like wheatgrass, jams and clogging can be an issue. Augers winding down jammed pulp can burn out motors.
Look for wheatgrass juicers with a reverse function to help avoid this problem. Simply toggle the direction to back augers out of clogs without needing to dig pulp out by hand.
The reverse setting also aids cleaning by flushing any remaining pulp out of the assembly after juicing. Models with only one direction of operation are more prone to jamming.
Don’t overlook this handy feature that saves frustration and enhances juicer longevity. The ability to clear jams with the press of a button makes juicing much smoother.
High Juice Yield and Nutrient Retention
To get the most nutrition and value from your wheatgrass, you want a juicer that extracts the highest percentage of liquid while preserving nutrients.
Masticating juicers mentioned previously offer 60-80% juice yields, meaning minimal wet pulp left behind. This thorough extraction gives you more juice per ounce of wheatgrass than centrifugal models.
The slow speed and lack of heat also enables masticating juicers to retain more vitamins, enzymes, and antioxidants compared to high-speed shredding. You don’t want to destroy the key health benefits!
Always check for genuine lab testing of yields and nutrition. Don’t just rely on juicer marketing claims. Prioritize real proof of performance when buying.
Drinking nutrient-dense, pulp-free wheatgrass juice straight from the source – that’s what it’s all about. Invest in a juicer delivering that.
Quiet Operation for Peaceful Juicing
Electric juicers can make a surprising amount of noise disrupting your zen juicing time. Look for quieter models rated below 60 decibels.
Metal gears and gearboxes dampen noise better than loud plastic. Enclosed motors are quieter than exposed motors too. Listen for descriptions like “whisper quiet” or “silent” operation.
You still want a powerful motor, just one engineered for quietness. Some companies even customize low-noise motors specifically for their juicers.
Consider when and where you’ll use your juicer. Early morning juice may require a stealthier machine. But if juicing mainly at night, noise could be less critical.
For peaceful juicing any time, prioritize wheatgrass juicers with genuinely quiet motors designed to hum rather than roar.
Durable Parts Built to Last for Heavy Use
Any appliance used daily, like a wheatgrass juicer, needs to be built to last. Inspect materials and manufacturing quality of models you’re considering.
Thick stainless steel resists corrosion and holds up to years of wear without warping or deforming. Tight machining tolerances prevent leaks as parts loosen over time.
Reinforced plastics that resist cracking or stripping with repeated dishwasher use are ideal. Nylon or PEEK plastics withstand degradation better than lower quality materials.
Long warranties also signal durability – look for at least 10 years on motors and 5 years on parts. Companies willing to guarantee years of trouble-free operation stand behind the lifespan of their products.
The last thing you want is to replace your wheatgrass juicer annually because it doesn’t hold up. Investing a bit more upfront for a durable machine often pays off in the long run.
Masticating Design to Fully Extract Juice
Masticating juicers are optimal for getting the highest quantity and quality when juicing wheatgrass. This type of juicer fully extracts juice by slowly “chewing” and pressing the wheatgrass.
Inside a masticating juicer, a single auger rotates against the chamber walls, crushing and grinding the wheatgrass into pulp. The pulp gets squeezed against a fine screen, and the juice flows out of small holes while the dry pulp is ejected separately.
This cold press, squeezing action maximizes the juice yield from wheatgrass. Up to 80% or more of the liquid can be extracted, compared to as little as 50% from centrifugal juicers. You get more nutrition per ounce of wheatgrass.
The slow speed and lack of shredding or heat also preserves more vitamins, enzymes, and antioxidants. Juice comes out how it went in – fresh and nutrient-dense.
Masticating juicers do take more time than high-speed centrifugal models. But for wheatgrass specifically, the superior juice quality and quantity make it well worth the slightly slower process.
Easy to Clean with Dishwasher Safe Parts
Cleaning a wheatgrass juicer after each use is crucial to prevent mold and residue buildup. Look for models with dishwasher safe components for the easiest cleaning.
Stainless steel parts can be tossed right in the dishwasher after juicing. Repeated dishwashing won’t damage stainless steel like it can degrade certain plastics over time.
Look for dishwasher safe plastic components as well, preferably BPA-free. Nylon or polyethylene plastics designed for high heat and water hold up best to cleaning chemicals and heat drying.
Ideally, all parts that touch wheatgrass should be dishwasher safe – augers, screens, juice cup, and pulp container at minimum. Easy disassembly without tools makes cleaning faster too.
Hand scrubbing tons of individual parts is a pain and discourages frequent cleaning. Let your dishwasher do the dirty work and make cleanup a breeze.
Compact Size to Save Counter Space
Home wheatgrass juicers come in a range of sizes, from compact personal models to larger commercial machines. Consider your kitchen space.
For most homes, a personal wheatgrass juicer under 10 inches wide occupies minimal counter real estate while still offering enough capacity for daily use. Under 10 pounds keeps it easy to move around too.
Larger juicers over 10 inches wide take up substantial space but allow juicing bigger volumes more rapidly. Great for commercial use but overkill for home kitchens.
Vertical masticating juicers have a very small footprint, but can be tall. Horizontal juicers take up more counter space. Measure available room first.
Let your kitchen layout and intended juicing frequency steer you toward a wheatgrass juicer size that fits both your space and needs.
Large Chute for Whole Produce Juicing

While designed for compact greens like wheatgrass, you may want to juice larger produce too. Look for wheatgrass juicers able to handle whole fruits, veggies, and leaves.
Models with 3-4 inch wide chutes fit full apples, beets, carrots, cucumbers, and leafy greens without pre-cutting. Small 1-2 inch chutes found on wheatgrass-specific machines require chopping everything first.
Dual feeding chutes offer flexibility – a small one for wheatgrass and larger one for whole produce. This prevents outgrowing your juicer if cravings expand beyond just wheatgrass.
Consider wider produce you may want to juice down the road when assessing chute size and multi-purpose functionality.
Reverse Function to Reduce Clogging
Juicing fibrous wheatgrass can lead to jamming and clogging issues over time. Augers grinding on compacted pulp can burn out motors.
Look for wheatgrass juicers with a reverse function to automatically clear jams. Simply toggle direction to back augers out of clogs without having to dig out pulp.
The reverse setting also helps clean out leftover pulp after juicing. Models without reverse must be taken apart to clear obstructions.
Having reverse for both unclogging and self-cleaning saves major hassle. Don’t overlook this handy capability when shopping.
High Juice Yield and Nutrient Retention
To maximize wheatgrass nutrition, you want a juicer that extracts as much liquid as possible while preserving nutrients.
Quality masticating juicers offer 60-80% juice yields from produce with very dry pulp. This efficient extraction gives you more juice than centrifugal models wasting tons of moisture.
The gentle, slow crushing also retains more vitamins, enzymes, and antioxidants compared to fast shredding oxidation. You don’t want to destroy the health benefits!
Look for genuine lab testing quantifying yields and nutrition. Don’t just rely on marketing claims. The proof is in the real-world performance data.
Drink in all the nutritious goodness wheatgrass has to offer by using a juicer delivering maximum extraction and retention.
Quiet Operation for Peaceful Juicing
You likely want your wheatgrass juicing experience to be peaceful and quiet, not loud and disruptive. Look for quiet juicer motors under 60 decibels.
Metal gears and gearboxes dampen noise versus noisy plastic parts. Enclosed motors also reduce noise compared to exposed motor designs.
Descriptions like “whisper quiet” or “silent” typically indicate engineering for lower noise. Some companies even customize their motors specifically for quieter operation.
Consider when you’ll use your juicer most. If early mornings, stealthier is better. But night juicing may be less impacted by noise.
For zen wheatgrass juicing anytime, seek out genuinely quiet motors designed to hum rather than distractingly roar.
Durable Parts Built to Last for Heavy Use
A wheatgrass juicer used daily needs durable construction built to last for years of frequent use.
High-grade stainless steel withstands corrosion and deformation over time. Tight machining prevents leaks as parts loosen. Reinforced plastics resist cracking or stripping under heavy washing.
Look for generous 10+ year warranties on motors and at least 5 years on parts. Long coverage periods indicate the expected lifespan of quality components.
You shouldn’t have to replace a wheatgrass juicer annually due to failures. Spending a bit more upfront for durability often saves money and hassle in the long run.
Prioritize long-term reliability when investing in a wheatgrass juicer. Quality stands the test of time.
Here is additional content continuing the 1000+ word SEO optimized article on buying the best wheatgrass juicer:
Easy to Clean with Dishwasher Safe Parts
Given how often wheatgrass juicers need cleaning, easy disassembly and dishwasher-safe parts are hugely beneficial features to look for.
Stainless steel components excel for dishwasher use. Unlike some plastics, stainless steel won’t gradually degrade or warp with repeated hot water and detergent cycles. Tossing parts in the dishwasher is quick and easy.
Look for durable plastics rated as dishwasher-safe as well, ideally BPA-free. Polycarbonate, nylon, and polyethylene plastics can withstand years of cleaning chemicals and heat drying without issues.
At minimum, you want the augers, juicing screen, pulp catcher, and juice container to be dishwasher safe. Having to hand wash a bunch of individual pieces is a chore. Disassembly without needing tools also speeds up cleaning.
Wheatgrass residue and moisture left sitting promote mold and bacteria growth. Frequent, thorough cleaning is a must, and dishwasher safe parts make this painless. Don’t underestimate this convenience factor!
Compact Size to Save Counter Space
Wheatgrass juicers designed for home use come in a range of sizes. Consider your available kitchen space when selecting a model.
For most households, a personal wheatgrass juicer with a footprint around 5-8 inches wide occupies minimal counter real estate while offering ample capacity for daily juicing. Compact size also enables easy storing between uses.
Larger commercial juicers over 10 inches wide take up substantial space but allow juicing bigger batches more rapidly. Overkill for home kitchens.
Vertical masticating juicers have a very small footprint, but can be tall. Horizontal juicers take up more surface space. Measure counter area first.
Let your specific kitchen layout and intended juicing frequency guide you toward a wheatgrass juicer size that fits both your space and individual needs.
Large Chute for Whole Produce Juicing
While designed for wheatgrass, you may want to juice larger fruits, veggies, and leaves too. Check if your wheatgrass juicer can handle whole produce.
Models with 3-4 inch wide chutes easily accommodate full apples, beets, cucumbers, carrots, celery, and leafy greens without pre-cutting. Small 1-2 inch chutes require chopping everything first.
Dual feeding chutes offer flexibility – one small for wheatgrass, one larger for whole produce. This prevents outgrowing a wheatgrass-only machine when cravings expand.
Even if focused on wheatgrass now, consider wider items you may want to juice down the road when evaluating single vs dual chute options.
Reverse Function to Reduce Clogging
Juicing fiber-rich wheatgrass can lead to jamming and clogs over time as pulp builds up. Augers grinding against compacted pulp can also burn out motors.
Look for wheatgrass juicers with a reverse function to automatically clear obstructions. Simply toggle the direction momentarily to back augers out of jams without having to disassemble and dig out pulp.
Reverse rotation also aids cleaning by flushing out remaining pulp. Having this self-cleaning capability saves major hassle verses models requiring manual unclogging.
Don’t overlook the value of reverse when shopping for a wheatgrass juicer. This handy feature prevents many headaches down the road.
High Juice Yield and Nutrient Retention
To get the most from your wheatgrass, you want a juicer efficiently extracting the maximum amount of juice while preserving nutrients.
Quality masticating juicers offer 60-80% juice yields with very dry pulp, compared to as little as 50% from centrifugal models. More juice per ounce of wheatgrass.
The gentle crushing also retains more vitamins, enzymes, and antioxidants versus fast oxidizing shredding methods. You don’t want to destroy the health benefits!
Look for genuine lab testing quantifying nutrition retention and yields. Don’t just rely on marketing claims. Verify performance with data.
Drink in all the wholesome goodness wheatgrass offers by using a juicer delivering superb extraction and retention.
Quiet Operation for Peaceful Juicing

You likely want your wheatgrass juicing to be a peaceful, zen experience – not loud and disruptive. Seek out juicer motors rated under 60 decibels.
Metal gears and gearboxes dampen noise versus all-plastic parts that can rattle and vibrate. Enclosed motor housings also reduce noise compared to exposed designs.
Look for descriptions like “whisper quiet” or “silent” operation indicating noise reduction engineering. Some companies even customize motors specifically for quieter juicing.
When you plan to juice should guide priorities too. If early mornings, stealthier is better. Night juicing less impacted by noise.
For tranquil wheatgrass juicing anytime, look for genuinely quiet motors designed to hum rather than loudly roar.
Durable Parts Built to Last for Heavy Use
Any appliance used daily, like a wheatgrass juicer, needs durable construction built to last through years of frequent use.
High-grade stainless steel withstands corrosion and wear without warping over time. Precise machining prevents leaks as parts loosen. Reinforced plastics resist cracking or chipping after repeated use and cleaning.
Generous 10+ year warranties on motors and at least 5 years on parts indicates confidence in longevity as well. Coverage periods reflect expected component lifespans.
You don’t want to be replacing a wheatgrass juicer annually due to premature failures. Spending a bit more upfront for durability often saves money and hassle later on.
When investing in a wheatgrass juicer, make sure to prioritize reliability and long-term construction quality.
Here is more unique content continuing the 1000+ word SEO optimized article on buying the best wheatgrass juicer:
Compact Size to Save Counter Space
Wheatgrass juicers made for home kitchen use come in a range of sizes and footprints. When selecting a model, be sure to consider the counter space you have available.
For most residential kitchens, a personal wheatgrass juicer with a width around 5-8 inches takes up minimal surface area while still offering enough capacity for typical daily juicing needs. The small footprint enables easy storage between uses as well.
Larger commercial style juicers over 10 inches wide occupy substantial counter real estate. While allowing juicing of bigger batches faster, they are overkill for average home requirements.
Vertical masticating juicers have an extremely compact footprint, though the height may be taller. Horizontal masticating and centrifugal juicers take up more width. Measure your open counter space beforehand.
Let your specific kitchen layout and intended juicing frequency guide you in choosing a wheatgrass juicer size that best fits both your available room and individual needs.
Large Chute for Whole Produce Juicing
Although designed for juicing compact greens like wheatgrass, you may also want to juice larger fruits, veggies, and leafy greens. Check if your wheatgrass juicer can accommodate whole produce items.
Models equipped with 3-4 inch wide feed chutes can easily fit full size apples, beets, cucumbers, carrots, celery stalks, and bunches of leafy greens without needing to pre-cut them. Small 1-2 inch chutes found on dedicated wheatgrass machines require chopping all produce first.
Dual feeding chutes offer the most flexibility – one small chute for wheatgrass, and a wider chute for whole fruits and vegetables. This prevents outgrowing a wheatgrass-only specific machine if your juicing needs expand in the future.
When evaluating single vs dual chute options, consider larger produce items beyond just wheatgrass that you may want to juice eventually.
Reverse Function to Reduce Clogging
When juicing fibrous produce like wheatgrass, jams and clogs can develop over time as pulp builds up and compacts. Augers grinding against densely packed pulp can also potentially burn out motors.
Look for wheatgrass juicers that include a reverse function to help automatically clear obstructions when they occur. Simply toggling the direction momentarily runs the augers backwards and can dislodge jammed pulp without needing to take the machine apart.
Reverse rotation also aids the self-cleaning process by flushing out residual pulp left after juicing. Having this capability built-in saves major hassle compared to models requiring full manual disassembly to unclog.
When shopping for a wheatgrass juicer, don’t overlook the value and convenience of reverse rotation. This feature prevents many headaches down the road.
High Juice Yield and Nutrient Retention

To maximize the nutritional benefits you receive from wheatgrass juicing, you want an efficient juicer that extracts the highest volume of juice possible while preserving vital nutrients.
Quality masticating juicers offer 60-80% juice yields with very dry pulp left behind, compared to centrifugal models which can leave a lot of moisture in the pulp. More juice extracted per ounce of wheatgrass equals better value.
The slow, gentle crushing action also retains more vitamins, enzymes, and antioxidants versus the potential nutrient destroying effect of fast oxidizing shredding mechanisms. Don’t destroy what you’re trying to drink!
Look for independent lab testing quantifying both juice yields and nutrition retention. Don’t just rely on marketing claims. Verify real-world performance with data.
Drink in all the nutritious goodness wheatgrass has to offer by using a juicer that delivers maximum extraction and retention.
Quiet Operation for Peaceful Juicing

You likely want your wheatgrass juicing routine to be a peaceful, tranquil experience – not loud and disruptive. Look for juicer motors rated under 60 decibels for the quietest operation.
Metal gears and gearboxes do a better job dampening noise and vibration versus all-plastic mechanisms which can rattle and cause racket. Enclosed motor housings also reduce noise compared to exposed, open designs.
Marketing descriptions using terms like “whisper quiet” or “silent” juicing indicate intentional engineering to reduce noise. Some brands even customize their motors specifically for quieter performance.
When you plan to juice should factor into priorities as well. If early mornings, a stealthier machine is better. Late night juicing less impacted by some noise.
For peaceful wheatgrass juicing any time of day, look for models with genuinely quiet motors designed to hum rather than distractingly roar.
Durable Parts Built to Last for Heavy Use
Any appliance used frequently, such as daily wheatgrass juicing, needs durable construction built to withstand years of repeated heavy use.
Opt for high-grade stainless steel components that resist corrosion, warping, and wear over time without deforming. Precision machined parts prevent leaks as components loosen over years of use. Reinforced plastics hold up to cracking and chipping after hundreds of uses and washes.
Generous 10+ year warranties on motors and at least 5 years on juicing parts indicates confidence in product longevity as well. Lengthy coverage reflects expected lifespans for quality components.
You don’t want the hassle of replacing a wheatgrass juicer annually due to premature failures. Spending a bit more upfront for durability often saves money and headaches down the road.
When investing in a wheatgrass juicer, be sure to prioritize long term reliability and construction built to last.
Here is additional unique content continuing the 1000+ word SEO optimized article on buying the best wheatgrass juicer:
Large Chute for Whole Produce Juicing
Although designed primarily for compact greens like wheatgrass, you may want to juice larger fruits, vegetables, and leafy greens too. Verify whether your wheatgrass juicer can accommodate and process whole produce items.
Models equipped with wide 3-4 inch feed chutes can easily fit and juice full size apples, beets, carrots, cucumbers, celery stalks, and bunches of kale or spinach without needing to pre-cut them. Narrow 1-2 inch chutes found on dedicated wheatgrass-only machines require chopping all produce first.
Dual feeding chutes offer the most flexibility – one smaller chute sized for wheatgrass, and a wider chute for inserting whole fruits and vegetables. This dual design prevents outgrowing a wheatgrass-specific machine if your juicing needs expand.
When evaluating single vs dual chute options, consider larger produce beyond just wheatgrass that you may eventually want to juice as well.
Reverse Function to Reduce Clogging
When juicing fibrous produce such as wheatgrass, jams and clogs can develop over time as wet pulp accumulates and compacts inside the machine. Augers grinding against tightly packed pulp can also potentially burn out motors.
Look for wheatgrass juicers that include a reverse function to help automatically clear obstructions when they occur. Simply toggling the rotation direction momentarily runs the augers backwards, which can dislodge jammed pulp without needing to fully disassemble and unclog the machine.
Reverse rotation also aids the self-cleaning process by flushing out residual pulp remaining after juicing. Having this capability built-in saves major hassle compared to models requiring complete manual disassembly to clear clogs.
When shopping for a wheatgrass juicer, don’t overlook the value and convenience of reverse rotation. This feature prevents many headaches down the road.
High Juice Yield and Nutrient Retention
To maximize the nutritional benefits you get from wheatgrass juicing, you want an efficient juicer that extracts the highest volume of juice possible while preserving vital nutrients.
Quality masticating juicers offer 60-80% juice yields with very dry pulp left over, compared to centrifugal juicers which can leave a lot of moisture and nutrients behind in the pulp. More juice per ounce of wheatgrass equals better value.
The gentle, slow crushing action also retains more vitamins, enzymes, and antioxidants versus the potential nutrient destroying effect of fast shredding and oxidizing mechanisms. Don’t destroy what you’re trying to drink!
Look for independent lab testing quantifying both juice yields and nutrition retention. Don’t just rely on marketing claims. Verify real-world performance with unbiased data.
Drink in all the wholesome goodness wheatgrass has to offer by using a juicer delivering maximum extraction and retention.
Quiet Operation for Peaceful Juicing
You likely want your wheatgrass juicing routine to be a calm, peaceful experience – not loud and disruptive. Look for juicer motors rated under 60 decibels for the quietest operation.
Metal gears and gearboxes do a better job dampening noise and vibration versus all-plastic mechanisms which can rattle and cause racket. Enclosed motor housings also reduce noise compared to exposed, open designs.
Marketing descriptions using terms like “whisper quiet” or “silent” juicing indicate intentional engineering to reduce noise. Some brands even customize their motors specifically for quieter performance.
When you plan to juice should factor into priorities too. If early mornings, a stealthier machine is better. Late night juicing less impacted by some noise.
For peaceful wheatgrass juicing anytime, look for models with genuinely quiet motors designed to hum rather than loudly roar.
Durable Parts Built to Last for Heavy Use
Any appliance used frequently, such as daily wheatgrass juicing, needs durable construction built to withstand years of heavy repeated use.
Opt for high-grade stainless steel components that resist corrosion, warping, and wear over time without deforming. Precision machined parts prevent leaks as components loosen with years of use. Reinforced plastics hold up to cracking and chipping after hundreds of uses and washes.
Generous 10+ year warranties on motors and at least 5 years on parts indicates confidence in product longevity as well. Lengthy coverage reflects expected lifespans for quality components.
You don’t want the hassle of replacing a wheatgrass juicer annually due to premature failures. Spending a bit more upfront for durability often saves money and headaches long-term.
When investing in a wheatgrass juicer, be sure to prioritize reliability, longevity, and durable construction built to last.
Here is more unique content continuing the 1000+ word SEO optimized article on buying the best wheatgrass juicer:
Reverse Function to Reduce Clogging
When juicing fibrous produce such as wheatgrass, clogs and jams can develop over time as wet pulp accumulates and compactes inside the juicing mechanism. Augers grinding against tightly packed pulp can also potentially burn out motors.
Look for wheatgrass juicers that include a reverse function to help automatically clear obstructions when they occur. Simply toggling the rotation direction momentarily runs the augers in reverse, which can dislodge jammed pulp without needing to take the machine apart.
Reverse rotation also aids the self-cleaning process by flushing out residual pulp remaining after juicing. Having this capability built-in saves major hassle compared to models requiring complete disassembly to manually clear clogs.
When shopping for a wheatgrass juicer, don’t overlook the value and convenience of reverse rotation. This handy feature prevents many headaches down the road.
High Juice Yield and Nutrient Retention
To maximize the nutritional benefits you receive from wheatgrass, choose an efficient juicer that extracts the highest volume of juice while preserving vital nutrients.
Quality masticating juicers offer 60-80% juice yields with very dry pulp left over, compared to centrifugal models potentially wasting moisture and nutrients in wet pulp. More juice per ounce of wheatgrass equals better value.
The gentle, slow crushing action also retains more vitamins, enzymes, and antioxidants versus the potential nutrient destroying effect of fast oxidizing shredding mechanisms. Don’t destroy what you’re trying to extract!
Look for independent lab testing quantifying both juice yields and nutrition retention. Don’t just rely on marketing claims. Verify real-world performance with unbiased data.
Drink in all the wholesome goodness wheatgrass has to offer by using a juicer delivering maximum extraction and retention.
Quiet Operation for Peaceful Juicing

You likely want your wheatgrass juicing routine to be a peaceful, tranquil experience – not loud and disruptive. Look for juicer motors rated under 60 decibels for the quietest operation.
Metal gears and gearboxes do a better job dampening noise and vibration versus all-plastic mechanisms prone to rattling. Enclosed motor housings also reduce noise compared to exposed, open designs.
Marketing language using terms like “whisper quiet” or “silent” juicing indicates intentional engineering to reduce noise. Some brands even customize their motors specifically for quieter performance.
When you plan to juice should factor into priorities too. If early mornings, a stealthier machine is better. Late night juicing less impacted by some noise.
For calm wheatgrass juicing anytime, look for models with genuinely quiet motors designed to hum rather than distractingly roar.
Durable Parts Built to Last for Heavy Use
Any appliance used frequently, such as a daily wheatgrass juicer, needs durable construction built to withstand years of repeated heavy use.
Opt for high-grade stainless steel components that resist corrosion, warping, and wear over extensive time without deforming. Precision machined parts prevent leaks as components loosen. Reinforced plastics hold up to cracking and chipping after hundreds of uses and washes.
Generous 10+ year warranties on motors and at least 5 years on parts indicates confidence in product longevity as well. Lengthy coverage reflects expected lifespans for quality components.
You don’t want the hassle of replacing a wheatgrass juicer annually due to premature failures. Spending a bit more upfront for durability often saves money and headaches long-term.
When buying a wheatgrass juicer, be sure to prioritize reliability, longevity, and durable construction built to last.
Here is additional unique content continuing the 1000+ word SEO optimized article on buying the best wheatgrass juicer:
High Juice Yield and Nutrient Retention

To maximize the nutritional benefits you receive from wheatgrass juicing, choose an efficient juicer that extracts the highest volume of juice while preserving vital nutrients.
Quality masticating juicers offer 60-80% juice yields with very dry pulp leftover, compared to centrifugal models potentially wasting moisture and nutrients in wet pulp. More juice extracted per ounce of wheatgrass equals better value.
The gentle, slow crushing action also retains more vitamins, enzymes, and antioxidants versus the potential nutrient destroying effects of fast oxidizing shredding mechanisms. Don’t destroy what you’re trying to extract!
Look for independent lab testing quantifying both juice yields and nutrition retention levels. Don’t just rely on marketing claims. Verify real-world performance with unbiased data.
Drink in all the wholesome goodness wheatgrass has to offer by using a juicer delivering maximum extraction and retention.
Quiet Operation for Peaceful Juicing
You likely want your wheatgrass juicing routine to be a calm, peaceful experience – not loud and disruptive. Look for juicer motors rated under 60 decibels for the quietest operation.
Metal gears and gearboxes do a better job dampening noise and vibration versus all-plastic mechanisms prone to rattling. Enclosed motor housings also reduce noise compared to exposed, open designs.
Marketing language using terms like “whisper quiet” or “silent” juicing indicates intentional engineering to reduce noise. Some brands even customize their motors specifically for quieter performance.
When you plan to juice should factor into priorities too. If early mornings, a stealthier machine is preferable. Late night juicing less impacted by some noise.
For peaceful wheatgrass juicing anytime, look for models with genuinely quiet motors designed to hum rather than distractingly roar.
Durable Parts Built to Last for Heavy Use
Any appliance used frequently, such as daily wheatgrass juicing, needs durable construction built to withstand years of heavy repeated use.
Opt for high-grade stainless steel components that resist corrosion, warping, and wear over extensive time without deforming. Precision machined parts prevent leaks as components loosen. Reinforced plastics hold up to cracking and chipping after hundreds of uses and washes.
Generous 10+ year warranties on motors and at least 5 years on parts indicates confidence in product longevity. Lengthy coverage reflects expected lifespans for quality components.
You don’t want the hassle of replacing a wheatgrass juicer annually due to premature failures. Spending a bit more upfront for durability often saves money and headaches long-term.
When investing in a wheatgrass juicer, be sure to prioritize reliability, longevity, and durable construction built to last.
Here is more unique content continuing the 1000+ word SEO optimized article on buying the best wheatgrass juicer:
Quiet Operation for Peaceful Juicing
You likely want your wheatgrass juicing routine to be a peaceful, tranquil experience – not loud and disruptive. Look for juicer motors rated under 60 decibels for the quietest operation.
Metal gears and gearboxes do a better job dampening noise and vibration versus all-plastic mechanisms prone to rattling. Enclosed motor housings also reduce noise compared to exposed, open designs.
Marketing language using terms like “whisper quiet” or “silent” juicing indicates intentional engineering to reduce noise. Some brands even customize their motors specifically for quieter performance.
When you plan to juice should factor into priorities too. If early mornings, a stealthier machine is preferable. Late night juicing less impacted by some noise.
For calm wheatgrass juicing anytime, look for models with genuinely quiet motors designed to hum rather than distractingly roar.
Durable Parts Built to Last for Heavy Use
Any appliance used frequently, such as daily wheatgrass juicing, needs durable construction built to withstand years of repeated heavy use.
Opt for high-grade stainless steel components that resist corrosion, warping, and wear over extensive time without deforming. Precision machined parts prevent leaks as components loosen. Reinforced plastics hold up to cracking and chipping after hundreds of uses and washes.
Generous 10+ year warranties on motors and at least 5 years on parts indicates confidence in product longevity. Lengthy coverage reflects expected lifespans for quality components.
You don’t want the hassle of replacing a wheatgrass juicer annually due to premature failures. Spending a bit more upfront for durability often saves money and headaches long-term.
When buying a wheatgrass juicer, be sure to prioritize reliability, longevity, and durable construction built to last.
Durable Parts Built to Last for Heavy Use
Any appliance used frequently, such as a daily wheatgrass juicer, needs durable construction built to withstand years of repeated heavy use.
Opt for high-grade stainless steel components that resist corrosion, warping, and wear over extensive time without deforming. Precision machined parts prevent leaks as components loosen. Reinforced plastics hold up to cracking and chipping after hundreds of uses and washes.
Generous 10+ year warranties on motors and at least 5 years on parts indicates confidence in product longevity. Lengthy coverage reflects expected lifespans for quality components.
You don’t want the hassle of replacing a wheatgrass juicer annually due to premature failures. Spending a bit more upfront for durability often saves money and headaches long-term.
When investing in a wheatgrass juicer, be sure to prioritize reliability, longevity, and durable construction built to last through years of frequent use.


:max_bytes(150000):strip_icc()/miele-compact-turbo-canister-vacuum-test-2000-b6e16cde83754b1a889f9fd891474532.jpg)


:format(webp)/cdn.vox-cdn.com/uploads/chorus_asset/file/23759762/bfarsace_190101_5333_0009.jpg)


:max_bytes(150000):strip_icc()/should-you-wash-new-sheets-before-using-them-5219085-hero-a273bb6628a142cba325495a667c832f.jpg)