Use metallic fabric backdrops for a glamorous look
Looking to add some extra glitz and glam to your holiday photos this year? Metallic fabric backdrops are the perfect way to make your Christmas photos shine. The luxurious sheen of gold, silver, copper, or rose gold fabric will elevate your photos to ultra-glamorous new heights. Drape a coordinating metallic fabric over a basic backdrop stand and let the magic happen!
Metallic fabrics like lame, shantung, or sequined material reflect light beautifully, lending elegant texture and dimension to your photos. The colors are rich yet neutral, ensuring the focus remains on your subjects while adding an air of celebration and sophistication. Metallic backdrops pair effortlessly with sequined party dresses or sharp tuxedos for New Year’s Eve photos. For family photos, they provide a fresh, modern twist on classic Christmas colors. Even casualwear looks polished against these eye-catching backdrops.
When working with metallic backdrops, pay attention to lighting. Natural light illuminates metallic fabric the best, while flash can sometimes wash out its detail. Ask your photographer to use diffused light sources and reflectors to bring out the gorgeous glimmer. Pose subjects at an angle to the backdrop so their faces don’t disappear in its sheen. Most importantly, have fun playing with different poses and props against these dazzling photographic accents.
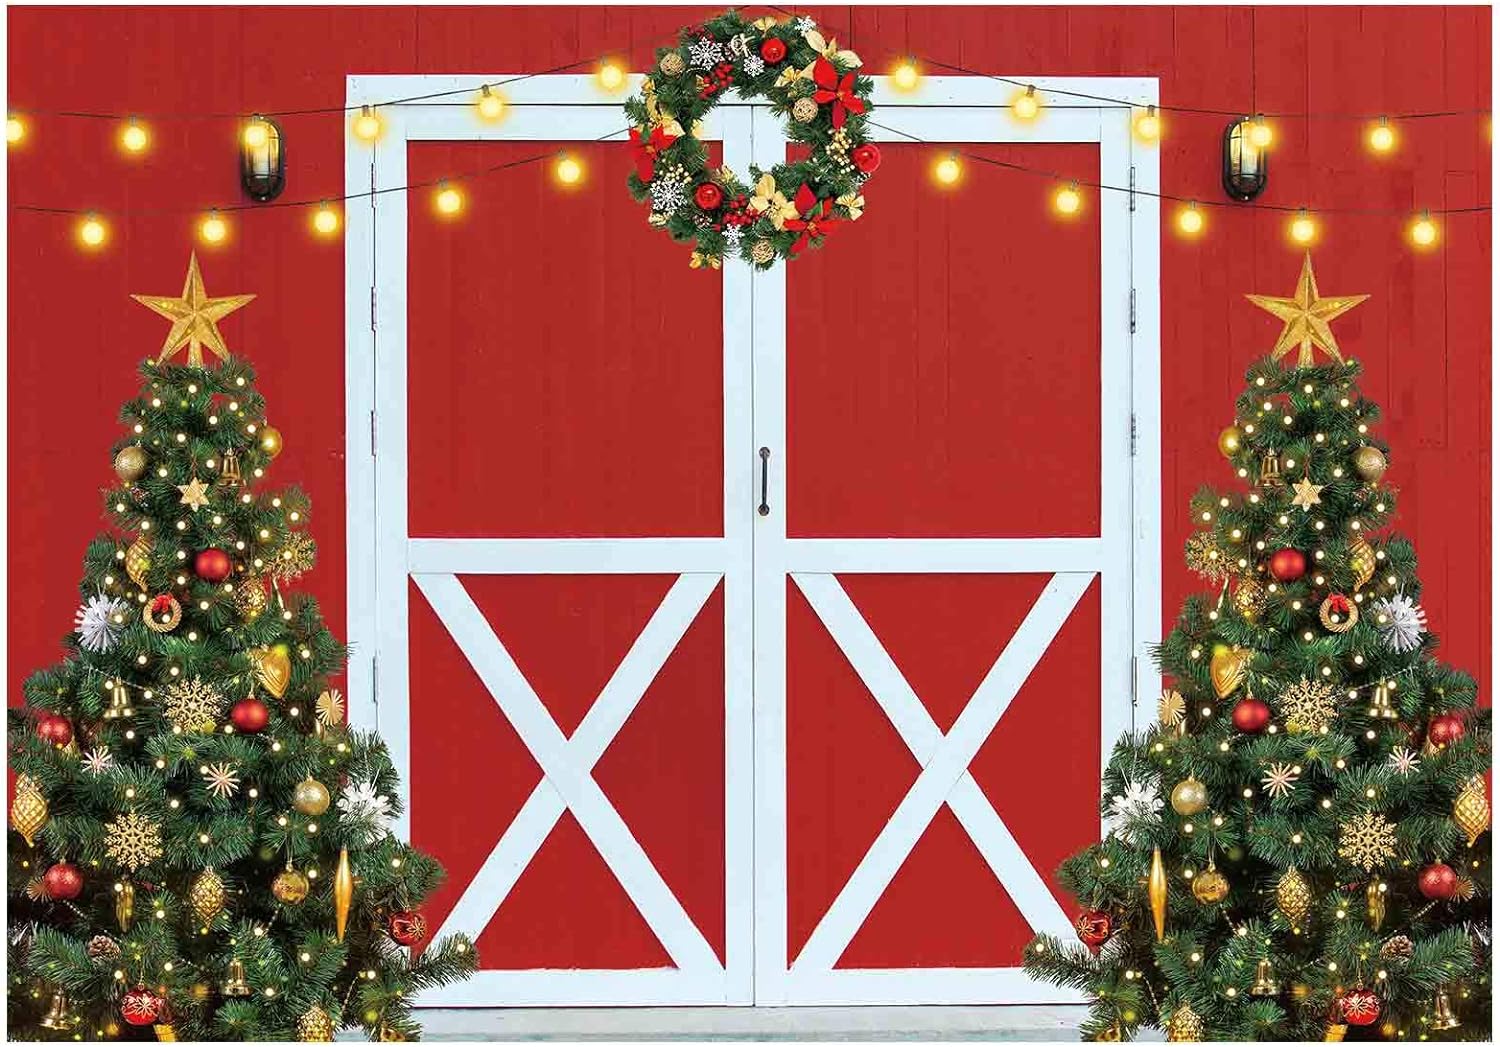
Go for solid red or green backdrops for classic holiday photos

Sometimes simple is best when it comes to Christmas photos. Red and green fabric backdrops evoke the quintessential warmth and nostalgia of the holidays in an easy, timeless way. These classic Christmas colors complement any outfit and keep the focus on your smiling subjects.
Solid red or green fabric instantly communicates “Christmas!” without being over-the-top festive. Drape them over a stand or wall for a pop of seasonal color in formal portraits or casual snapshots alike. For added interest, hang ornaments, pine garlands, string lights, or other decor directly on the fabric. The neutral background allows the trimmings to really stand out.
Red and green also pair beautifully together. Alternate panels of each color for a striking striped effect. Or hang swaths of red and green fabric on either side of your set to frame the shot. This color combo looks great behind parent-child poses, coordinating outfits, or festive pet portraits.
Layer different fabric textures like velvet and satin

Why stick with just one fabric when you can layer multiple materials for added visual interest? Combining textures like velvet, satin, burlap, lace, or even faux fur creates a dynamic, tactile backdrop for holiday photos.
Try draping velvet and satin fabric together in lush red or emerald hues. The contrast between the matte and shiny finishes gives photos intriguing depth and dimension. For a woodsy feel, drape burlap over satin in earthy neutrals. Or layer sparkly lace over solid-colored velvet or satin for an elegant statement.
Get creative with length and height too. Hang a long piece of sequined lace from the top of the frame while a swath of velvet sits at the bottom. The varied vertical textures feel modern and chic. Pose subjects in between the layers for a striking composition. With endless combinations possible, layered fabrics make for endlessly customizable backdrops to suit any style.
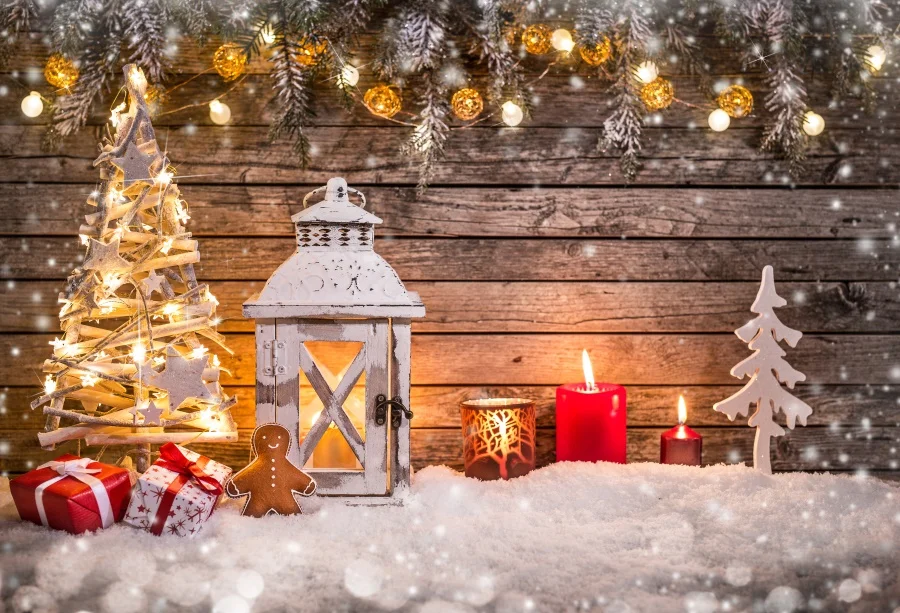
Incorporate Christmas lights into your fabric backdrop
String lights instantly infuse any scene with cozy holiday charm. Incorporating Christmas lights into your fabric backdrop adds festive sparkle and dimension. The interplay between the soft draped fabric and tiny bright bulbs creates visual interest and depth.
For starters, you can simply hang string lights along the top of a plain draped backdrop. Let the lights drape down along the edges of the fabric for an illuminated frame effect. For extra twinkle, attach individual bulbs directly onto the fabric using mini clothespins.
Get creative with string light shapes and fabrics too. Try zig-zagging lights across plush velvet in royal red or emerald. Or, hang them in arcs or waves over neutral burlap or muslin. Groupings of round holiday lights scattered across a backdrop filled with snowflake or plaid prints will make spirits bright.
Use sparkly, sequined fabric for festive flair
Few materials capture the excitement and glitz of the holidays quite like sequins. Sparkly, shiny sequined fabric adds instant merriment and magic as a Christmas photo backdrop. The dazzling sheen attracts the eye while setting a celebratory mood.
Look for sequined material with red, green, gold, or silver accents to complement any outfit. Drape it over a backdrop stand just like any fabric. For added twinkle, hang extra tinsel garlands or ornaments directly on the sequins. The interplay between the hanging decor and the shimmery fabric creates a dynamic, festive scene.
Sequined backdrops pair perfectly with party wear and glamorous metallic fabrics. They lend endless sparkle to holiday soirée snapshots. Just be sure your lighting illuminates all that shine. With some strategic spotlights and diffusers, sequined backdrops will have you seeing stars!
Drape sheer fabrics over trees or railings
Sheer, lightweight fabrics like tulle, organza, or chiffon provide airy, ethereal textures perfect for outdoor holiday photos. Instead of a traditional backdrop stand, consider draping your translucent fabrics over natural features like trees, stair railings, or arches.
The interplay between the soft, filmy fabric and rugged nature creates visual intrigue. As natural light filters through, it casts a magical glow. Opt for neutral, icy sheers or metallic tones that pop against nature’s palette.
This technique works especially well for winter wonderland-themed sessions. Drape frosted snow-colored tulle over barren trees for romantic icy vibes. Or wrap evergreen trees in glimmering silver organza like tinsel. Just secure the fabrics well so they don’t blow away in the wind. The resulting photos beautifully capture the ephemeral spirit of the season.
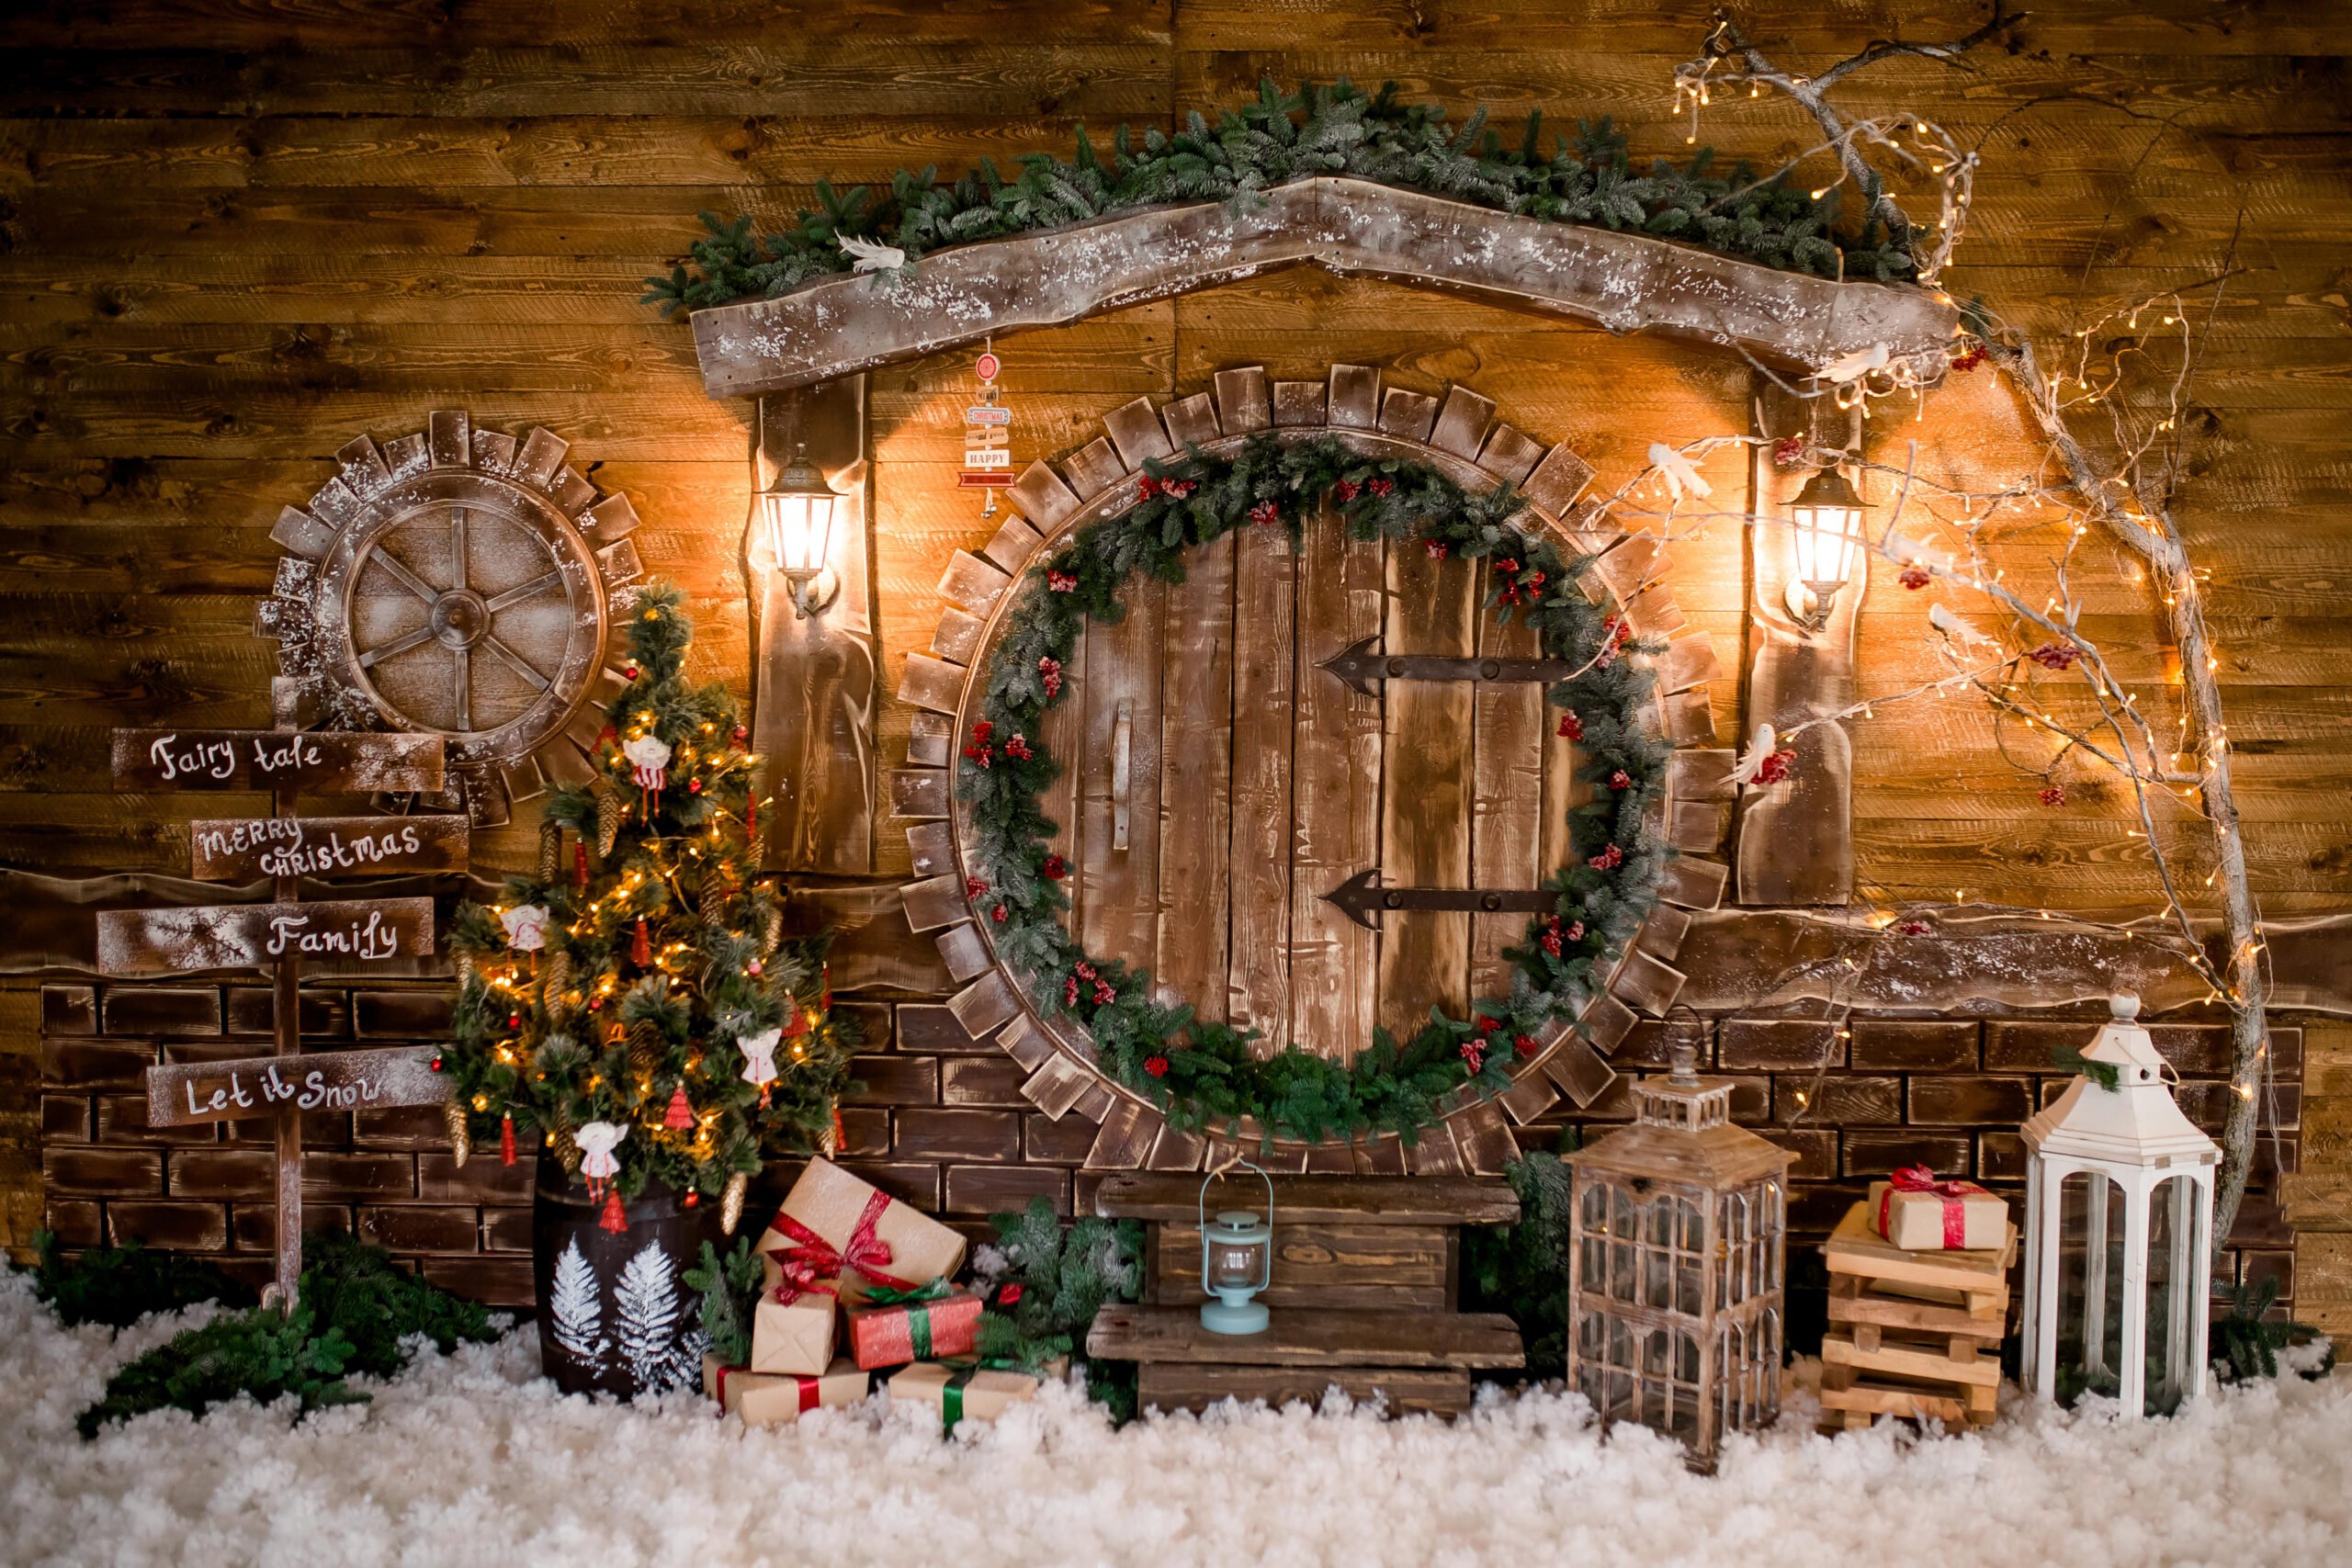
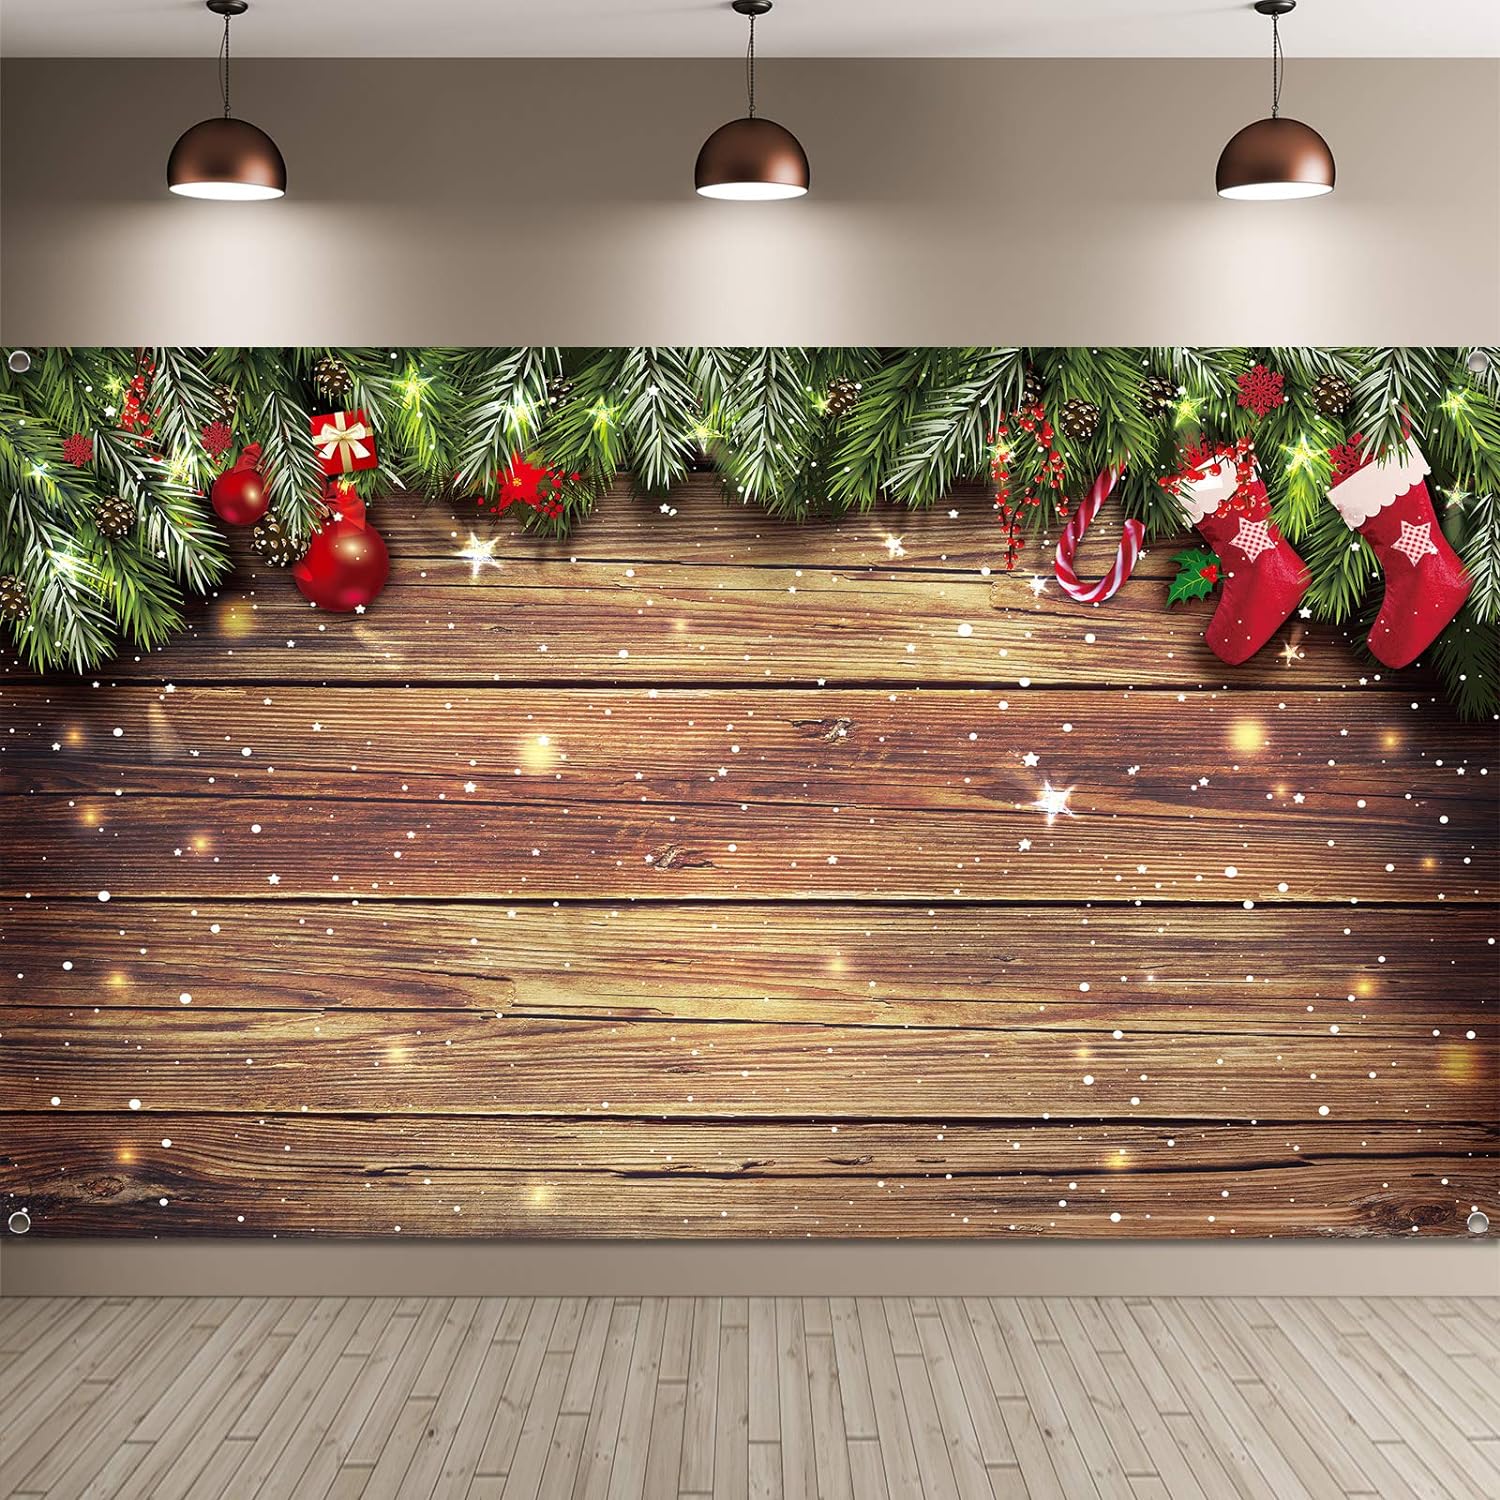
Style woodland-themed backdrops with pinecones and faux snow

Rustic, woodsy scenes make for timeless holiday portraits with nostalgic appeal. Create a cozy outdoor setting with fabric backdrops decorated with pinecones, pine branches, and fake snow.
Drape burlap, muslin, or solid evergreen fabric over your stand for a neutral base evoking nature. Then artfully arrange pinecones, sprigs of cedar, pine, or juniper, and artificial snow around the edges and atop the fabric. Leave some weighted snow piles on the floor in front for characters like Santa or woodland critters.
This woodland style works great for family photos and kids’ sessions. Let kids build little snowmen or pose holding pinecones and branches. The textured, organic backdrop with bright pops of red and green creates lively seasonal spirit. Just be sure to secure any loose pine needles to avoid poking fingers (or eyes!).
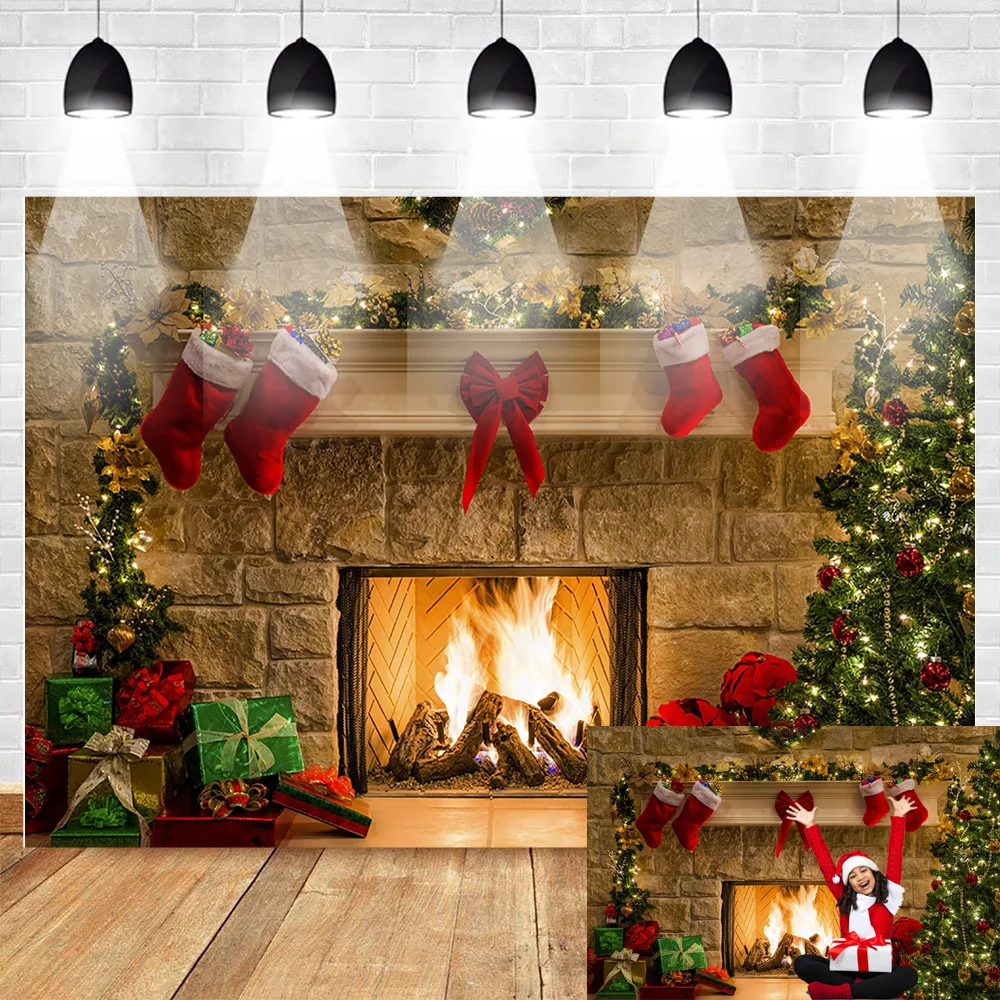
Create a faux fireplace with stockings using red fabric
A fireplace strung with stockings is a hallmark image of Christmas. With some red fabric, you can easily mimic a cozy fireside scene. Drape yards of bright red velvet, satin, or ultra-plush blanket fabric on the floor or over a low backdrop stand. Pile the fabric to create “faux flames” rising up.
Use white and red tube socks or red mittens clipped with clothespins to make DIY stockings. Hang them across the top of the fabric fireplace or along the edges. For extra realism, clip some red and yellow felt “flames” around the edges too. Stock up on plastic logs and pine garlands to complete the wintry hearth.
This fake fireplace makes an ideal setting for capturing traditional family photos. Just be sure to safely pin down any edges so no one slips on the silky fabric. Curling up together in comfy knits beside the cozy (faux) fire will make for heartwarming portraits with timeless appeal.
Hang wreaths, garlands, and other decor on your backdrops
You can instantly make plain fabric backdrops more festive by decorating them with holiday embellishments. Wreaths, garlands, ribbon, ornaments, and other trimmings liven up neutral solids into celebratory scenes.
Try adorning burlap, muslin, or velvet swaths with fresh evergreen garlands and big red bows. Pine wreaths dotted with red berries or gold baubles make excellent focal points for family portraits. Hang strings of popcorn or cranberries for natural organic texture.
The decor needn’t be perfect or pristine. Let pine needles scatter onto the floor for a lived-in look. Mix gleaming round balls with rustic homemade ornaments for eclectic charm. The key is creating layers of textures and details that catch the eye while complementing your subjects.
Print holiday patterns and words on fabric using iron-on transfers
For one-of-a-kind backdrops, try printing your own holiday graphics onto fabric. Iron-on transfer sheets allow you to easily transfer any image or text onto a fabric surface using a home iron.
Look for transfer material formulated for dark fabrics in order to show up on rich red, green, or black. Then, simply print out any PDF patterns, clip art, or text using your home printer onto the transfer sheets. Cut out the images and iron them onto your swath of fabric backdrop as desired.
You can create personalized scenes like snowy forests or typographic holiday sentiments. Use iron-on transfers to print whimsical holiday patterns onto inexpensive muslin or burlap too. Get the kids involved by letting them draw their own Santa or snowman scenes to transfer. The personalized, DIY touches make for heartfelt photos and backdrops to treasure.
The holiday season is the perfect time to get creative with festive backdrops for all your Christmas photos! Fabric Christmas backdrops are a fun and easy way to add a pop of seasonal cheer to your holiday pictures. Whether you’re looking for a backdrop for your family photos, Christmas cards, or even product photos for your small business, fabric backdrops allow you to customize the scene and make your photos truly unique. Here are 10 creative ways to use fabric Christmas backdrops this holiday season:
‘Use sparkly, sequined fabric for festive flair’
Nothing says Christmas quite like a little sparkle! Look for fabric backdrops featuring shimmery sequins, glittery patterns, or metallic accents. The light will catch on the sequins, adding a magical touch of holiday spirit to your photos. Try solid red or green sequined fabric for a classic Christmas vibe. Or opt for prints featuring snowflakes, poinsettias, or Christmas trees for a more festive feel. Photos of kids, pets, and families will all pop against a sparkly, sequined fabric Christmas backdrop.
You can also decorate a plain fabric backdrop with your own sequins and glitter to customize the look. Add sequins in festive shapes like snowflakes, bows, stockings, or ornaments using fabric glue or iron-on adhesive. Use glitter paint to create your own Christmas designs like snow-covered pine trees, holly leaves and berries, a gingerbread house, or a snowman against a solid colored backdrop. Get the kids involved in the fun by having them place their glittery handprints on the fabric to make DIY Christmas art for your photoshoot backdrop.
Use fabric with Christmas patterns or designs

From Santa making his list to busy elves wrapping gifts, a fabric Christmas backdrop featuring festive prints and patterns is a merry way to set the scene for your holiday photoshoot. Search for Christmas-themed fabric featuring images like:
- Santa Claus, reindeer, and sleighs
- Poinsettias, holly, evergreens, and wreaths
- Snowflakes and snow-covered pine trees
- Presents, gifts, bows, stockings, and ornaments
- Gingerbread houses, cookies, and candy canes
- Stars, angels, candles, and lanterns
- Christmas villages, churches, and cozy cabins
- Plaid, stripes, polka dots, and checks in red, green, gold, and white
Pair your smiling family with a matching backdrop – kids by the Christmas tree, pets posing with Santa Paws, or everyone in their matching pajamas on Christmas morning. Let the fun fabric prints set the festive tone and complement your Christmas outfits and style.
Drape fabric over furniture or frames
For a quick and easy fabric photoshoot backdrop, simply drape Christmas fabric over furniture like a sofa, chair, or table. Let the excess fabric drape onto the floor for soft ripples and folds. Pose subjects in front of the draped fabric to make it appear like they’re sitting by the Christmas tree or unwrapping presents by the fireplace on Christmas morning.
You can also build a simple PVC frame and clip fabric panels to it with clothespins. Drape and twist fabric around the frame, allowing some panels to hang down loosely while pulling others taught across the frame. Position lights behind or around the frame to illuminate the fabric colors and designs.
Layer multiple fabrics for texture and depth
Why choose just one fabric when you can combine several for a textured, multi-dimensional backdrop? Layer lightweight fabrics like tulle, lace, gauze, or sheer in complimentary colors or patterns. The layered look adds visual interest and creates a soft-focus background for portraits. For kids’ photos, layer chunky knitted blankets or faux fur over the top of a fabric backdrop for cozy Christmas vibes. Let some of the bottom layers peek through for added depth and dimension.
Incorporate Christmas lights or lanterns
Lights add a warm, cozy glow perfect for Christmas photos. Drape string lights over your fabric backdrop or tape individual bulbs onto the fabric to spell out words like “Noel” or “Joy.” For safety, use LED string lights and only keep them on long enough for the photoshoot. You can also place lanterns on the floor in front of the backdrop and use the real flame to cast a natural flickering light.
Use styrofoam to shape dimensional designs
Get creative shaping everyday styrofoam into 3D Christmas designs. Glue large styrofoam balls together into the shape of snowmen or Christmas trees, then cover them with patterned scrapbooking paper or fabric. Use rods of styrofoam to form candy canes, gingerbread men, or the outline of a chimney. Place your sculpted designs behind or beside your photoshoot subjects. The styrofoam shapes make whimsical props and add holiday spirit to your photos.
Hang ornaments, garlands, tinsel, and other decorations
For a quick decorative touch, hang Christmas ornaments, garlands, tinsel, ribbon, and other embellishments from your fabric backdrop. Use sequined ribbon to form giant bows, garlands of oversized ornaments, or a wreath outline. Drape tinsel garlands in sweeping curves along the top and sides. Hang a stocking with each family member’s name from mini hooks along the bottom. The colorful decorations help liven up a simple solid colored fabric, and also complement festive patterned backdrops.
Incorporate natural elements like pinecones, poinsettias, and evergreens
Bring the outdoors inside by decorating your Christmas fabric backdrop with natural details. Gather pinecones, poinsettia plants, fresh evergreen branches, holly leaves and berries from your yard or a florist. Arrange them artfully along the base of your fabric backdrop or tape sprigs of evergreens directly onto the fabric. The organic textures and earthy colors contrast beautifully with the shimmery fabrics and embellishments.
Use wood slices, crates, and a little “snow” for a rustic vignette
Set a rustic holiday scene by pairing your fabric backdrop with wooden elements. Place slices of logs, small crates filled with ornaments or gifts, and faux snowy pinecones on the floor in front of the fabric. Pose subjects amongst the nature-inspired props for a cozy, woodland Christmas vignette. Fabric in buffalo check or faux fur complements the organic textures and colors.
Make it a Christmas cube for immersive photos
For a fun and immersive 360-degree holiday photo booth, transform your fabric backdrop into a Christmas cube. Build a simple PVC pipe cube frame and clip fabric panels to all four sides as well as the top and floor. Use the same fabric pattern or complementary designs on each side. Add lights and decorations inside the cube. You can even place wrapped gifts, Santa hats, hot cocoa mugs, or a mini Christmas tree inside. Step right into Christmas by taking festive family portraits or selfies inside the Christmas cube!
The possibilities are endless when using festive fabric backdrops for your Christmas photos this holiday season. With a little creativity and DIY spirit, you can customize the backdrop to match your theme or decor. Coordinate your outfits with the colors and patterns for a cohesive, styled photoshoot. Most importantly, have fun celebrating the season with your loved ones against a handcrafted, photo-ready Christmas fabric backdrop!
The holidays present the perfect opportunity to get imaginative with decorative backdrops for all your festive Christmas photos! Fabric Christmas backdrops are an enjoyable and simple way to infuse seasonal spirit into your holiday images. Whether you need a backdrop for family photos, Christmas cards, or even product shots for your small business, fabric backdrops let you customize the setting and make your photos truly special. Here are 10 creative ways to utilize fabric Christmas backdrops this holiday season:
‘Drape sheer fabrics over trees or railings’
For an ethereal, dreamy look, drape billowy sheer fabrics like chiffon, tulle, or lace over trees, railings, furniture, or even the backs of chairs. The transparent, floating quality of the fabric makes subjects pop while adding softness to the background. Shoot against a window to backlight the diaphanous fabric and create a glowing effect. Stick to whites, silvers, icy blues, and other cool tones for an angelic winter wonderland vibe. Or opt for sheer fabrics in rich crimson, emerald, or sapphire for some striking colors ideal for Christmas cards.
Outdoors, gently toss a sheer fabric over a tree branch and allow the breeze to create gentle ripples. Position subjects so their outlines show through the translucent fabric for a magical look. For indoor shots, drape longer panels over stair railings, mantels, or bookcases. Let the ends puddle on the floor for dreamy, ethereal photos that transport viewers to a snowy Christmas landscape.
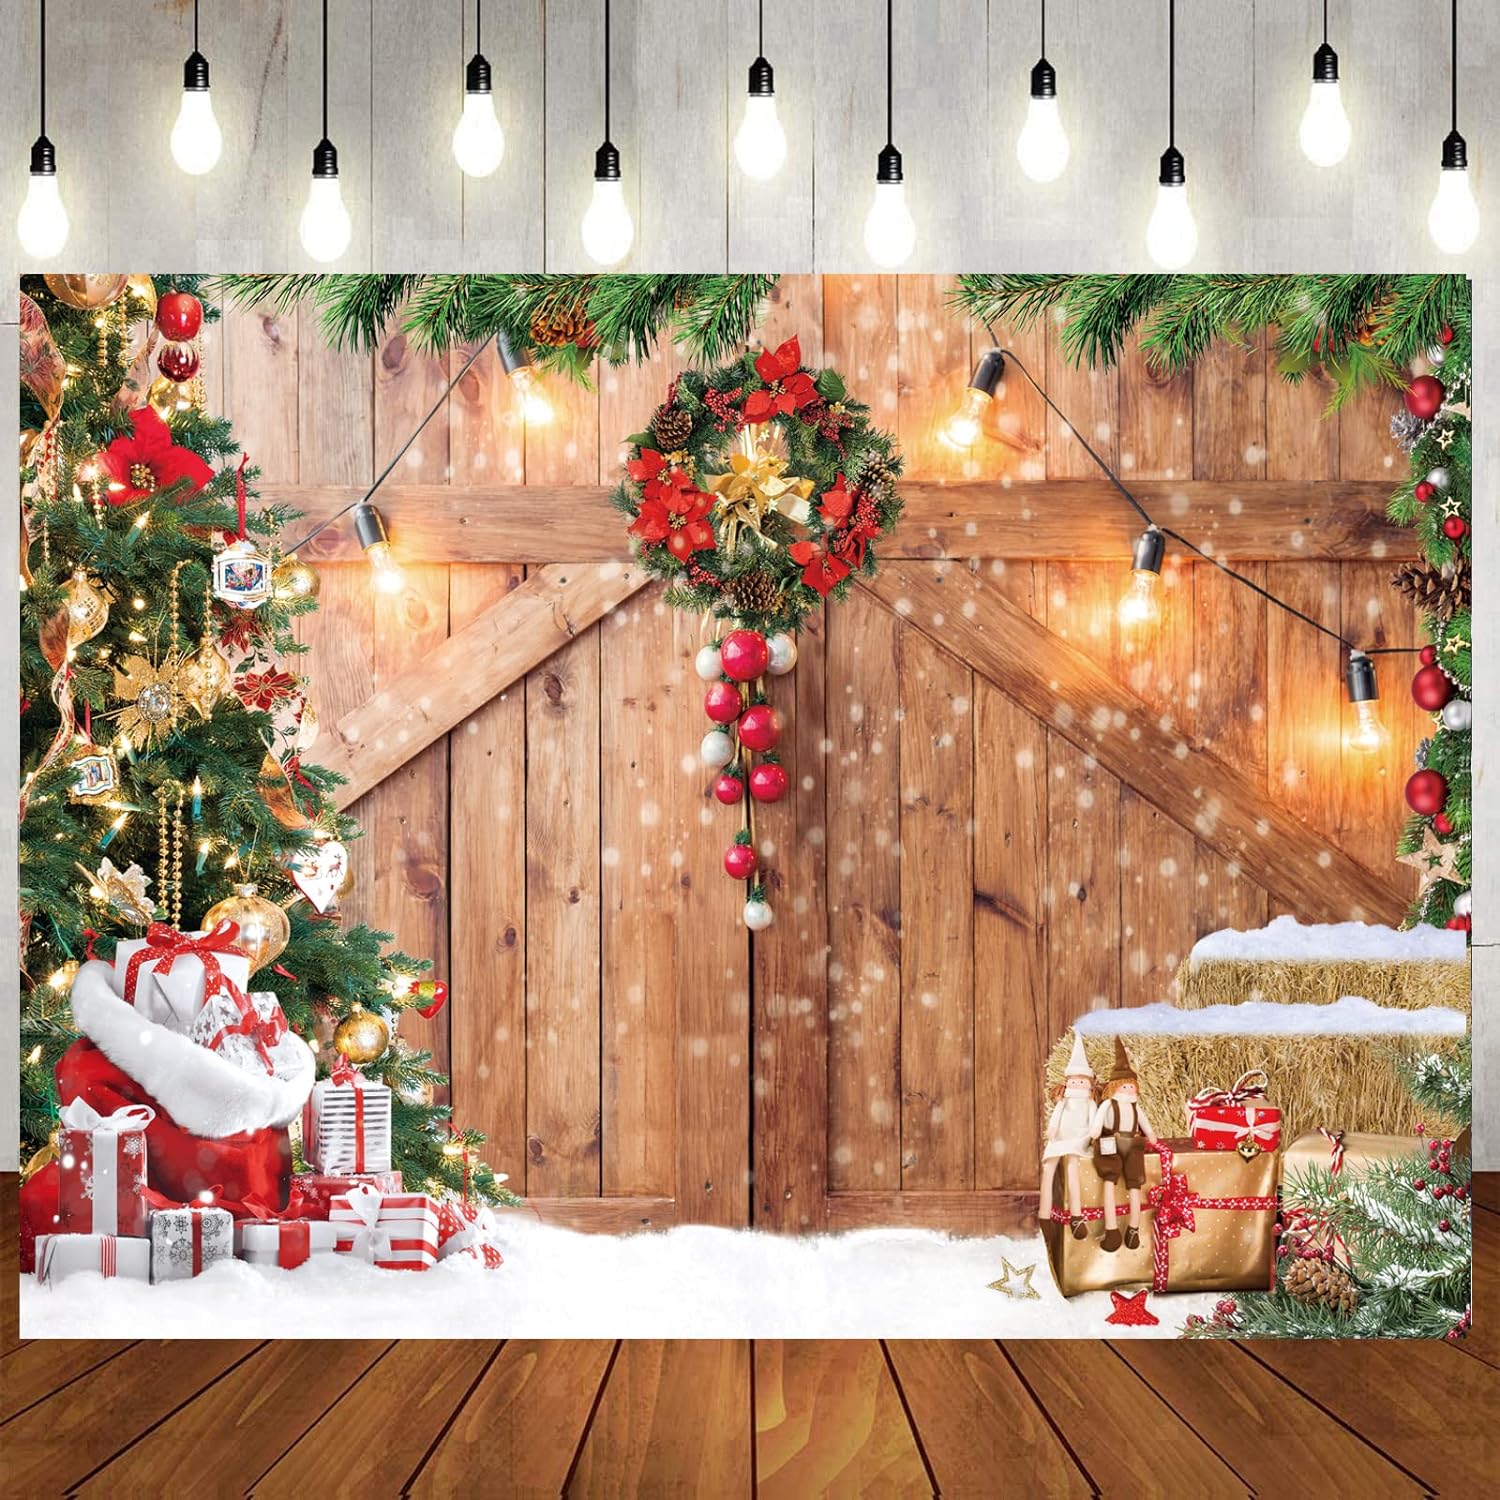
Use burlap, linen, or muslin for rustic farmhouse charm
Channel cozy, homemade holiday style with natural fiber fabrics like burlap, linen, or muslin. These organic materials pair perfectly with plaid flannels, distressed wood finishes, and accessorized with homey touches like pine cones, cranberries, or little woodland critters. Drape burlap sacks stuffed with faux presents or treats behind kids and pets. Line up a row of antiqued wooden sleds against an off-white linen backdrop. Ask everyone to don their favorite hand-knit sweater or buffalo check shirt for a perfectly imperfect holiday portrait filled with fuzzy, textured goodness.
Incorporate tartan, buffalo check, and classic holiday plaids
What’s Christmas without a little plaid? Incorporate classic buffalo check or tartan fabric panels to infuse your photos with traditional holiday spirit. Red and black buffalo check makes a handsome backdrop for dad’s annual Christmas morning photo by the tree, while green and navy tartan looks sharp behind a boy dressed in his holiday finest. For a custom look, sew together different plaid fabrics in patterns and color combinations that complement your decor and outfits.
Mix metallic fabric with glitter, sequins, and shine

Go glam with shimmery metallic fabric backdrops in crimson, emerald, sapphire, gold, or silver. The lux look makes an excellent choice for formal holiday family portraits. Pair subjects in sequined party dresses or sharp tuxedos with a gleaming backdrop for black tie Christmas photos that pop. For extra sparkle, hang strands of glittery tinsel garland, scattering sequins, or even shiny ornaments from the metallic fabric panels. A touch of glitz dresses photos up for the holidays.
Use snowy faux fur for wintry cabin vibes
Setting a snowy scene is easy with wintry faux fur fabric backdrops. Opt for shaggy white or cream faux fur or get creative by gluing swatches of cotton batting onto fabric base panels to achieve the look of snow drifts. Place vintage sleds, skis, snow shoes, and other rustic winter props against the furry backdrop. Have everyone bundle up in their warmest sweaters, hats, and scarves for adorable family photos that capture the feeling of a day well spent playing in the snow.
Incorporate family photos or kids’ art

Make your Christmas backdrop meaningful by decorating fabric panels with scans of old family photos, your kids’ artwork, or even using handprints and messages to create DIY art. Print out black and white scans of generations past gathered around the Christmas tree and tape or glue them onto fabric panels. Frame your kids’ Santa drawings, paper snowflake art, or candy cane created handprints by adhering them to colorful fabric panels.
Use Christmas lights for a glow
Incorporate string lights into your fabric backdrop for a magical, festive glow in photos. Tape or pin mini light strands onto fabric panels to outline shapes like Christmas trees, stars, or gift boxes. Plug lights in just before shooting photos and unplug immediately after to avoid overheating hazards. Place larger subjects like families in front of light-outlined backdrops for beautiful silhouetted shots. For little ones, fill clear glass bulbs with faux snow and cranberries and attach to fabric to make colorful glowing ornaments that complement holiday outfits.
Divide into panels to build versatile sets
Maximize your backdrop options by dividing fabric into modular panels. Use removable clips or velcro dots to connect panels together in different arrangements. Create custom nooks and alcoves by angling panels. Roll panels from the top down to make faux fireplace surrounds. Connect panels into creative shapes like Christmas trees, gingerbread houses, or stars. Move panels around between sets to divide up product shoots when running a home-based business. The possibilities are endless with mix and match modular fabric backdrop panels.
Add wooden crates, blocks, and craft boxes for interest
Stack wooden crates, blocks, and craft boxes around the edges of your fabric backdrop to add visual interest. Crates wrapped with fabric bunting become festive gifts. Place a small Christmas tree inside a large block. Tuck pretty packages into craft boxes wrapped with ribbon. Fill crates with DIY styrofoam building bricks spray painted white like snow blocks. The wooden textures complement fabric backdrops and offer ledges for posing and propping holiday accents.
Go outside the frame with extending elements
Open up small spaces by using fabric to extend the backdrop up, down, and outside the frame. Drape billowing panels from the ceiling. Let ends trail onto the floor for a sweeping effect. Run panels up the adjacent wall and prop Christmas village buildings on top against the wall backdrop. Extend the magic outside the frame with a fabric backdrop that pulls viewers into the jolly Christmas world of your photos.
With a bit of innovation and holiday spirit, the possibilities are infinite for styling fanciful Christmas fabric backdrops to match your theme. Coordinate outfits and props with backdrop colors and patterns for a cohesive, polished photoshoot. Most importantly, have fun making merry memories this season with loved ones against a handcrafted, photo-ready fabric Christmas backdrop!
The holiday season is a magical time filled with festive decorations, delicious food, and time with loved ones. It’s also prime time for taking those perfect family photos to capture precious memories. While many opt for the classic photos in front of the Christmas tree, getting creative with backdrops can take your holiday photos to the next level. Fabric backdrops are an easy and affordable way to transform any space into a festive photo studio. From sparkling winter wonderlands to cozy holiday scenes, fabric backdrops allow you to customize photos and create a magical backdrop. Read on for ten creative ways to use fabric backdrops this holiday season and take your Christmas photos from boring to beautiful.
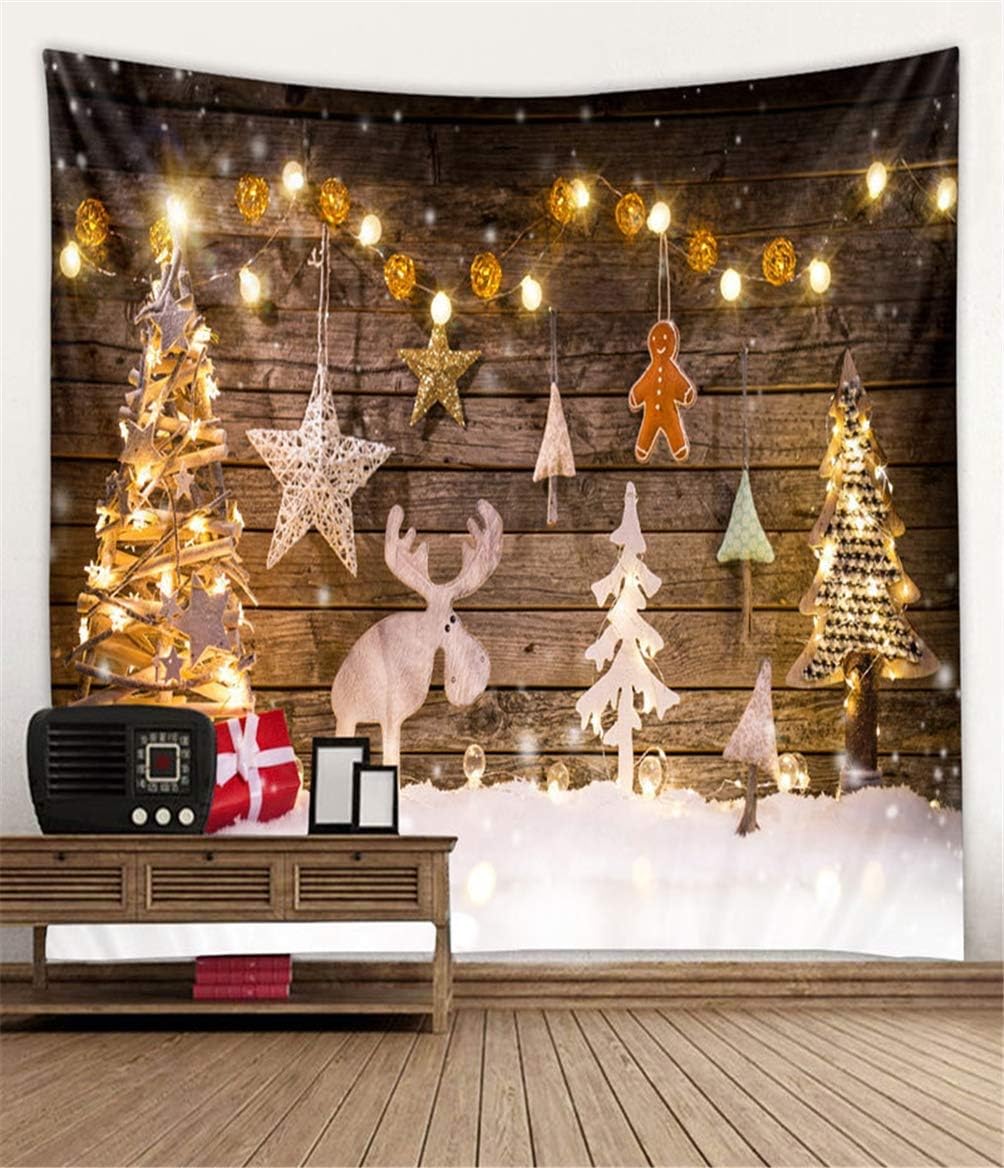
Go Through the Wardrobe into a Snowy Forest

Transform any space into a snow-covered forest straight out of Narnia with woodland-themed backdrops. Drape sparkling tinsel garlands from wall to wall to mimic glistening icicles. Style pinecones and faux snow around the base of the garlands so it appears the models are tromping through freshly fallen snow. For added magic, hang twinkling fairy lights throughout the backdrop. The lights will shine through the translucent fabric, giving an ethereal glow to the icy scene. Top with a dusting of glitter for extra shimmer and you’ll capture truly magical photos through the wardrobe.
Get Cozy By the Fireplace
What’s more festive than roasting chestnuts by a crackling fireplace? Use a brick or wood-paneled fabric backdrop to mimic a cozy fireside scene. Set a plush Christmas tree rug on the floor and arrange red stockings hanging from a garland. Add a table with mugs of hot cocoa and candy canes to complete the heartwarming vignette. For a finishing touch, set up a red or gold tinsel garland over the fireplace or tape up whimsical Christmas cards along the mantle. The Christmas fireplace scene will provide a merry and bright setting for capturing darling holiday photos.
Deck the Halls
Show off your holiday spirit by decking the halls from floor to ceiling with festive Christmas decorations. Use a velvet curtain backdrop and go all out with strands of lights, glittering ornaments, row after row of stockings, and the biggest bows you can find. Pull in a Christmas tree, wrap garland around table legs, and fill every nook and cranny with holiday cheer. With so many eye-catching decorations, the star of each photo will be the dazzling Christmas backdrop you created. Your photos will shine as bright as the hall decked out in its holiday finest.
Set the Scene with a Holiday Mantle
for a quick and easy Christmas backdrop, set up a holiday mantle to anchor your photos. Use red and green patterned fabric backdrops and secure them to the wall. Drape garlands across the top and line Christmas cards along the edges to frame out the backdrop. Finish it off with a beautiful Christmas stocking for each family member, with care placed to display name tags. You can then take mantle photos of each kid individually or as a group. For fun variety, take some sitting or lying down with just legs and stockings in the frame. The Christmas mantle makes a festive focal point for capturing adorable holiday photos.
Christmas Morning Memories

On Christmas morning, before the chaos of unwrapping gifts begins, gather the kids in their new holiday pajamas for some pictures in front of the tree. Use a fabric backdrop printed or stitched with Christmas trees or ornaments to mimic a festive forest. Have them hold wrapped gifts, candy canes, or Santa hats to embrace the Christmas magic. Many fabric backdrops come with attached wooden beams perfect for hanging knit stockings lined up in a row. Set out a plate of Santa’s half-eaten cookies for a fun touch. Photos of kids in front of the backdrop, waiting in anticipation to open gifts, will become a cherished Christmas memory for years to come.
Joy to the World Winter Wonderland
For a showstopping winter wonderland, use sparkling white and silver fabric backdrops and loads of tinsel trim. Glue cotton balls on every surface for fluffy faux snow. Hang glittery snowflakes and icicles from the ceiling and top it off with a magical falling snow projector. Have the kids bundle up in their new winter coats, hats, and mittens. Let them throw fake snow in the air and frolic in the winter wonderland you created. The immersive set paired with the snowy outfits will transport you straight to the North Pole for Christmas card perfect photos.
See Santa at the North Pole
Meeting Santa is a highlight of the Christmas season. Set the scene for an iconic photo op with the big guy at his North Pole workshop. Use sparkling white fabric backdrops and hang strings of colorful Christmas lights. Set out wrapped gifts, candy canes, and a giant stuffed reindeer. Top it off with a big red armchair for Santa. Once dressed in the full Santa suit, have kids sit on his lap and whisper Christmas wishes in his ear. Parents can step to the side in elf costumes for some outtakes. The whimsical Santa set lets you capture the essence of childhood Christmas magic.
Countdown to Christmas
In the weeks leading up to Christmas, create an advent calendar backdrop for a festive photo series. Construct each number 1 through 25 out of cardboard and duct tape strips of red and green fabric vertically. Drape strings of lights in the shape of each day’s number. Have the kids pose in front of the illuminated number of days until Christmas for a daily holiday countdown. As you swap out backdrops, watch excitement build in their faces as the big day draws near. Display all 25 photos together in a holiday album or calendar for a heartwarming documentation of the Christmas countdown.
Christmas Cards with Character
Why send boring old Christmas cards when you can make them come to life with fun characters? Pick iconic holiday personas like the wise Santa, funny elf, cheerful snowman, or cute gingerbread man. Find fabric backdrops that coordinate with each character like Santa’s workshop, snowy forest, Christmas kitchen, or candy factory. Have kids pose in costumes matching each scene. Photograph their silly and spirited character impersonations against the colorful Christmas backdrops. Use these lively persona photos in place of traditional Christmas card photos for customized holiday greetings that showcase your kids’ bubbling personalities.
DIY Photo Booth
Set up a festive DIY photo booth at your annual holiday party for guests to strike a pose and capture some memorable photos. Use a fun tropical palms backdrop for a Christmas in July vibe or pick neon backdrops for a funky aesthetic. Provide props like silly holiday glasses, reindeer antlers, and jingle bell necklaces. To give photos a personal touch, offer custom photo banner props displaying names or Christmas greetings. Set out a basket of dress up items like Santa hats, elf ears, and ugly Christmas sweaters. As your guests ham it up and mix-and-match props, they’ll walk away with photos perfect for a laugh-out-loud Christmas card.
Fabric backdrops open up a world of possibilities for taking creative Christmas photos beyond the typical tree shots. With a little imagination and festive flair, you can customize backdrops to match any theme or character. So break out the garlands, ornaments, and tinsel to deck out your perfect Christmas scene. With so many options for fun and festive fabric photo backdrops, you’re sure to capture stunning holiday photos and create memories to treasure for a lifetime.
When the holiday season rolls around, it’s time to get creative with Christmas backdrops! Fabric photo backdrops open up a world of festive possibilities for taking your holiday pictures to the next level. From sparkling winter wonderlands to cozy Christmas scenes, fabric backdrops allow you to easily customize photos and create a magical setting. Read on for ten inventive ways to use fabric backdrops this Christmas and take your holiday photos from boring to beautiful.
Create a faux fireplace with stockings using red fabric

Nothing says Christmas like gathering around a crackling fireplace on a cold winter’s night. Use a brick or wood-paneled fabric backdrop to mimic a cozy fireside setting. Strategically arrange red Christmas stockings hung with care from the mantle to complete the holiday vignette. For an extra festive touch, string up popcorn garlands around the fireplace or tape up greeting cards along the edges. The Christmas fireplace scene makes for a heartwarming backdrop to capture priceless holiday memories with the whole family.
Transport into a snowy forest straight from the pages of a fairy tale
Channel a magical snow-covered forest perfect for a holiday card photo. Drape shimmery silver and white tinsel garlands floor to ceiling to resemble glistening icicles. Sprinkle white faux snowflakes and dot pinecones around the base of garlands so it appears models are traipsing through fresh powder. For an ethereal effect, intertwine twinkling fairy lights throughout the wintry backdrop. The lights will shine through the translucent fabric, casting a magical glow on the frozen scene. A light dusting of silver glitter completes the dazzling Narnia-inspired winter wonderland.
Get tangled up in lights with a larger-than-life Christmas tree

Make your wildest Christmas decoration dreams come true by decking the halls from floor to ceiling for your holiday photos. Drape velvet curtains and string endless lights, jumbo ornaments, and rows of stockings. Bring in the tallest tree you can fit and wrap every table and chair leg with swaths of garlands. Fill up every nook with bows, tinsel, lights – anything shiny or sparkly. With Christmas décor overload, the real stars will be the spectacularly festive backdrops you created. Photos amid the winter decorations will shine brightly with holiday spirit.
Set the scene with a classic holiday mantle and stockings
Create a quick Christmas backdrop by constructing a festive mantle to anchor your photos. Mount patterned red and green fabric on the wall and top with a cheery garland. Line up personalized Christmas stockings for each family member, making sure names are visible. Capture mantle photos of kids individually or as a group. For fun variety, get ground-level shots of just legs and stockings. The traditional Christmas mantle makes a lovely and effortless focal point for your holiday photos.
Capture excitement on Christmas morning
Before ripping open presents on Christmas day, gather the kids in new holiday PJs for some special photos by the tree. Use a fabric backdrop embroidered or printed with cheerful Christmas trees, presents, and ornaments to mimic being in a festive pine forest. Have kids hold gifts, candy canes, or Santa hats to embrace the Christmas magic. Many backdrops come with attached knit stockings perfect for stuffing with goodies. Add Santa’s half-eaten cookies on a plate for some extra morning cheer. These sweet pics of eager kids waiting to open gifts will warm your heart for years.
Play in a winter wonderland from the North Pole
For showstopping photos straight from the North Pole, deck out your space with white shimmering fabric backdrops and glittery silver tinsel. Hang snowflake cutouts and icicles from ceiling pipes to create a winter canopy. Cover every surface with mounds of fluffy cotton ball snow and consider adding a snow machine for a flurry of magic. Have kids bundle up in new coats, mittens, and earmuffs then let them romp and play in your homemade winter wonderland. These snow-covered shots will capture the essence of childhood innocence and joy.
Meet Santa Claus up close at his magical workshop

Create an iconic Christmas photo of your child meeting Santa at his secret North Pole workshop. Drape glistening white fabric backdrops and string colorful twinkle lights everywhere. Set out wrapped gifts, candy canes, and a giant stuffed reindeer. Top it off with Santa’s signature red armchair. Once suited up, have kids sit on Santa’s lap and whisper Christmas wishes while capturing their holiday excitement. For extra fun, dress up as elves and photobomb in the background. This whimsical Santa set lets you record touching Christmas memories.
Countdown the days until Christmas with festive photos
In the weeks leading up to Christmas, make a festive backdrop Advent calendar for a holiday photo series. Construct numbers 1 to 25 from cardboard and cover with red and green fabric. Outline each day’s number with strings of lights. Have kids pose by the illuminated numbers, watching their enthusiasm build as Christmas draws nearer. Displaying the photos chronologically captures all the excitement of the countdown to Christmas.
Send Christmas cards with characters that show off your family’s silly side
Forget boring Christmas card photos and have some fun with iconic holiday characters. Pick backdrops to match each persona, like Santa’s workshop, snowy forest, Christmas kitchen, or candy factory. Dress up as characters – Santa, elves, snowmen, gingerbread people – and capture your kids’ spirited impersonations against colorful Christmasy scenes. Use these comical character creations in place of traditional Christmas cards for customized holiday greetings that showcase your family’s joy and personality.
Set up a merry photo booth for DIY holiday fun
At your annual Christmas bash, create a DIY photo booth for guests using quirky backdrops like tropical Christmas or neon tinsel. Provide wacky props like silly spectacles, reindeer ears, and jingle bell necklaces. Offer custom photo banner props for a personalized touch. Set out baskets of dress up items like Santa hats, elf shoes, and tacky sweaters. As guests ham it up and mix-and-match props, they’ll walk away with hilarious photos perfect for laughs and memories.
The possibilities are endless when using vibrant fabric backdrops to creatively transform holiday photos. With a little imagination and lots of Christmas spirit, you can customize festive scenes to match any theme or character. So break out the ornaments, garlands, tinsel, and lights to deck out your picture-perfect Christmas wonderland. Get ready to snap stunning yuletide photos and make lasting memories with all kinds of inventive fabric photo backdrops!
When the holiday season comes around, it’s time to get imaginative with Christmas backdrops! Fabric photo backdrops open up a world of festive possibilities for taking your holiday photos up a notch. From sparkling winter wonderlands to cozy Christmas scenes, fabric backdrops allow you to easily customize your photos and create a festive setting. Read on for ten creative ways to use fabric backdrops this yuletide season and take your Christmas photos from boring to beautiful.
Hang wreaths, garlands, and other decor on your backdrops
An easy way to make your Christmas backdrops more festive is by hanging holiday decorations like wreaths, garlands, and ribbons. Adorn your backdrops with lush green wreaths dotted with red berries and bows. Drape cranberry garlands above doorframes or fireplaces. Accent with velvet ribbons in holiday motifs like candy canes, snowflakes, or Christmas trees. The pops of color and texture from the decorations will give your backdrops a merry makeover ideal for capturing vacation vibes. Decking out plain backdrops transforms them into a winter wonderland in minutes.
Set the scene with a classic brick fireplace and Christmas stockings
Create an iconic holiday scene with a faux brick fireplace backdrop decorated for Christmas. Hang knit stockings lined up across the mantle just waiting to be filled. For extra flair, string cranberry garlands atop the fireplace and line the edges with miniature gift boxes or tiny Christmas cards. Capture the whole family seated fireside in their matching holiday jammies for a warm, festive photo by the Christmas tree. The traditional fireplace and stockings will provide a cozy, nostalgic backdrop for your holiday photos.
Embrace the chaos of a Christmas explosion with tons of decorations
Why stick to tasteful holiday decor when you can deck the halls to the max for your Christmas photos? Go over the top with strands of lights, ribbons, garlands galore. Fill up every corner with ornaments, tinsel, bows – anything bright, shiny, or sparkly. The more the merrier! Let your decor reach new heights with giant trees, rows of stockings, and enough lights to be seen from space. With so many eye-popping decorations, your home will become a winter wonderland perfect for snapping festive photos celebrating the season.
Channel a snowy pine forest straight from the pages of a storybook
Create an enchanting snowy forest backdrop using tinsel garlands, white tulle, and mini string lights. Drape shimmery silver garlands floor to ceiling to mimic icy icicles. Swirl fluffy tulle around tree trunks like freshly fallen snow. Incorporate twinkling string lights throughout to give a magical glow. Finish it off with a light snowfall using a snow machine or DIY paper snowflakes. The glistening wintry wonderland sets the scene for whimsical holiday photos that look straight from the pages of a fairytale.
Capture the magic and excitement of Christmas morning
On Christmas morning, gather the kids in their cozy new holiday pajamas for some special photos in front of the tinseled tree. Select a festive fabric backdrop embroidered with cheerful Christmas trees, stockings, and gifts. Have the kids hold candy canes, hot cocoa mugs, or pose peeking under the tree before present time. Capture their anticipation and joy in the moments before unwrapping gifts. Print your favorite shots to make Christmas cards or compile them into a photo book documenting your whole holiday season from decorating to Christmas morning.
Get tangled up in lights, ornaments, and garlands galore
For over-the-top holiday photos, deck out a corner banquet hall style with lights, ornaments, garlands – everything Christmassy you can get your hands on. Construct a giant backdrop Christmas tree out of wire and fabric. Surround it with presents, trees, and stockings overflowing with goodies. Have kids wear their most festive holiday outfits and let them run wild playing, dancing, and exploring in your Christmas explosion. They’re sure to have a ball amidst all the lights and decorations while you snap candid holiday shots.
Set up a merry holiday photo booth for DIY fun
At your annual Christmas party, create a festive DIY photo booth using quirky backdrops and tons of props. Use a tropical Christmas scene with sparkly palm trees or pick neon colored tinsel drapes. Provide wacky props like ridiculous glasses, reindeer ears, and jingle bell necklaces. Offer custom photo banner props for a personalized touch. Set out baskets overflowing with silly hats, shoes, and ugly Christmas sweaters. Let guests get creative and ham it up for hilarious holiday photos to laugh over and enjoy.
The possibilities are endless when decking out fabric backdrops to creatively transform your Christmas photos. With a little imagination and lots of festive flair, the decorating options are unlimited. So break out the lights, garlands, ornaments, and ribbons to trim your backdrops and deck your halls. Get ready to capture beautiful holiday photos and make memories that will last long after the season is over.
The holidays are a magical time of year filled with joy, togetherness, laughter, delicious food, and of course, photos! Capturing precious memories with family and friends during the Christmas season is a tradition many hold dear. And what better way to set the festive scene for your holiday photoshoot than with a beautiful fabric Christmas backdrop?
Fabric backdrops provide a lightweight, versatile, and economical alternative to traditional solid backdrops. With a vast array of colors, patterns, and designs available, you’re sure to find the perfect fabric backdrop to complement your Christmas photos. From elegant velvets to whimsical prints, the options are endless! Here are 10 creative ways to use fabric backdrops for your holiday photos this Christmas.
Christmas Tree Backdrop

A Christmas tree backdrop is a classic choice that will never go out of style. Whether you select a backdrop with a photorealistic tree, a sequin tree, or a more modern geometric tree design, this option is sure to spread the Christmas cheer. Capture posed portraits or candid moments in front of the tree with friends, family, kids, or pets!
Fireplace Backdrop
Cozy up with loved ones in front of a festive fireplace backdrop that exudes the warm, comforting feeling of the holidays. Choose a design with stockings hung with care, pine garlands, candles, and other traditional fireplace details. You can even add props like hot cocoa mugs or Christmas blankets to complete the heartwarming vignette.
Winter Wonderland Backdrop
Set the stage for a magical ice kingdom photoshoot with a shimmering winter wonderland backdrop. These backdrops feature sparkling silver and white trees, falling snowflakes, and other icy accents that will make it feel like you’re in your very own winter paradise. Pull out the faux fur coats, hats, and mittens and let the snow adventures begin!
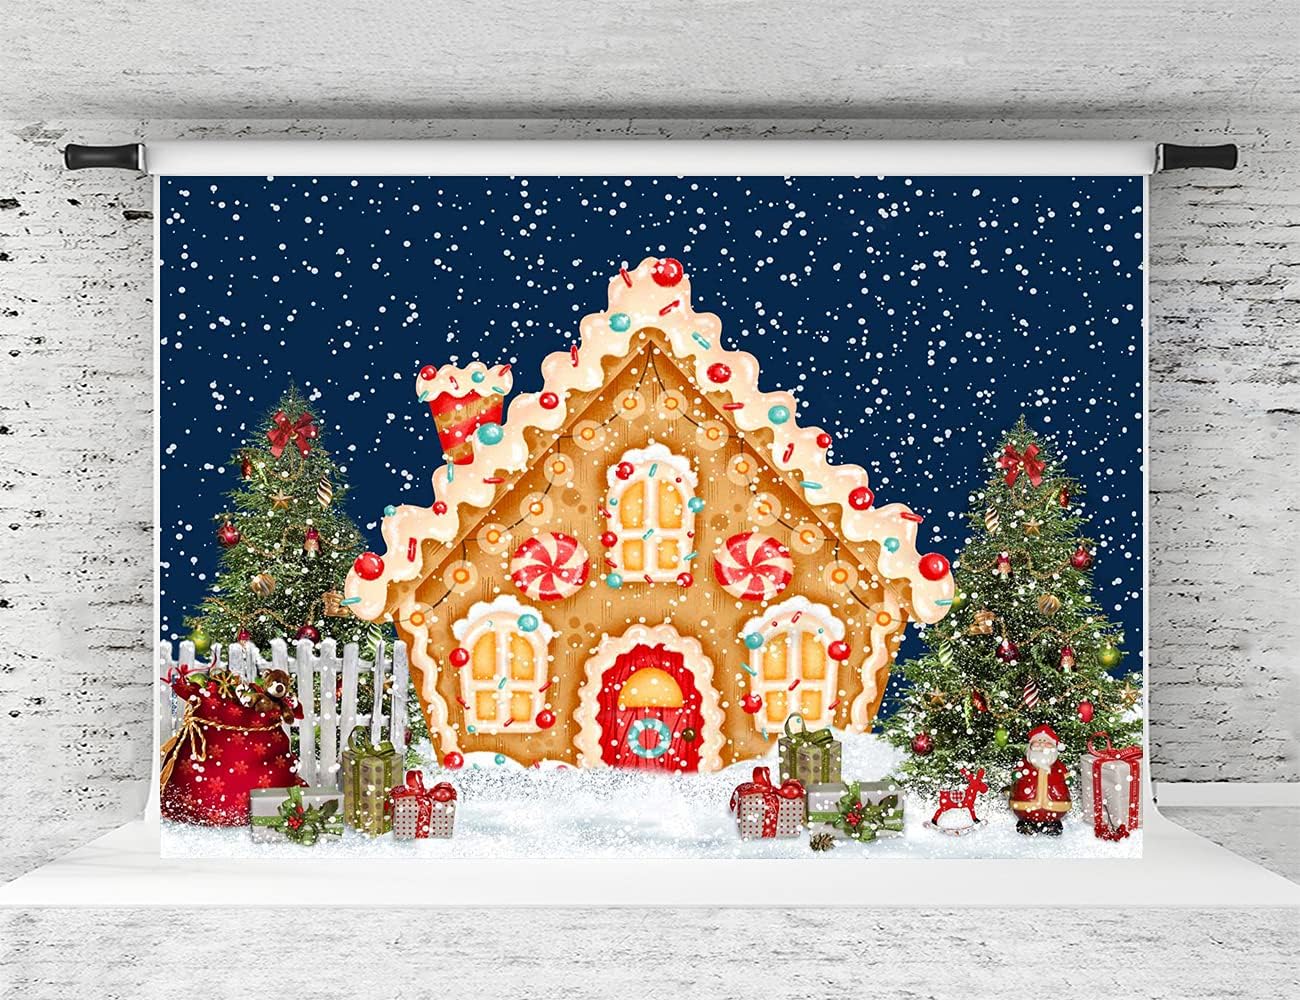
Gingerbread House Backdrop

Capture delicious seasonal photos in front of a cute gingerbread house backdrop that looks good enough to eat! Whether you choose a minimalist design or an intricate icing-adorned confection, you’ll have fun playing up the sweetness. Add gingerbread men props, candy canes, or hot chocolate accessories for an extra sugary touch.
Holiday Mantel Backdrop
The mantel is often the focal point of Christmas decor in most homes. Drape a holiday-themed fabric backdrop along your wall and decorate with garlands, stockings, and a gorgeous green wreath for an eye-catching feature area. Gather the whole gang for an elegant family photo you’ll treasure for years.
Christmas Lights Backdrop
Twinkling Christmas lights can instantly infuse any scene with merry and bright vibes. Pose solo, as a couple, or with the whole crew in front of a stunning starry night or string lights backdrop. For added dimension, glue or pin strands of fairy lights onto the backdrop – the possibilities for gorgeous glowy photos are endless.
Holiday Word Backdrop
Spell out the Christmas spirit with a backdrop featuring festive words and phrases like “Ho Ho Ho”, “Be Merry”, or “Tis the Season”. These cheer-spreading word art backdrops make ideal decor for Christmas card photos, family photos, holiday party pics, and more. Deck the walls with these jolly sentiments!
Christmas Ornaments Backdrop
Frame your Christmas photos with festive flair using a bold and bright ornament backdrop! Available in a range of vibrant jewel tones like ruby red, emerald green, and sapphire blue, these punched-up bauble backdrops really pop on camera. For added holiday character, accessorize your look with matching ornament earrings or props.
North Pole Backdrop
Transport your photoshoot straight to Santa’s workshop with a magical North Pole backdrop! These Arctic-inspired designs feature snow-capped villages, the Northern Lights, reindeer in flight, candy canes, and of course, Old Saint Nick. Capture the Christmas morning excitement before the kiddos rush downstairs.
Christmas Buffalo Check Backdrop

You can’t go wrong incorporating the classic Christmas color combo of red and green. A Buffalo check backdrop in these quintessential Christmas hues will give your photos a cozy, rustic cabin vibe. Pop on some plaid layers and get ready for heartwarming family portraits with all the holiday feels.
Get creative with festive colors, patterns, designs, and details to find the perfect fabric Christmas backdrop for your holiday photoshoot. With a stellar, scene-setting backdrop and some strategic styling and props, you’ll capture magical memories and stunning photos to treasure for a lifetime. ‘Tis the season for Christmas backdrops!


:max_bytes(150000):strip_icc()/chic-ways-to-dress-up-walls-without-paint-3017318-hero-e1467f554a2b4d55842526a2ed0b78da.jpg)
:max_bytes(150000):strip_icc()/Wayla_Garden_Courtyard_041-9b9eb6d3eb794d9aa0d287e00d06b896.jpg)


:max_bytes(150000):strip_icc()/spacejoy-9xoQJ-3-HGs-unsplash-9ca95689bcab4d7c9d2e62d954fc69de.jpg)


:max_bytes(150000):strip_icc()/102679813_630-c4eee40821154d8e85acb9d1101ba724.jpg)